SpringMVC概述:
是基于MVC开发模式的框架,用来优化控制器
是Spring家族的一员,也具备IOC和AOP
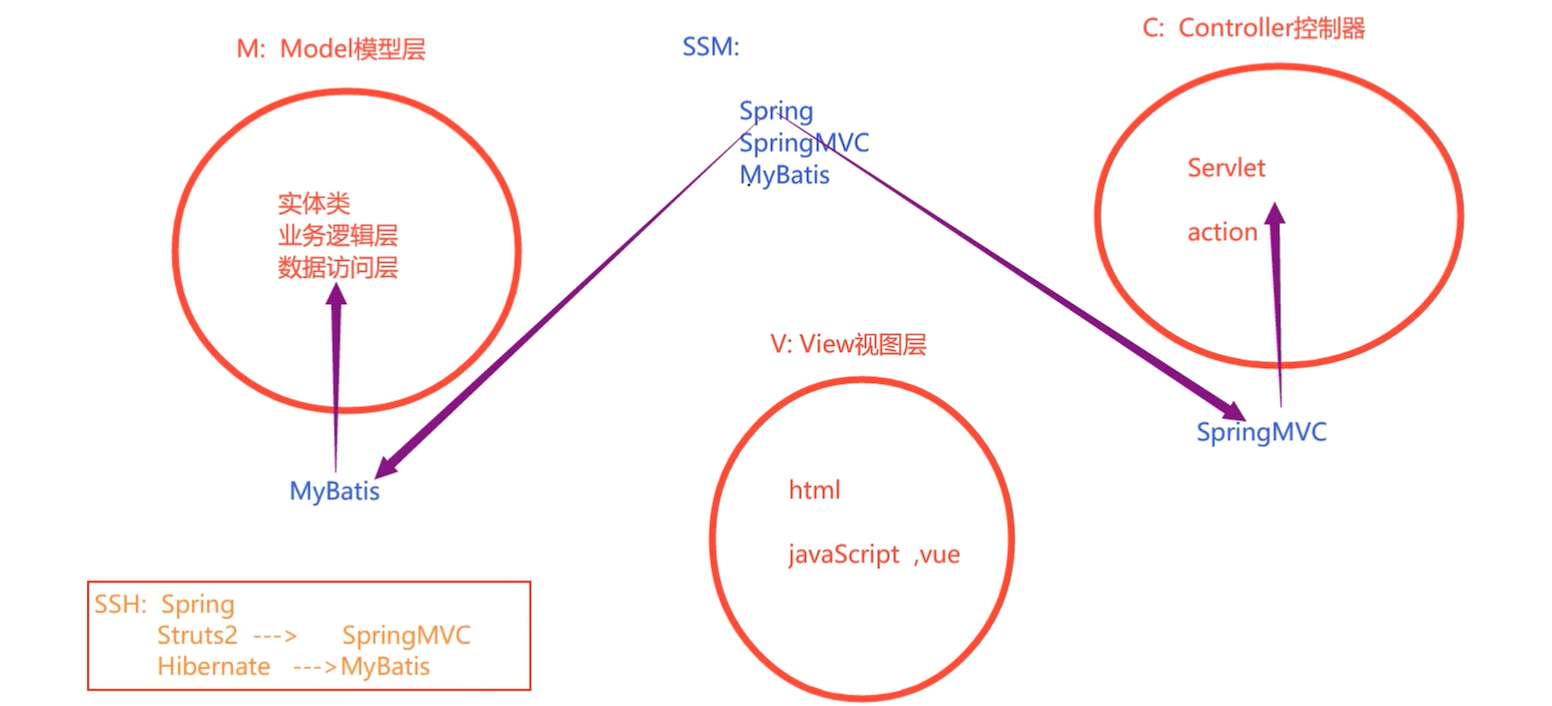
什么是MVC:
它是一种开发模式,是模型视图控制器的简称,所有的web应用都应当基于MVC模式开发
M:模型层,包含实体类,业务逻辑层,数据访问层
V:视图层,html,javaScript,vue等都是视图层,用来显示数据
C:控制器,它是用来接收客户端的请求,并返回响应到客户端的组件,Servlet就是这样的组件
组成:
SSM:Spring + SpringMVC + MyBatis
仨框架的分工:
MyBatis:增强数据访问层
SpringMVC:增强控制器
Spring:整合MyBatis和SpringMVC框架,使得框架更加易用
了解SSH:
Spring + Struts2 + Hibernate:Struts2后来被SpringMVC取代,Hibernate后来被MyBatis取代
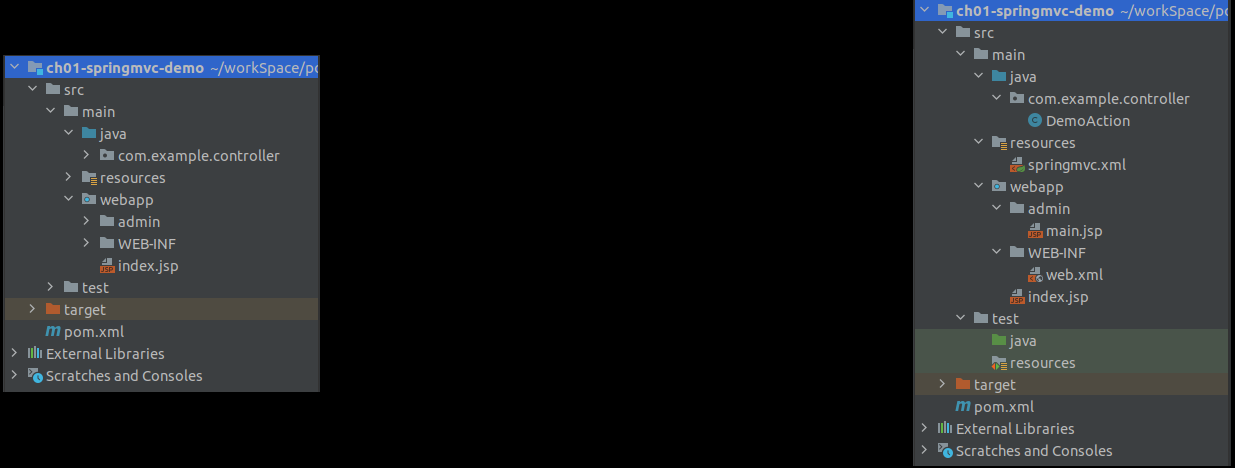
<?xml version="1.0" encoding="UTF-8"?><project xmlns="http://maven.apache.org/POM/4.0.0" xmlns:xsi="http://www.w3.org/2001/XMLSchema-instance" xsi:schemaLocation="http://maven.apache.org/POM/4.0.0 http://maven.apache.org/xsd/maven-4.0.0.xsd"> <modelVersion>4.0.0</modelVersion> <groupId>com.example</groupId> <artifactId>ch01-springmvc-demo</artifactId> <version>1.0.0</version> <packaging>war</packaging> <properties> <project.build.sourceEncoding>UTF-8</project.build.sourceEncoding> <maven.compiler.source>1.8</maven.compiler.source> <maven.compiler.target>1.8</maven.compiler.target> </properties> <dependencies> <dependency> <!-- junit测试依赖 --> <groupId>junit</groupId> <artifactId>junit</artifactId> <version>4.13.2</version> <scope>test</scope> </dependency> <!-- 添加spring-webmvc的依赖 --> <dependency> <groupId>org.springframework</groupId> <artifactId>spring-webmvc</artifactId> <version>5.2.5.RELEASE</version> </dependency> <!-- 添加javax-servlet依赖--> <dependency> <groupId>javax.servlet</groupId> <artifactId>javax.servlet-api</artifactId> <version>4.0.0</version> <scope>provided</scope> </dependency> </dependencies> <build> <!-- 添加资源文件指定 --> <resources> <!-- 资源文件指定1 --> <resource> <directory>src/main/java</directory> <includes> <include>**/*.xml</include> <include>**/*.properties</include> </includes> </resource> <!-- 资源文件指定2 --> <resource> <directory>src/main/resources</directory> <includes> <include>**/*.xml</include> <include>**/*.properties</include> </includes> </resource> </resources> </build></project><?xml version="1.0" encoding="UTF-8"?><beans xmlns="http://www.springframework.org/schema/beans" xmlns:xsi="http://www.w3.org/2001/XMLSchema-instance" xmlns:context="http://www.springframework.org/schema/context" xsi:schemaLocation="http://www.springframework.org/schema/beans http://www.springframework.org/schema/beans/spring-beans.xsd http://www.springframework.org/schema/context https://www.springframework.org/schema/context/spring-context.xsd"> <!-- 添加包扫描 --> <context:component-scan base-package="com.example.controller"/> <!-- 添加视图解析器 --> <bean > <!-- 配置前缀--> <property name="prefix" value="/admin/"/> <!-- 配置后缀--> <property name="suffix" value=".jsp"/> </bean></beans>
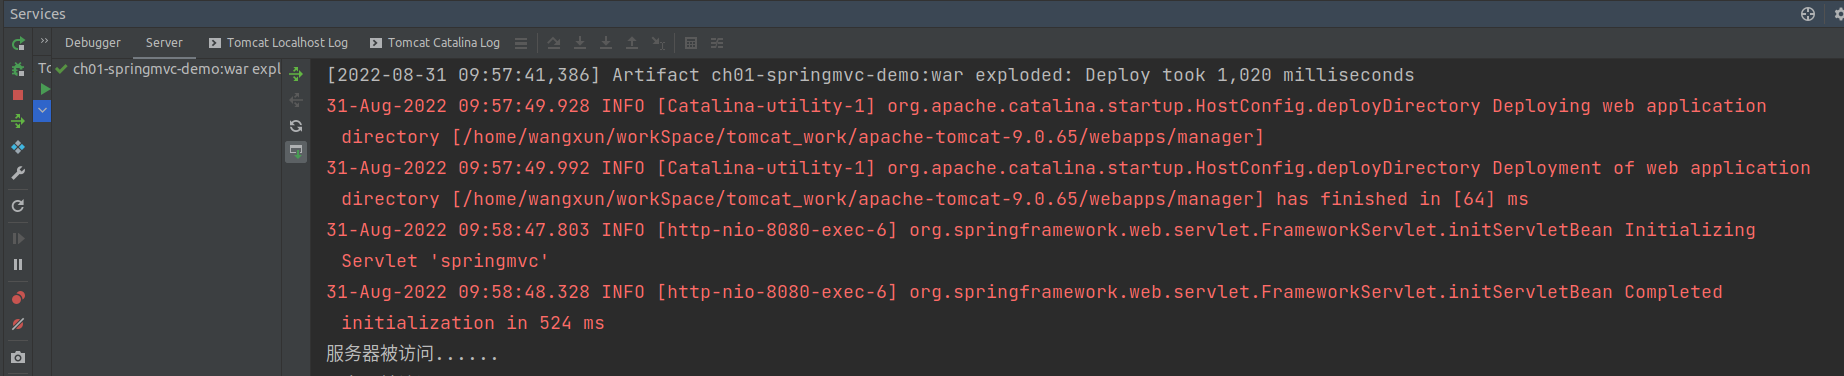
<?xml version="1.0" encoding="UTF-8"?><web-app xmlns="http://xmlns.jcp.org/xml/ns/javaee" xmlns:xsi="http://www.w3.org/2001/XMLSchema-instance" xsi:schemaLocation="http://xmlns.jcp.org/xml/ns/javaee http://xmlns.jcp.org/xml/ns/javaee/web-app_4_0.xsd" version="4.0"> <!-- 注册SpringMVC框架 --> <servlet> <servlet-name>springmvc</servlet-name> <!-- 注册底层使用的servlet --> <servlet-class>org.springframework.web.servlet.DispatcherServlet</servlet-class> <!-- 要让SpringMVC的核心处理器知道SpringMVC的核心配置文件,相当于把web项目交给SpringMVC接管--> <init-param> <param-name>contextConfigLocation</param-name> <param-value>classpath:springmvc.xml</param-value> </init-param> </servlet> <servlet-mapping> <servlet-name>springmvc</servlet-name> <!-- 拦截处理所有以action为后缀名的请求 --> <url-pattern>*.action</url-pattern> </servlet-mapping> </web-app><!-- index.jsp --><%-- Created by IntelliJ IDEA. User: wangxun Date: 2022/8/30 Time: 下午8:07 To change this template use File | Settings | File Templates.--%><%@ page contentType="text/html;charset=UTF-8" language="java" %><html><head> <title>index.jsp</title></head><body><a href="${pageContext.request.contextPath}/demo.action">访问服务器</a></body></html>package com.example.controller;import org.springframework.stereotype.Controller;import org.springframework.web.bind.annotation.RequestMapping;/** * 业务管理器:包含很多完成具体需求的方法 */@Controllerpublic class DemoAction { /** * DemoAction中的所有功能实现都是由方法来完成的 * 这些方法的规范 * 1.访问权限:public * 2.方法的返回值:任意 * 3.方法名称:任意 * 4.方法参数:可以没有,如果有可以是任意类型 * 5.注解:需要使用@RequestMapping注解来声明一个访问路径(名称),这里不用再写:demo.action项目请求路径后面的后缀 * 因为该后缀是给web.xml中注册的DispatcherServlet看的,起到拦截请求的作用,符合拦截要求的请求才交给底层servlet处理 */ @RequestMapping("/demo") public String demo(){ System.out.println("服务器被访问......"); return "main"; }}

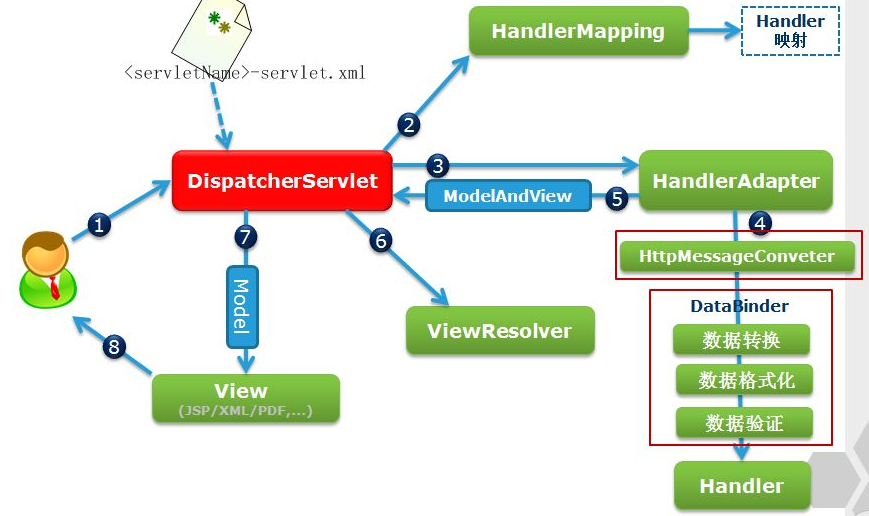
关于为什么要在web.xml文件中注册DispatcherServlet:
由于SpringMVC的控制器是一个普通的方法,而web请求都是基于servlet的,所以必须在web.xml文件中注册SpringMVC框架
将注册的DispatcherServlet作为SpringMVC的核心处理器,成为前端请求和SpringMVC控制器的沟通桥梁,完成前端请求和SpringMVC控制器的交互
而又由于我们无法直接通过类似@WebServlet这样的注解获得DispatcherServlet,所以要使用其所在的jar包注册DispatcherServlet
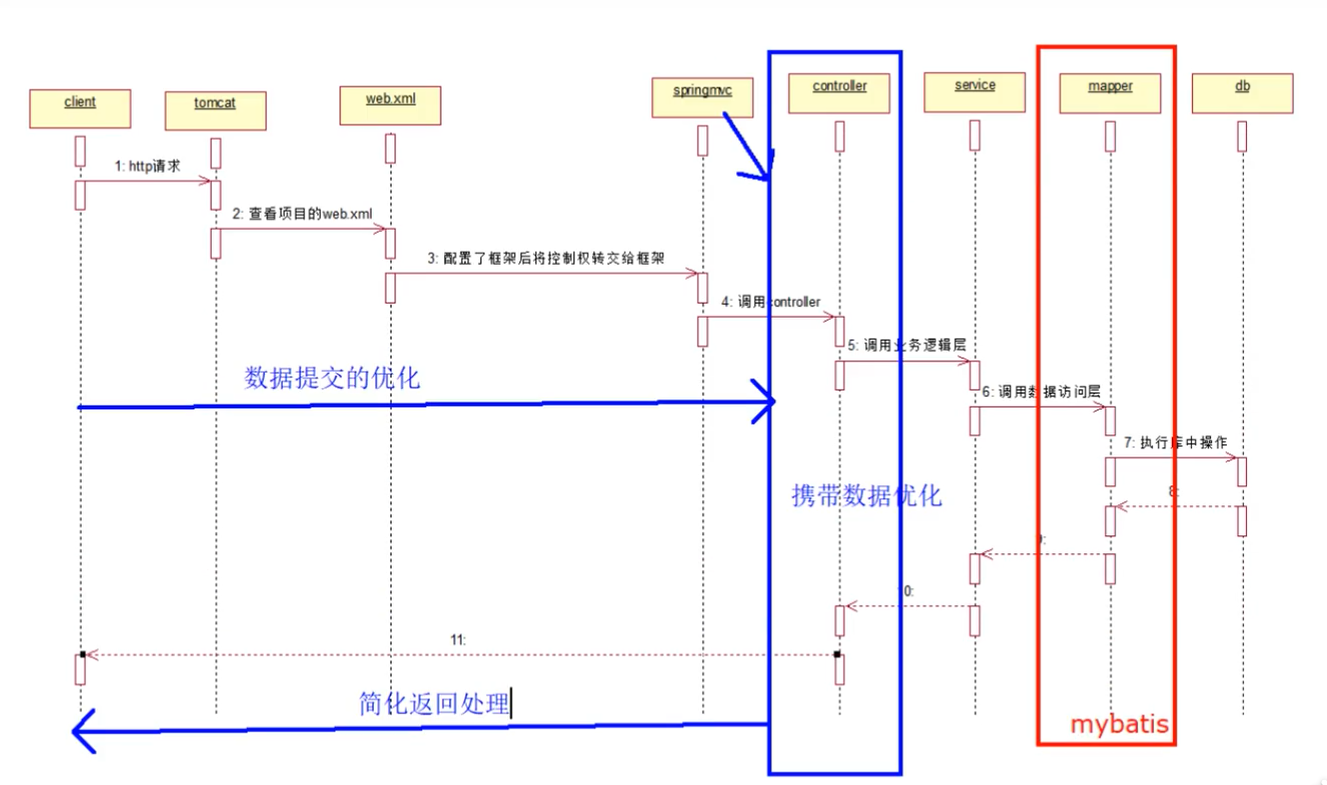
上述案例中web请求的流程究竟是怎样的:
将前端请求的路径和web.xml中注册的可以给予处理的请求路径比对,如果请求路径满足请求的通配条件(先具有被处理的资格),请求被底层DispatcherServlet拦截处理。
由于注册了SpringMVC框架,此时容器已经注册生成了许多通过注解生成的SpringMVC的控制器对象
根据请求的具体路径(根据需求,给予处理),将web请求交给SpringMVC的不同控制器中的不同action方法来解决
最终,SpringMVC的控制器将处理结果返回给DispatcherServlet,后者将结果返回给前端
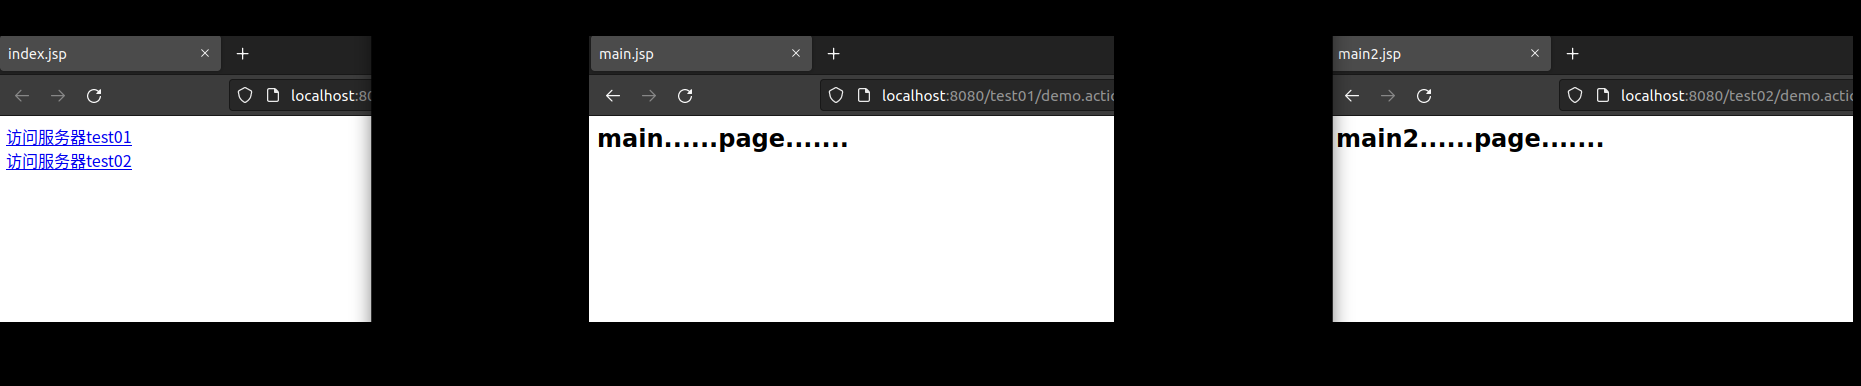
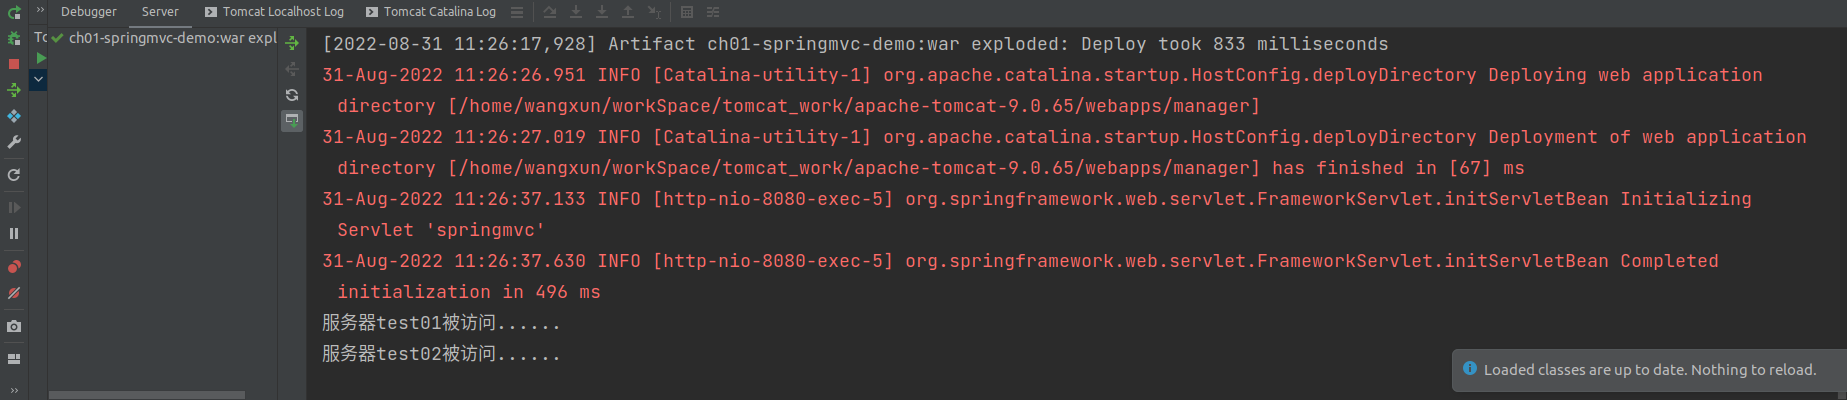
注册SpringMVC的核心处理器:DispatcherServlet index.jsp <--------> DispatcherServlet <--------> SpringMVC的控制器是一个普通方法 one.jsp <--------> DispatcherServlet <--------> SpringMVC的控制器是一个普通方法<%@ page contentType="text/html;charset=UTF-8" language="java" %><html><head> <title>index.jsp</title></head><body><a href="${pageContext.request.contextPath}/test01/demo.action">访问服务器test01</a><br><a href="${pageContext.request.contextPath}/test02/demo.action">访问服务器test02</a></body></html><%@ page contentType="text/html;charset=UTF-8" language="java" %><html><head> <title>main2.jsp</title></head><body><h2>main2......page.......</h2></body></html>package com.example.controller;import org.springframework.stereotype.Controller;import org.springframework.web.bind.annotation.RequestMapping;/** * 业务管理器:包含很多完成具体需求的方法 */@Controller@RequestMapping("/test01")public class DemoAction { /** * DemoAction中的所有功能实现都是由方法来完成的 * 这些方法的规范 * 1.访问权限:public * 2.方法的返回值:任意 * 3.方法名称:任意 * 4.方法参数:可以没有,如果有可以是任意类型 * 5.注解:需要使用@RequestMapping注解来声明一个访问路径(名称),这里不用再写:demo.action项目请求路径后面的后缀 * 因为该后缀是给web.xml中注册的DispatcherServlet看的,起到拦截请求的作用,符合拦截要求的请求才交给底层servlet处理 */ @RequestMapping("/demo") public String demo(){ System.out.println("服务器test01被访问......"); return "main"; }}package com.example.controller;import org.springframework.stereotype.Controller;import org.springframework.web.bind.annotation.RequestMapping;/** * 业务管理器:包含很多完成具体需求的方法 */@Controller@RequestMapping("/test02")public class DemoAction2 { /** * DemoAction中的所有功能实现都是由方法来完成的 * 这些方法的规范 * 1.访问权限:public * 2.方法的返回值:任意 * 3.方法名称:任意 * 4.方法参数:可以没有,如果有可以是任意类型 * 5.注解:需要使用@RequestMapping注解来声明一个访问路径(名称),这里不用再写:demo.action项目请求路径后面的后缀 * 因为该后缀是给web.xml中注册的DispatcherServlet看的,起到拦截请求的作用,符合拦截要求的请求才交给底层servlet处理 */ @RequestMapping("/demo") public String demo(){ System.out.println("服务器test02被访问......"); return "main2"; }}