当前为vue3的基础知识点,为总结b站某视频的知识文章,在刚开始学习时自我保存在语雀,现在分享到博客。
目前找不到原视频文章地址了!!!要有兄弟看到原文地址:欢迎在下面评论!
官方文档:https://cli.vuejs.org/zh/guide/creating-a-project.html#vue-create
## 查看@vue/cli版本,确保@vue/cli版本在4.5.0以上vue --version## 安装或者升级你的@vue/clinpm install -g @vue/cli## 创建vue create vue_test## 启动cd vue_testnpm run serve
官方文档: https://v3.cn.vuejs.org/guide/composition-api-introduction.html


<template> <h1>测试setup,拿数据</h1> <h3>姓名:{{ name }}</h3> <h3>年龄:{{ age }}</h3> <button @click="sayHello">打招呼</button></template><script>// 渲染函数 要导入这个import { h } from '@vue/runtime-core';export default { name: "TestSetup", //此处只是测试setup, 不考虑响应式的问题 setup() { //数据 let name = "张三", age = 15; //方法 function sayHello() { alert(`我叫${name},我${age}岁了,你好!`); } //返回一个对象 (常用) return { name, age, sayHello, }; //返回一个函数(渲染函数--了解) // return ()=> h('h1','返回一个函数(渲染函数)') },};</script><style></style>5.注意点:
const xxx = ref(initValue)xxx.value<div>{{xxx}}</div>Object.defineProperty()的get与set完成的。reactive函数。<template> <h1>学习ref</h1> <h3>姓名:{{ name }}</h3> <h3>年龄:{{ age }}</h3> <button @click="alterName">修改姓名</button></template><script>// 响应式 refimport { ref } from '@vue/reactivity';export default { name: "testRef", setup() { //数据 let name = ref("张三"), age = 15, obj = ref({ type:'前端工程师', salary:'5K' }); //方法 function alterName() { //成功 name.value = "修改姓名" //对象 obj.value.type = "修改工作" obj.value.salary = "60k" //修改失败 age ="修改年龄" } //返回一个对象 (常用) return { name, age, alterName, }; },};</script><style></style>ref函数)const 代理对象= reactive(源对象)接收一个对象(或数组),返回一个代理对象(Proxy的实例对象,简称proxy对象)<template> <h1>学习reactive</h1> <h3>工作:{{ obj.type }}</h3> <h3>薪水:{{ obj.salary }}</h3> <h3>爱好:{{ list }}</h3> <button @click="alterName">修改姓名</button></template><script>/* 响应式 reactive 对象类型*/import { reactive } from "@vue/reactivity";export default { name: "testRef", setup() { //数据 let obj = reactive({ type: "前端工程师", salary: "5K", }), list = reactive(['吃饭','睡觉','打豆豆']); //方法 function alterName() { //对象 obj.type = "修改工作"; obj.salary = "60k"; //数组 list[0] = '出去玩' } //返回一个对象 (常用) return { obj, list, alterName, }; },};</script><style></style>reactive转为代理对象。Object.defineProperty()的get与set来实现响应式(数据劫持)。.value,读取数据时模板中直接读取不需要.value。.value。this.$attrs。this.$slots。this.$emit。代码实例
//父页面<template> <Demo @hello="showHelloMsg" msg="你好啊" school="尚硅谷"> <template v-slot:qwe> <span>尚硅谷</span> </template> <template v-slot:asd> <span>尚硅谷</span> </template> </Demo></template><script> import Demo from './components/Demo' export default { name: 'App', components:{Demo}, setup(){ function showHelloMsg(value){ alert(`你好啊,你触发了hello事件,我收到的参数是:${value}!`) } return { showHelloMsg } } }</script>//组件<template> <h1>一个人的信息</h1> <h2>姓名:{{person.name}}</h2> <h2>年龄:{{person.age}}</h2> <button @click="test">测试触发一下Demo组件的Hello事件</button></template><script> import {reactive} from 'vue' export default { name: 'Demo', //接收参数 props:['msg','school'], //声明接收 自定义事件 emits:['hello'], //setup 的参数 setup(props,context){ // console.log('---setup---',props) //接收参数 // console.log('---setup---',context) //上下文 // console.log('---setup---',context.attrs) //相当与Vue2中的$attrs // console.log('---setup---',context.emit) //触发自定义事件的。 console.log('---setup---',context.slots) //插槽 //数据 let person = reactive({ name:'张三', age:18 }) //方法 function test(){ context.emit('hello',666) } //返回一个对象(常用) return { person, test } } }</script>
<template> <h1>一个人的信息</h1> 姓:<input type="text" v-model="person.firstName"> <br> 名:<input type="text" v-model="person.lastName"> <br> <span>全名:{{person.fullName}}</span> <br> 全名:<input type="text" v-model="person.fullName"></template><script> //导入 computed 计算属性 import {reactive,computed} from 'vue' export default { name: 'Demo', setup(){ //数据 let person = reactive({ firstName:'张', lastName:'三' }) //计算属性——简写(没有考虑计算属性被修改的情况) /* person.fullName = computed(()=>{ return person.firstName + '-' + person.lastName }) */ //计算属性——完整写法(考虑读和写) person.fullName = computed({ get(){ return person.firstName + '-' + person.lastName }, set(value){ const nameArr = value.split('-') person.firstName = nameArr[0] person.lastName = nameArr[1] } }) //返回一个对象(常用) return { person } } }</script>
<template> <h2>当前求和为:{{sum}}</h2> <button @click="sum++">点我+1</button> <hr> <h2>当前的信息为:{{msg}}</h2> <button @click="msg+='!'">修改信息</button> <hr> <h2>姓名:{{person.name}}</h2> <h2>年龄:{{person.age}}</h2> <h2>薪资:{{person.job.j1.salary}}K</h2> <button @click="person.name+='~'">修改姓名</button> <button @click="person.age++">增长年龄</button> <button @click="person.job.j1.salary++">涨薪</button></template><script> import {ref,reactive,watch} from 'vue' export default { name: 'Demo', setup(){ //数据 let sum = ref(0) let msg = ref('你好啊') let person = reactive({ name:'张三', age:18, job:{ j1:{ salary:20 } } }) //情况一:监视ref所定义的一个响应式数据 /* watch(sum,(newValue,oldValue)=>{ console.log('sum变了',newValue,oldValue) },{immediate:true}) */ //情况二:监视ref所定义的多个响应式数据 /* watch([sum,msg],(newValue,oldValue)=>{ console.log('sum或msg变了',newValue,oldValue) },{immediate:true}) */ /* 情况三:监视reactive所定义的一个响应式数据的全部属性 1.注意:此处无法正确的获取oldValue 2.注意:强制开启了深度监视(deep配置无效) */ /* watch(person,(newValue,oldValue)=>{ console.log('person变化了',newValue,oldValue) },{deep:false}) //此处的deep配置无效 */ //情况四:监视reactive所定义的一个响应式数据中的某个属性 /* watch(()=>person.name,(newValue,oldValue)=>{ console.log('person的name变化了',newValue,oldValue) }) */ //情况五:监视reactive所定义的一个响应式数据中的某些属性 /* watch([()=>person.name,()=>person.age],(newValue,oldValue)=>{ console.log('person的name或age变化了',newValue,oldValue) }) */ //特殊情况 /* watch(()=>person.job,(newValue,oldValue)=>{ console.log('person的job变化了',newValue,oldValue) },{deep:true}) //此处由于监视的是reactive素定义的对象中的某个属性,所以deep配置有效 */ //返回一个对象(常用) return { sum, msg, person } } }</script><template> <h2>当前求和为:{{sum}}</h2> <button @click="sum++">点我+1</button> <hr> <h2>当前的信息为:{{msg}}</h2> <button @click="msg+='!'">修改信息</button> <hr> <h2>姓名:{{person.name}}</h2> <h2>年龄:{{person.age}}</h2> <h2>薪资:{{person.job.j1.salary}}K</h2> <button @click="person.name+='~'">修改姓名</button> <button @click="person.age++">增长年龄</button> <button @click="person.job.j1.salary++">涨薪</button></template><script> import {ref,reactive,watch} from 'vue' export default { name: 'Demo', setup(){ //数据 let sum = ref(0) let msg = ref('你好啊') let person = ref({ name:'张三', age:18, job:{ j1:{ salary:20 } } }) console.log(person) watch(sum,(newValue,oldValue)=>{ console.log('sum的值变化了',newValue,oldValue) }) /* person 为 reactive 函数的对象 deep:true 需要开启深度监视 person.value 直接监视 reactive 函数的对象 可以参考上面 情况三 */ watch(person,(newValue,oldValue)=>{ console.log('person的值变化了',newValue,oldValue) },{deep:true}) //返回一个对象(常用) return { sum, msg, person } } }</script><template> <h2>当前求和为:{{sum}}</h2> <button @click="sum++">点我+1</button> <hr> <h2>当前的信息为:{{msg}}</h2> <button @click="msg+='!'">修改信息</button> <hr> <h2>姓名:{{person.name}}</h2> <h2>年龄:{{person.age}}</h2> <h2>薪资:{{person.job.j1.salary}}K</h2> <button @click="person.name+='~'">修改姓名</button> <button @click="person.age++">增长年龄</button> <button @click="person.job.j1.salary++">涨薪</button></template><script> import {ref,reactive,watch,watchEffect} from 'vue' export default { name: 'Demo', setup(){ //数据 let sum = ref(0) let msg = ref('你好啊') let person = reactive({ name:'张三', age:18, job:{ j1:{ salary:20 } } }) //监视watch('监视属性','回调','配置') /* watch(sum,(newValue,oldValue)=>{ console.log('sum的值变化了',newValue,oldValue) },{immediate:true}) */ //不用指明监视哪个属性,监视的回调中用到哪个属性,那就监视哪个属性 watchEffect(()=>{ const x1 = sum.value const x2 = person.job.j1.salary console.log('watchEffect所指定的回调执行了') }) //返回一个对象(常用) return { sum, msg, person } } }</script>| vue2 | vue3 |
| setup() |
| setup() |
|
|
|
|
|
|
|
|
|
|
|
|
<template> <h2>当前求和为:{{sum}}</h2> <button @click="sum++">点我+1</button></template><script> //导入生命周期 import {ref,onBeforeMount,onMounted, onBeforeUpdate,onUpdated, onBeforeUnmount,onUnmounted} from 'vue' export default { name: 'Demo', setup(){ console.log('---setup---') //数据 let sum = ref(0) //通过组合式API的形式去使用生命周期钩子 //先执行组合式 之后 配置项的形式 生命周期 onBeforeMount(()=>{ console.log('---onBeforeMount---') }) onMounted(()=>{ console.log('---onMounted---') }) onBeforeUpdate(()=>{ console.log('---onBeforeUpdate---') }) onUpdated(()=>{ console.log('---onUpdated---') }) onBeforeUnmount(()=>{ console.log('---onBeforeUnmount---') }) onUnmounted(()=>{ console.log('---onUnmounted---') }) //返回一个对象(常用) return {sum} }, //通过配置项的形式使用生命周期钩子 //先执行组合式 之后 配置项的形式 生命周期 //#region beforeCreate() { console.log('---beforeCreate---') }, created() { console.log('---created---') }, beforeMount() { console.log('---beforeMount---') }, mounted() { console.log('---mounted---') }, beforeUpdate(){ console.log('---beforeUpdate---') }, updated() { console.log('---updated---') }, beforeUnmount() { console.log('---beforeUnmount---') }, unmounted() { console.log('---unmounted---') }, //#endregion }</script> 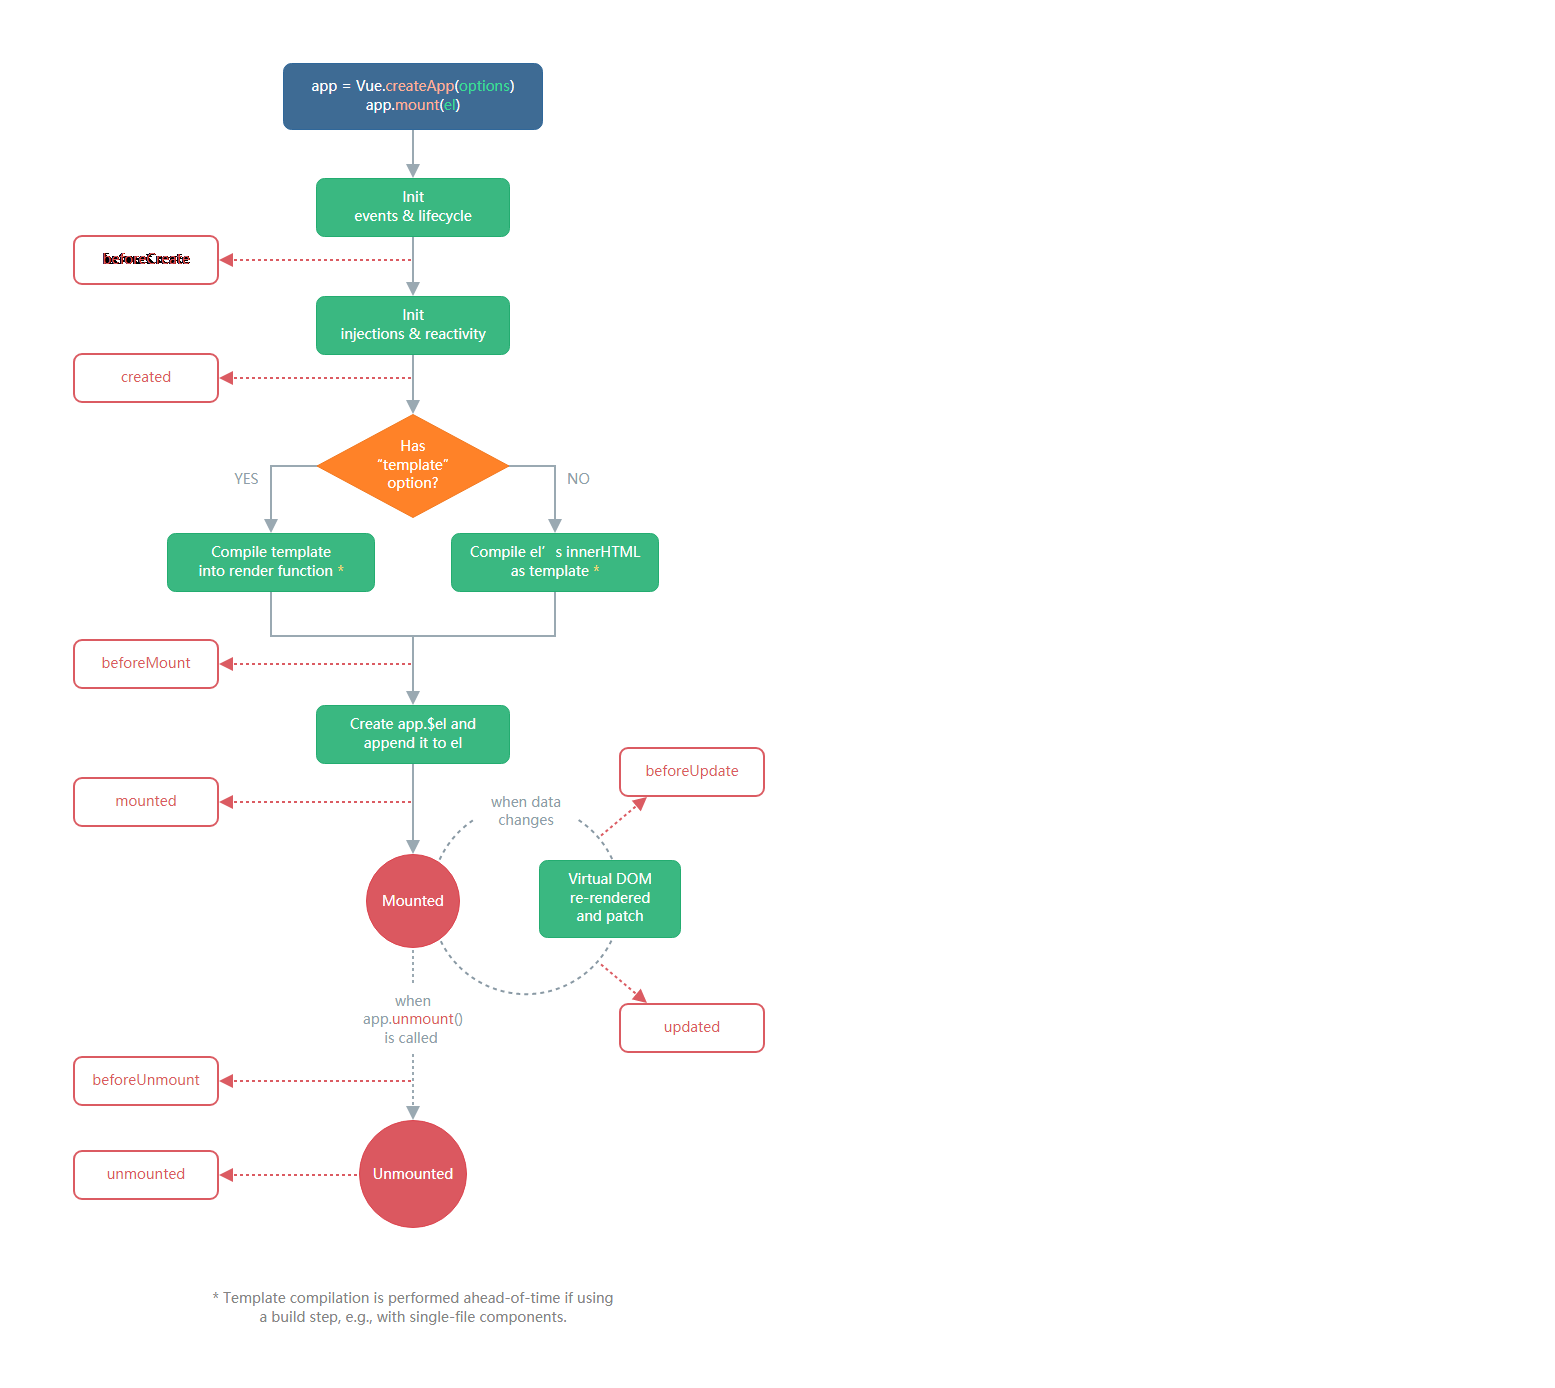
本文来自博客园,作者:虚乄,转载请注明原文链接:https://www.cnblogs.com/lovejielive/p/15936139.html