Spring 是一个轻量级的 DI/IoC 和 AOP 容器的开源框架,致力于构建致力于构建轻量级的 JavaEE 应用,简化应用开发,本身涵盖了传统应用开发,还拓展到移动端,大数据等领域。
① Spring 能帮我们低侵入/低耦合地根据配置文件 创建及组装对象之间的依赖关系。
② Spring 面向切面编程能帮助我们无耦合的实现日志记录,性能统计,安全控制等。
③ Spring 能非常简单的且强大的声明式事务管理(通过配置完成事务,不用修改代码)。
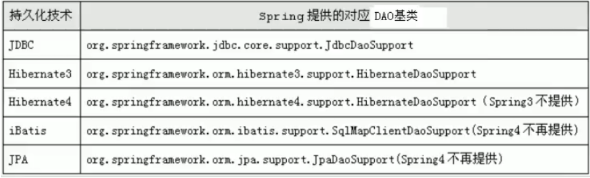
④ Spring 提供了与第三方数据访问框架(如 Hibernate、JPA)无缝集成,且自己也提供了一套 JDBC 模板来方便数据库访问。
⑤ Spring 提供与第三方 Web(如 Struts1/2、JSF)框架 无缝集成,且自己也提供了一套 Spring MVC 框架,来方便 Web 层搭建。
⑥ Spring 能方便的与如 Java Mail、任务调度、缓存框架等技术整合,降低开发难度。
? Spring 是一个DI容器或IoC容器(DI和IoC 思想差不多)。掌握着创建对象和构建对象之间的依赖的控制权。
? 一种设计思想。 其本意是是将原本在程序中手动创建对象的控制权,交由 Spring 框架来管理。
? 一种设计思想。具体是指 Spring 创建对象的过程中,将对象依赖属性(常量,对象,集合)通过配置设值给该对象。
创建applicationContext.xml 配置文件:
配置的约束内容:
<!-- 配置的bean约束内容 --><?xml version="1.0" encoding="UTF-8"?><beans xmlns="http://www.springframework.org/schema/beans" xmlns:xsi="http://www.w3.org/2001/XMLSchema-instance" xsi:schemaLocation="http://www.springframework.org/schema/beans https://www.springframework.org/schema/beans/spring-beans.xsd"> <!-- 通过配置的bean元素,告诉Spring的IoC容器,需要管理哪一个类的对象 --> <bean id="hello" > <!-- 通过property子元素,设置管理对象的属性的值 --> <property name="password" value="123"/> <property name="username" value="shan"/> </bean></beans> @Test void testIoC() throws Exception { Hello hello = null; //========================= //1、加载配置文件:从classpath路径去寻找配置文件,创建资源对象 Resource resource = new ClassPathResource("applicationContext.xml"); //2、创建IoC容器:创建spring的工厂对象(IoC容器对象) BeanFactory factory = new XmlBeanFactory(resource); //3、从Ioc容器获取对象:从spring IoC 容器(就是factory 工厂对象)中获取指定名称的对象 hello = (Hello)factory.getBean("hello"); //========================= hello.printUser(); }推荐使用:bean的名称+类型: T getBean(String name, Class
@Test void testIoC() throws Exception { Hello hello = null; //========================= //1、加载配置文件:从classpath路径去寻找配置文件,创建资源对象 Resource resource = new ClassPathResource("applicationContext.xml"); //2、创建IoC容器:创建spring的工厂对象(IoC容器对象) BeanFactory factory = new XmlBeanFactory(resource); //3、从Ioc容器获取对象:从spring IoC 容器(就是factory 工厂对象)中获取指定名称的对象 //方式(推荐): T getBean(String name, Class<T> requiredType) 根据bean对象在容器中的 名称+类型 来获取 hello = factory.getBean("hello", Hello.class); //========================= hello.printUser(); }前缀 classpathclasspath:com/shan/hello.xml"/>容器--管理对象的生命周期),生产 bean 对象的工厂,负责配置,创建和管理 bean。□ XML-based configuration (xml配置文件)
□ Annotation-based configuration (注解)
□ Java-based configuration (基于java-config)
反射(获取构造器实例对象)+内省机制(设置属性值)无参数构造器(且该无参构造器和访问权限无关);★相对于传统测试方式,spring测试框架会帮我们关闭对象资源,而使用传统方式,不会正常关闭spring容器。
■ SpringTestTest5-context.xml 文件(文件名必须是测试类-context,因为需要跟测试类名对应上):
<?xml version="1.0" encoding="UTF-8"?><beans xmlns="http://www.springframework.org/schema/beans" xmlns:xsi="http://www.w3.org/2001/XMLSchema-instance" xsi:schemaLocation="http://www.springframework.org/schema/beans https://www.springframework.org/schema/beans/spring-beans.xsd"> <!-- 配置bean对象 --> <bean id="someBean" /></beans> ■ SpringTestTest5 类:
//SpringTest 案例测试//运行 Spring JUnit5@SpringJUnitConfigpublic class SpringTestTest5 { //表示自动按照类型 Spring容器中去找到bean对象,并设置给该字段 @Autowired private SomeBean bean; @Test void testIoC() throws Exception { bean.doWork(); }}BeanFactory 在创建Spring容器的时候,并不会立马创建容器中管理的Bean对象,需要等到获取某一个 bean 的时候才会创建该 bean--延迟初始化。(懒加载)
ApplicationContext 在启动 Spring 容器的时候就会创建所有的 bean(在 Web 应用使用Application)
构造器实例化(bean 中有 无参数构造器),标准、常用。
<!-- 配置bean对象 --><bean id="someBean" />类要实现接口FactoryBean:
public class DogFactory implements FactoryBean<Dog>{ @Override public Dog getObject() throws Exception { Dog dog = new Dog(); return dog; } @Override public Class<?> getObjectType() { return Dog.class; }}<!-- 实现 FactoryBean 接口实例化:实例工厂变种, 如集成 MyBatis 框架使用 --> <bean id="dog" />缺省和常用的情况是单例 singleton<bean id="" scope="作用域"/>单例和多例: singleton: 单例(默认的作用域) prototype: 多例
在web应用中(request、session、application)
globalSession: 一般用于 Porlet 应用环境 , 分布式系统存在全局 session 概念(单点登录)
websocket:将一个bean定义定义到WebSocket的生命周期
<bean id="cat" init-method="init" destroy-method="close"/>\({\color{Violet}{● DI跟IoC差不多啦,细节就是DI还负责管理bean对象的属性}}\)
★ 配置与注入:
常量类型 配置value--->注入setter方法
对象类型 配置ref--->注入setter方法
集合类型 配置各自集合对应的元素...--->注入setter方法
■(常用) 注入常量 value
<bean id="person" > <property name="name" value="shan"/> <property name="age" value="22"/> <property name="salary" value="10000"/> </bean>■(常用) 注入对象 ref
<bean id="cat" > <property name="name" value="kity"/> </bean> <bean id="person" > <property name="name" value="shan"/> <property name="age" value="22"/> <property name="cat" ref="cat"/> </bean>■ 注入集合 、、
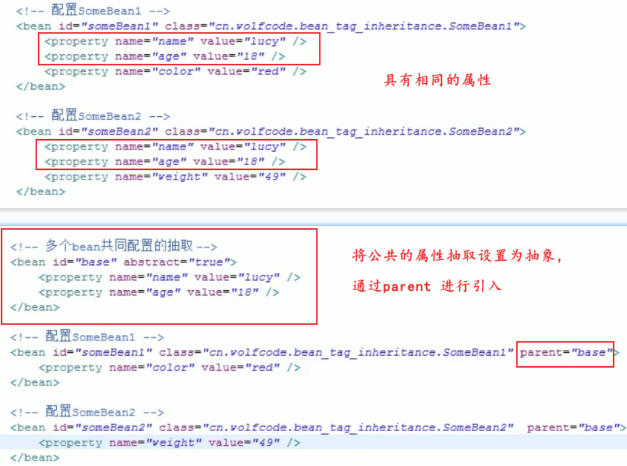
<bean id="person" > <!-- set类型 --> <property name="set"> <set> <value>set1</value> <value>set2</value> </set> </property> <!-- list类型 --> <property name="list"> <list> <value>list1</value> </list> </property> <!-- array类型 --> <property name="array"> <array> <value>array1</value> </array> </property> <!-- map类型(字典类型) --> <property name="map"> <map> <entry key="key1" value="value1"/> </map> </property> <!-- properties类型(特殊的map类型【key和value都是字符串】) --> <property name="prop"> <value> p1=v1 p2=v2 </value> </property> </bean>通过abstract属性进行抽取
通过parent属性进行引入
动态加载配置文件(db.properties---数据库连接的配置信息)
<context:property-placeholder/>
使用 ${} 动态引入属性值
<!-- 配置数据库连接池 --> <bean id="dataSource" init-method="init" destroy-method="close"> <property name="driverClassName" value="com.mysql.jdbc.Driver"/> <property name="url" value="jdbc:mysql://localhost:3306/springdemo?useSSL=false"/> <property name="username" value="root"/> <property name="password" value="admin"/> <property name="initialSize" value="2"/> </bean>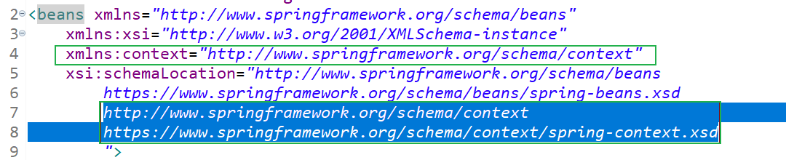
<!-- 从classpath的根路径 加载db.properties --> <context:property-placeholder location="classpath:db.properties"/> <!-- 配置数据库连接池 --> <bean id="dataSource" init-method="init" destroy-method="close"> <property name="driverClassName" value="${jdbc.driverClassName}"/> <property name="url" value="${jdbc.url}"/> <property name="username" value="${jdbc.username}"/> <property name="password" value="${jdbc.password}"/> <property name="initialSize" value="${jdbc.initialSize}"/> </bean>★ 对于IoC注解、DI注解:他们的第三方程序是他们对应的解析器。
IoC注解:组件扫描器 <context:component-scan base-package=""/>
DI注解:注解配置 <context:annotation-config/>
常量类型 配置value--->注入@Value
对象类型 配置ref--->注入@Autowired/@Resource
//相当于 <bean id="dataSource" />@Component("dataSource")public class MyDataSource {}@Component 泛指组件@Repository 持久层@Service 业务层@Controller 控制层\({\color{Violet}{■ 其中初始化和销毁注解[依赖:javax.annotation-api.jar]}}\)
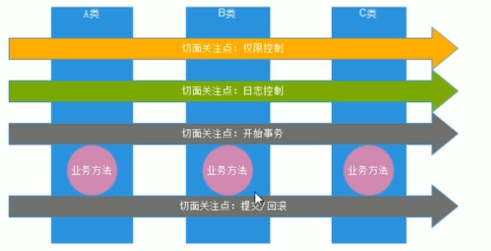
利用一种称为"横切"的技术,剖开封装的对象内部,并将那些影响了多个类的公共行为封装到一个可重用模块,并将其命名为"Aspect",即切面。
切面:把一个个的横切关注点放到某个模块中去,称之为切面。
那么每一个的切面都能影响业务的某一种功能, 切面的目的就是功能增强,
如日志切面就是一个横切关注点,应用中许多方法需要做日志记录的只需要插入日志的切面即可.
动态代理哪个包.哪个类.哪个方法execution(<修饰符>? <返回类型> <声明类型>? <方法名>(<参数>) <异常>)看具体的方法,先从方法名位置开始看):*:匹配任何部分,但是只能表示一个单词。
..:可用于全限定名中和方法参数中,分别表示子包和 0 到 N 个参数。
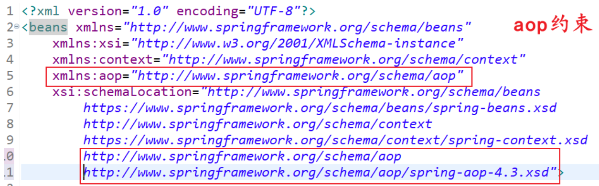
<!-- AOP 配置:在什么地点、什么时机、做什么 --> <!-- 1、what:做什么增强 --> <bean id="transactionManager" /> <aop:config proxy-target-> <!-- 属性proxy-target-class配置是否使用真实对象 --> <!-- 配置AOP切面 --> <aop:aspect ref="transactionManager"> <!-- 关联what --> <!-- 2、where:在哪些包中的哪些类中的哪些方法上做增强 --> <aop:pointcut id="txPoint" expression="execution(* com.shan.service..*Service*.*(..))"/> <!-- 3、when:在方法执行的什么时机做增强 --><!-- 关联where --> <aop:before method="open" pointcut-ref="txPoint"/> <aop:after-returning method="commit" pointcut-ref="txPoint"/> <aop:after-throwing method="rollback" pointcut-ref="txPoint"/> <aop:after method="close" pointcut-ref="txPoint"/> <aop:around method="aroundMethod" pointcut-ref="txPoint"/> </aop:aspect> </aop:config>被增强的方法的执行时机分为:前置增强、后置增强、异常增强、最终增强、环绕增强Joinpoint类】Joinpoint类连接点,访问被增强方法的真实对象,代理对象,方法参数等
可以作为前置、后置、异常、最终增强方法的参数,第一个参数
//可以作为前置、后置、异常、最终增强方法的参数,**`第一个参数`** public void open(JoinPoint jp) { System.out.println("开启事务~"); System.out.println("代理对象:" +jp.getThis().getClass()); System.out.println("目标对象:" +jp.getTarget().getClass()); System.out.println("被增强方法的参数:" +Arrays.toString(jp.getArgs())); System.out.println("连接点方法的签名:" +jp.getSignature()); System.out.println("当前连接点的类型:" +jp.getKind());}processdingJoinpoint】参数processdingJoinpoint:是JointPoin 的子类,只能用于环绕增强,作为第一个参数
还可以调用真实对象中被增强的方法。
//调用真实对象的方法 ret = pjp.proceed();public Object aroundMethod(ProceedingJoinPoint pjp) { Object ret = null; System.out.println("开启事务~"); try { ret = pjp.proceed();//调用真实对象的方法 System.out.println("调用真实对象的方法...~"); System.out.println("提交事务~"); } catch (Throwable e) { System.out.println("回滚事务~,错误信息:" + e.getMessage()); }finally { System.out.println("关闭资源~"); } return ret; }<!-- what --><bean id="txManager" > <property name="dataSource" ref="dataSource"></property></bean><!-- AOP注解的解析器 --><aop:aspectj-autoproxy/>注解@Aspect(配置一个AOP切面)配置where)配置when)@Component@Aspect //配置一个AOP切面public class TransactionManager { //where //xml:<aop:pointcut id="txPoint" expression="execution(* com.shan.service..*Service*.*(..))"/> @Pointcut("execution(* com.shan.service..*Service*.*(..))") public void txPoint() { } //@Before("txPoint()") public void open(JoinPoint jp) { System.out.println("开启事务~"); } //@AfterReturning("txPoint()") public void commit() { System.out.println("提交事务~"); } //@AfterThrowing(value="txPoint()", throwing="ex") public void rollback(Throwable ex) { System.out.println("回滚事务~,异常信息:" +ex.getMessage()); } //@After("txPoint()") public void close() { System.out.println("关闭资源~"); } @Around("txPoint()") public Object aroundMethod(ProceedingJoinPoint pjp) { Object ret = null; System.out.println("开启事务~"); try { ret = pjp.proceed();//调用真实对象的方法 System.out.println("调用真实对象的方法...~"); System.out.println("提交事务~"); } catch (Throwable e) { System.out.println("回滚事务~,错误信息:" + e.getMessage()); }finally { System.out.println("关闭资源~"); } return ret; }}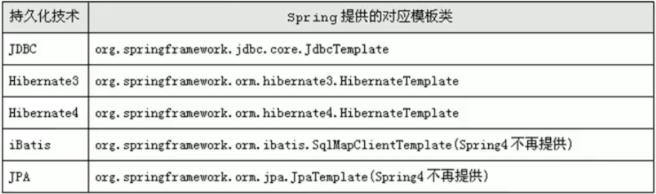
//DML操作:public update(String sql, Object...args)参数:sql ?占位符对应的参数返回:受影响的行数//DQL 操作:public <T>List<T> query(String sql, Object...args, RowMapper<T> rowMapper)参数:sql ?占位符对应的参数 结果集处理器返回:多行结果集封装的listNameParameterJdbcTemplate顺序占位符】,需要数第几个,然后写对应的参数,参数多了麻烦使用NameParameterJdbcTemplate命名的参数JdbcTemplate模板,其实就是在JdbcTemplate外面套一层。
允许使用 xx 来给占位参数起名称,我们需要给名称xx的位置设置参数。
□ 举例:
public int countOfActorsByFirstName(String firstName) { String sql = "select count(*) from T_ACTOR where first_name = :first_name"; Map<String, String> namedParameters = Collections.singletonMap("first_name", firstName); return this.namedParameterJdbcTemplate.queryForObject(sql, namedParameters, Integer.class);}创建事务。封装事务的隔离级别和超时时间,是否为只读事务和事务的隔离级别和传播规则等事务属性.封装了事务的具体运行状态。如是否是新开启事务,是否已经提交事务,设置当前事务为rollback-only.在一个事务方法中,调用了其他事务的方法,此时事务该如何传递,按照什么规则传播.
常用)必须存在一个事务,如果当前存在一个事务,则加入到该事务中,否则,新建一个事务.常用)不管当前是否存在事务,都会新开启一个事务.必须是一个新的事务. <!-- ===============好比是AOP,事务增强================================== --> <!-- 1、what:配置jdbc事务管理器 --> <bean id="txManager" > <property name="dataSource" ref="dataSource"/> </bean> <!-- 2:when:配置事务管理器增强(环绕增强) --><!-- 关联what --> <tx:advice id="txAdvice" transaction-manager="txManager"> <tx:attributes> <tx:method name="trans"/> </tx:attributes> </tx:advice> <!-- 3、where:配置切面 --><!-- 关联when --> <aop:config> <aop:pointcut id="txPc" expression="execution(* com.shan.service.*Service.*(..))" /> <aop:advisor advice-ref="txAdvice" pointcut-ref="txPc"/> </aop:config><bean id="txManager" > <property name="dataSource" ref="dataSource"></property></bean><!-- tx注解解析器 --><tx:annotation-driven transaction-manager="txManager"/>■ 注解@Transactional使用:
@Service@Transactionalpublic class AccountServiceImpl implements IAccountService{ @Autowired private IAccountDAO dao; @Override public void trans(Long outId, Long inId, int money) { dao.transOut(outId, money); int a = 1/0; //算术异常 dao.transIn(inId, money); } //若是有查询方法,可以再贴注解@Transactional添加注解属性 @Transactional(readOnly = true) public void listXX() { }}注解:
\({\color{Blue}{@Configuration}}\) 配置
\({\color{Blue}{@import(配置子类)}}\)
\({\color{Blue}{@Bean}}\) 配置创建bean对象
\({\color{Blue}{@ComponentScan}}\) IoC注解解析器
\({\color{Blue}{@EnableTransactionManagement}}\) 事务注解解析器
@Transactional 配置jdbc事务
@PropertySource 配置引入的属性文件资源
\({\color{Gray}{@Component}}\) 泛指组件
\({\color{Gray}{@Repository}}\) 持久层
\({\color{Gray}{@Service}}\) 业务层
\({\color{Gray}{@Controller}}\) 控制层
@Value 配置注入属性值
@Autowired 配置注入属性值
本文来自博客园,作者:一乐乐,转载请注明原文链接:https://www.cnblogs.com/shan333/p/15974254.html