前段时间我发表了一系列文章,开始介绍基于 .net core 的在线客服系统开发过程。
有很多朋友一直提出希望能够支持 MySQL 数据库,考虑到已经有朋友在用 SQL Server,我在升级的过程中不能丢下对 SQL Server 的支持,必须让系统同时支持 SQL Server 和 MySQL。
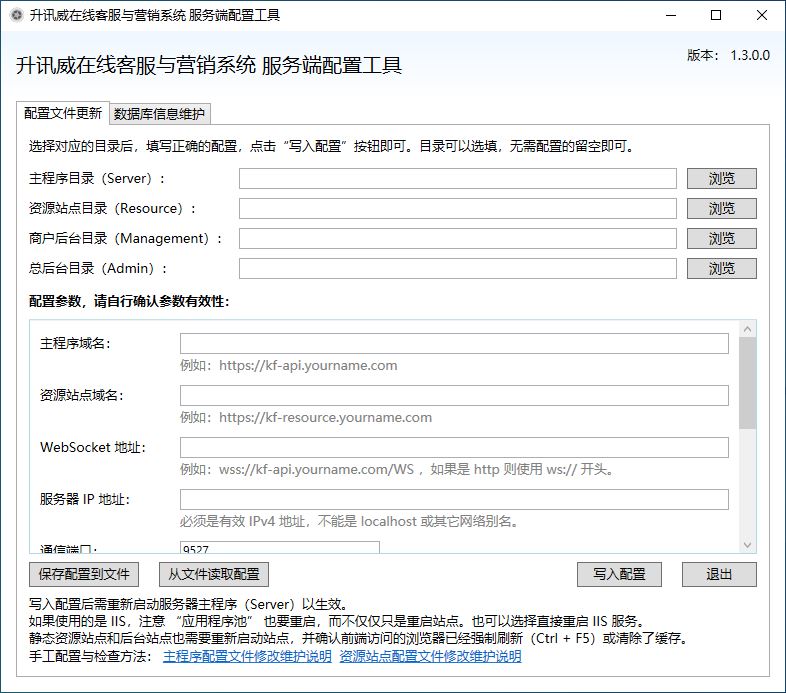
为了简化安装部署过程,我开发了一个配套的配置工具。
使用自动化配置工具,可以在“数据库引擎”这一项中,切换 SQL Server 和 MySQL,而不需要部署不同的两套程序。
在本文我将介绍:
我详细列出了需要执行的命令的全过程,跟随本文可以在 30 分钟内完成部署。
升讯威在线客服与营销系统是基于 .net core / WPF 开发的一款在线客服软件,宗旨是: 开放、开源、共享。努力打造 .net 社区的一款优秀开源产品。
?? https://kf.shengxunwei.com
发布日期: 2022-5-15
数据库版本: 20220219a
通信协议版本: 20220306
服务器版本: 1.10.5.0
客服程序版本: 1.9.3.0
资源站点版本: 1.5.9.0
Web 管理后台版本: 1.1.7.0
客服系统默认使用 9527 端口进行通信,如果开启了防火墙,请在防火墙中开放此端口。
也可以更改为其它可用端口号,在后续配置客服系统服务端程序时要做对应的修改。
请确保您所使用的主机服务商提供的防火墙服务中,也开放了对应端口。如阿里云服务器需要在安全组规则中配置。
下载wget https://dev.mysql.com/get/mysql80-community-release-el8-1.noarch.rpm
安装sudo yum install mysql80-community-release-el8-1.noarch.rpm -ysudo yum install mysql-community-server -y
如果报 Error: Unable to find a match: mysql-community-server
则先执行yum module disable mysql
然后再执行sudo yum install mysql-community-server -y
启动sudo systemctl start mysqld
查看安装时生成的临时密码sudo cat /var/log/mysqld.log |grep password
使用临时密码连接 MySQLmysql -uroot -p
修改 root 密码alter user root@localhost identified with mysql_native_password by '你的密码';
安装 gccyum -y install gcc
安装 pcre、pcre-develyum install -y pcre pcre-devel
安装 zlibyum install -y zlib zlib-devel
安装 opensslyum install -y openssl openssl-devel
wget http://nginx.org/download/nginx-1.20.1.tar.gz如果提示 command not found,则先执行
yum install wget安装
解压缩tar zxvf nginx-1.20.1.tar.gz
进入目录cd nginx-1.20.1
安装和配置,依次执行./configuremakemake install
如果提示 command not found,则先执行
yum -y install gcc automake autoconf libtool make安装
启动 nginx 服务cd /usr/local/nginx/sbin./nginx
查看nginx服务是否启动成功ps -ef | grep nginx
访问你的服务器IP
看到显示欢迎页面。
进入到 /lib/systemd/system/ 目录cd /lib/systemd/system/
创建 nginx.service 文件vim nginx.service
如果提示 command not found,则先执行
yum -y install vim安装
[Unit]Description=nginx serviceAfter=network.target[Service]Type=forkingExecStart=/usr/local/nginx/sbin/nginxExecReload=/usr/local/nginx/sbin/nginx -s reloadExecStop=/usr/local/nginx/sbin/nginx -s stopPrivateTmp=true[Install]WantedBy=multi-user.target内容说明
Description:描述服务
After:描述服务类别
[Service]服务运行参数的设置
Type=forking是后台运行的形式
ExecStart为服务的具体运行命令
ExecReload为重启命令
ExecStop为停止命令
PrivateTmp=True表示给服务分配独立的临时空间
注意:[Service]的启动、重启、停止命令全部要求使用绝对路径
[Install]运行级别下服务安装的相关设置,可设置为多用户,即系统运行级别为3
启动 nginxsystemctl start nginx.service
加入开机自启动systemctl enable nginx.service
查看服务当前状态systemctl status nginx.service
sudo dnf install dotnet-sdk-3.1连接数据库引擎mysql -uroot -p
创建数据库create database kf
切换到数据库use kf
创建数据库表结构source createDatabase.sql
请确认已经完成了对服务器主程序配置文件的配置。
参阅:使用自动化工具配置服务器端程序
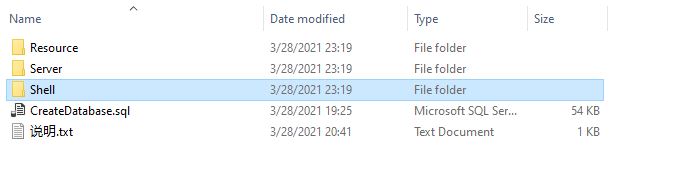
上传并解压缩 Server 目录tar -xvf Server.tar
编辑 nginx 配置文件vim /usr/local/nginx/conf/nginx.conf
在 Server 节点 平级 添加如下内容
注意 server_name 处替换为你所使用的域名。
map $http_upgrade $connection_upgrade { default upgrade; '' close; }upstream dotnet_server_proxy { server localhost:5000; keepalive 2000; } server{ listen 80; listen [::]:80; server_name kf-api.yourname.com; location / { proxy_pass http://dotnet_server_proxy; proxy_http_version 1.1; proxy_set_header Upgrade $http_upgrade; proxy_set_header Connection keep-alive; proxy_set_header Host $host; proxy_cache_bypass $http_upgrade; proxy_set_header X-Forwarded-For $remote_addr; proxy_set_header Upgrade $http_upgrade; proxy_set_header Connection $connection_upgrade; }}示例文件:https://kf.shengxunwei.com/freesite/nginx.conf.txt
重新加载 nginx 配置文件cd /usr/local/nginx/sbin./nginx -s reload
测试运行cd /root/wwwroot/Server/dotnet Sheng.Linkup.Server.dll &
访问域名,进入 Status 查看状态
https://kf-api.yourname.com/Status
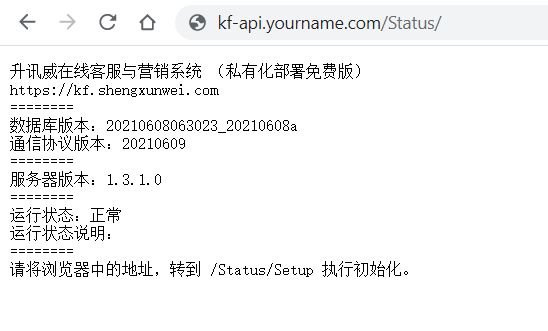
Status/Setup 命令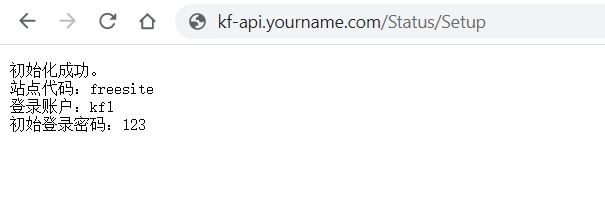
进入cd /lib/systemd/system/
创建文件vim kfServer.service
输入以下内容后保存退出
注意 WorkingDirectory 为您的 Server 目录
[Unit]Description=kfServer serviceAfter=network.target[Service]Type=simpleGuessMainPID=trueWorkingDirectory=/root/wwwroot/Server/StandardOutput=journalStandardError=journalExecStart=dotnet Sheng.Linkup.Server.dll &Restart=always[Install]WantedBy=multi-user.target启动服务器主程序systemctl start kfServer.service
设置开机启动systemctl enable kfServer.service
查看运行状态systemctl status kfServer.service
请确认已经完成了对服务器主程序配置文件的配置。
参阅:使用自动化工具配置服务器端程序
上传并解压缩 Resource 目录tar -xvf Resource.tar
编辑 nginx 配置文件vim /usr/local/nginx/conf/nginx.conf
在 Server 节点平级添加如下内容
注意 server_name 处替换为你所使用的域名。location 下的 root 后为 Resource 目录路径。
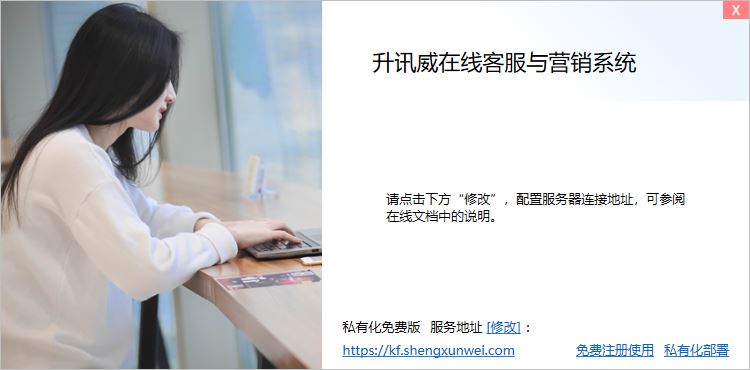
server { listen 80; server_name kf-resource.yourname.com; location / { root /root/wwwroot/Resource; index v.html; } error_page 500 502 503 504 /50x.html; location = /50x.html { root html; }}chmod 777 /rootchmod 777 /root/wwwrootchmod 777 /root/wwwroot/Resource此页面显示的是私有化部署版本的客服端配置说明,如果您在线使用,下载客服端程序请至:下载安装客服端软件
操作系统:
依赖:
客服程序没有任何恶意代码并经过病毒扫描。 使用的是:
如果执行安装程序时显示 Windows SmartScreen 筛选器窗口,请点击“更多信息”后,点击“运行”按钮即可。
出现该窗口的原因 并不是发现恶意代码 ,而是单纯的指程序没有企业签名。
代码签名证书的价格较贵,需要每年近万元的费用,对于免费软件来说 成本高昂。
此外 360 如果出现类似提示也是由于类似原因,并不是发现恶意代码,而是需要向 360 缴纳认证费。
压缩包中的“Shell”目录为客服端程序。


- 如果提示没有返回版本信息,是因为在配置服务器主程序后,没有初始化数据。请查阅 配置服务器主程序 的结尾部分。
- 如果登录时提示“不允许对非连接的套接字执行此操作”,请检查服务器的防火配置,将客服系统使用的通信规则添加到入站规则,参阅:准备操作系统
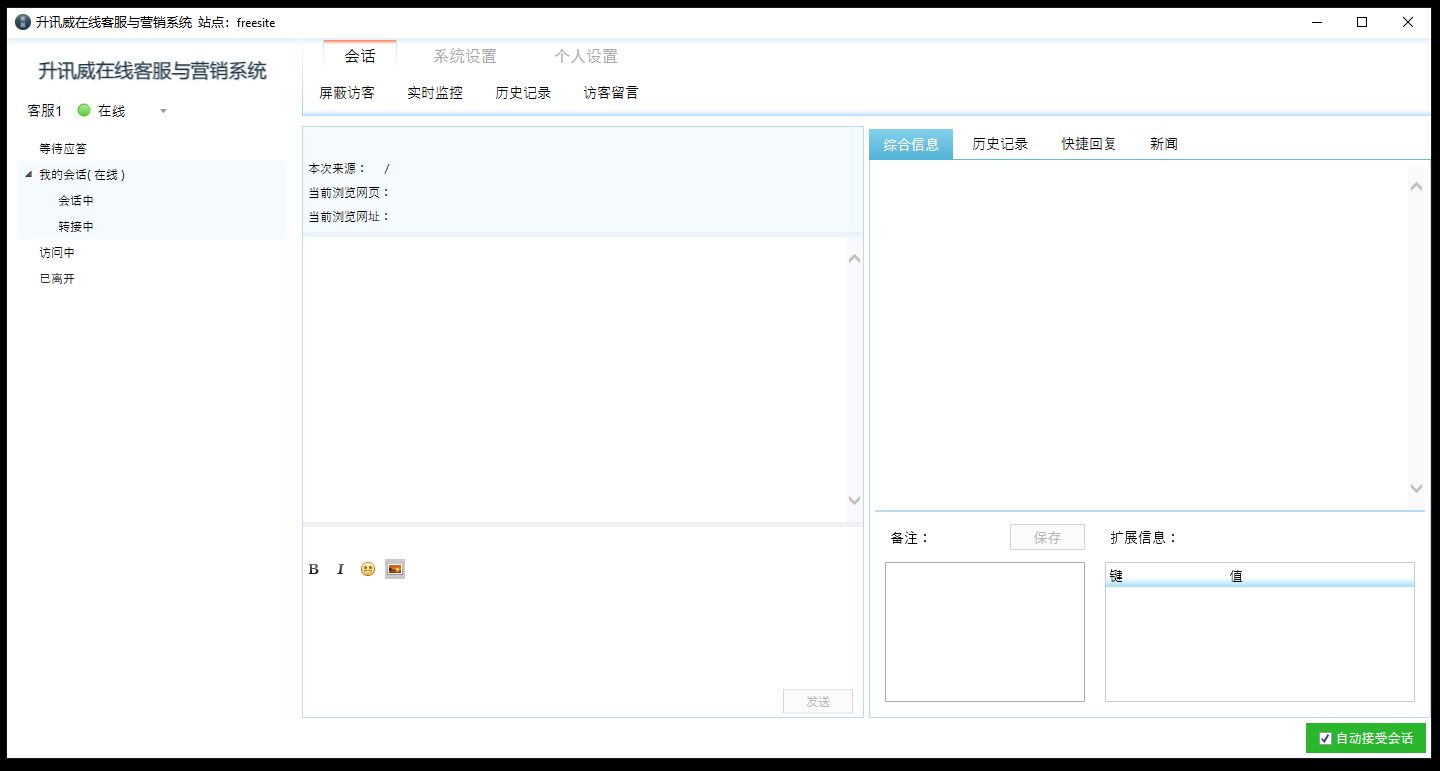
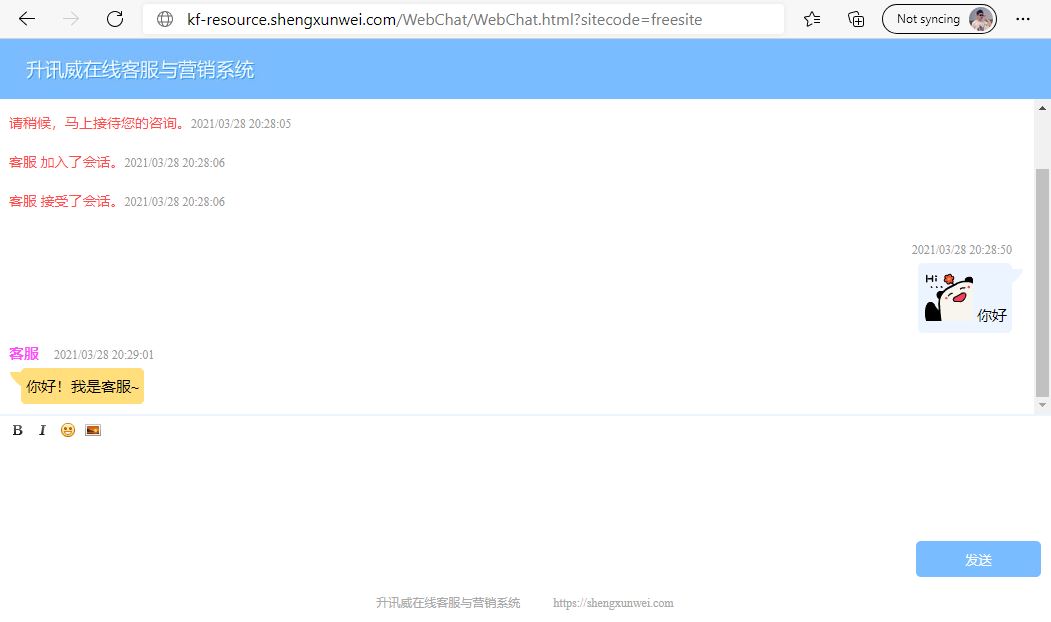
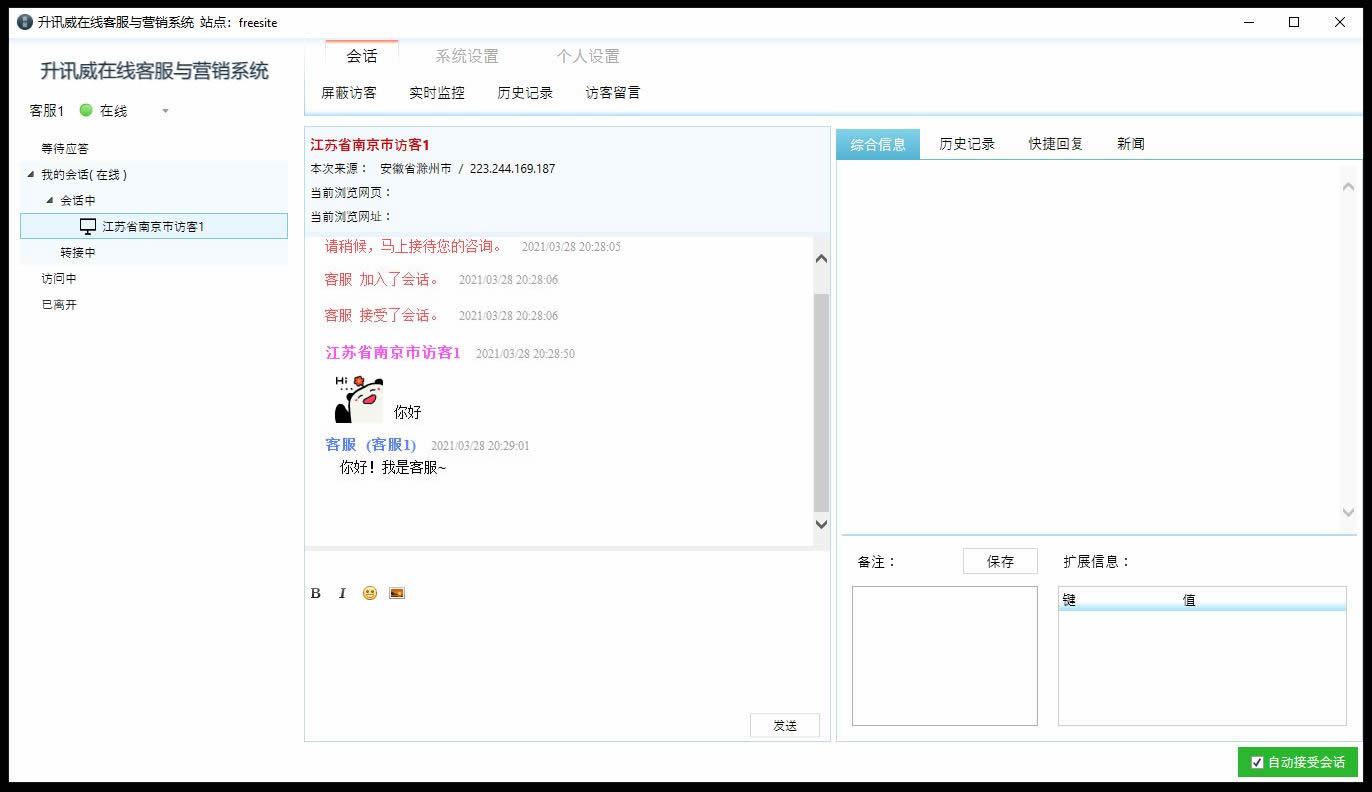
登录客服端以后,用浏览器打开你的资源站点域名下的聊天页面,如:
kf-resource.shengxunwei.com/WebChat/WebChat.html?sitecode=freesite
开始聊天。
将配置好的客服端程序 Shell 目录,压缩或打包分发给客服使用即可。