其实在写这个redis专题时我想了很久,我觉得redis没什么好说的,因为现在是个人都会用redis,但是我在写netty专题时发现,netty里面很多东西和概念有很多跟redis的很多应用和底层很相似和可以借鉴的地方,所以后来想想,还是写个专题来简单聊聊。按照我以前的习惯在写应用前我是要写一篇中间件的安装,但redis的安装这次不写了,因为安装过于简单,但是看这专题的朋友记得,我后面所写的所有内容是基于redis6版本的基础上进行写的。如果看过官网的朋友可以知道,redis6和以往版本最大的区别在于他引入了多线程IO,对于6以前的单线程redis来说,性能瓶颈主要在于网络的 IO 消耗, 所以新版本优化主要有两个方向:

官网:https://spring.io/projects/spring-data-redis
具体底层实现我会在后面篇幅会写,这里就不过多说明,下面就将springboot项目集成redis作一个简单的过程演示。
引入pom文件
<dependency> <groupId>org.springframework.boot</groupId> <artifactId>spring-boot-starter-data-redis</artifactId> </dependency>
修改application.yml文件
spring: redis: # redis数据库索引(默认为0),我们使用索引为3的数据库,避免和其他数据库冲突 database: 0 host: 192.168.0.23 port: 6379 password: 123456 # redis连接超时时间(单位毫秒) timeout: 0 # redis连接池配置 jedis: pool: # 最大可用连接数(默认为8,负数表示无限) max-active: -1 # 最大空闲连接数(默认为8,负数表示无限) max-idle: 2000 # 最小空闲连接数(默认为0,该值只有为正数才有用) min-idle: 1 # 从连接池中获取连接最大等待时间(默认为-1,单位为毫秒,负数表示无限) max-wait: -1 # 配置空闲连接回收间隔时间,min-idle才会生效,否则不生效 time-between-eviction-runs: 5000

@SpringBootTestclass SpringRedisApplicationTests { // 注入 RedisTemplate @Autowired private RedisTemplate redisTemplate; // String 类型 @Test void testString () { redisTemplate.opsForValue().set("name", "ljx"); Object name = redisTemplate.opsForValue().get("name"); System.out.println(name); } // Hash 类型 @Test public void testHash () { redisTemplate.opsForHash().put("user1", "name", "clarence"); redisTemplate.opsForHash().put("user1", "age", "25"); Map map = redisTemplate.opsForHash().entries("user1"); System.out.println(map); } // List 类型 @Test public void testList () { redisTemplate.opsForList().leftPushAll("names", "xiaobai", "xiaohei", "xiaolan"); List<String> names = redisTemplate.opsForList().range("names", 0, 3); System.out.println(names); } // Set 类型 @Test public void testSet () { redisTemplate.opsForSet().add("set", "a", "b", "c"); Set<String> set = redisTemplate.opsForSet().members("set"); System.out.println(set); } // SortedSet 类型 @Test public void testSortedSet () { redisTemplate.opsForZSet().add("class", "xiaobai", 90); Set aClass = redisTemplate.opsForZSet().rangeByScore("class", 90, 100); System.out.println(aClass); Set<ZSetOperations.TypedTuple<String>> set = new HashSet<> (); set.add(new DefaultTypedTuple<> ("xiaohei", 88.0)); set.add(new DefaultTypedTuple<>("xiaohui", 94.0)); set.add(new DefaultTypedTuple<>("xiaolan", 84.0)); set.add(new DefaultTypedTuple<>("xiaolv", 82.0)); set.add(new DefaultTypedTuple<>("xiaohong", 99.0)); redisTemplate.opsForZSet().add("class", set); Set aClass1 = redisTemplate.opsForZSet().range("class", 0, 6); System.out.println(aClass1); }}
1、默认是 JdkSerializationRedisSerializer
Redis 配置文件
@Configurationpublic class RedisConfig { @Bean public RedisTemplate<String, Object> redisTemplate(RedisConnectionFactory connectionFactory) { // 创建 RedisTemplate 对象 RedisTemplate<String, Object> redisTemplate = new RedisTemplate<>(); // 设置连接工厂 redisTemplate.setConnectionFactory(connectionFactory); // 设置 Key 的序列化 - String 序列化 RedisSerializer.string() => StringRedisSerializer.UTF_8 redisTemplate.setKeySerializer( RedisSerializer.string()); redisTemplate.setHashKeySerializer(RedisSerializer.string()); // 设置 Value 的序列化 - JSON 序列化 RedisSerializer.json() => GenericJackson2JsonRedisSerializer redisTemplate.setValueSerializer(RedisSerializer.json()); redisTemplate.setHashValueSerializer(RedisSerializer.json()); // 返回 return redisTemplate; }}
引入 Jackson 依赖
<!--Jackson依赖--> <dependency> <groupId>com.fasterxml.jackson.core</groupId> <artifactId>jackson-databind</artifactId> <version>2.11.4</version> </dependency>
添加 User 实体类
@Data@NoArgsConstructor@AllArgsConstructorpublic class User { private String name; private Integer age;}
案例
@SpringBootTestpublic class RedisDemoApplicationTest2 { // 注入 RedisTemplate @Autowired private RedisTemplate<String, Object> redisTemplate; @Test void testString() { redisTemplate.opsForValue().set("name", "小白"); Object name = redisTemplate.opsForValue().get("name"); System.out.println(name); } @Test void testSaveUser() { redisTemplate.opsForValue().set("user", new User("小白", 23)); User user = (User) redisTemplate.opsForValue().get("user"); System.out.println(user); }}
运行结果

<!--fastjson依赖--><dependency> <groupId>com.alibaba</groupId> <artifactId>fastjson</artifactId> <version>1.2.62</version></dependency>
案例
@SpringBootTestpublic class RedisDemoApplicationTest2 { // 注入 RedisTemplate @Autowired private RedisTemplate<String, Object> redisTemplate; @Test void testString() { redisTemplate.opsForValue().set("name", "小白"); Object name = redisTemplate.opsForValue().get("name"); System.out.println(name); } @Test void testSaveUser() { redisTemplate.opsForValue().set("user", new User("小白", 23)); User user = (User) redisTemplate.opsForValue().get("user"); System.out.println(user); }}

上面简单的演示了下redis的操作,接下来首先详细了解一下Redis Serialization Protocol(Redis序列化协议),这个是Redis提供的一种,客户端和Redis服务端通信传输的编码协议,服务端收到后,会基于这个约定编码进行解码。首先打开Wireshark工具,对VMnet8这个网络进行抓包(没有这工具可以自己下个),先在连接工具加一个假数据

打开Wireshark工具,对VMnet8这个网络进行抓包
增加过滤条件
ip.dst_host==ip and tcp.port in {6379}
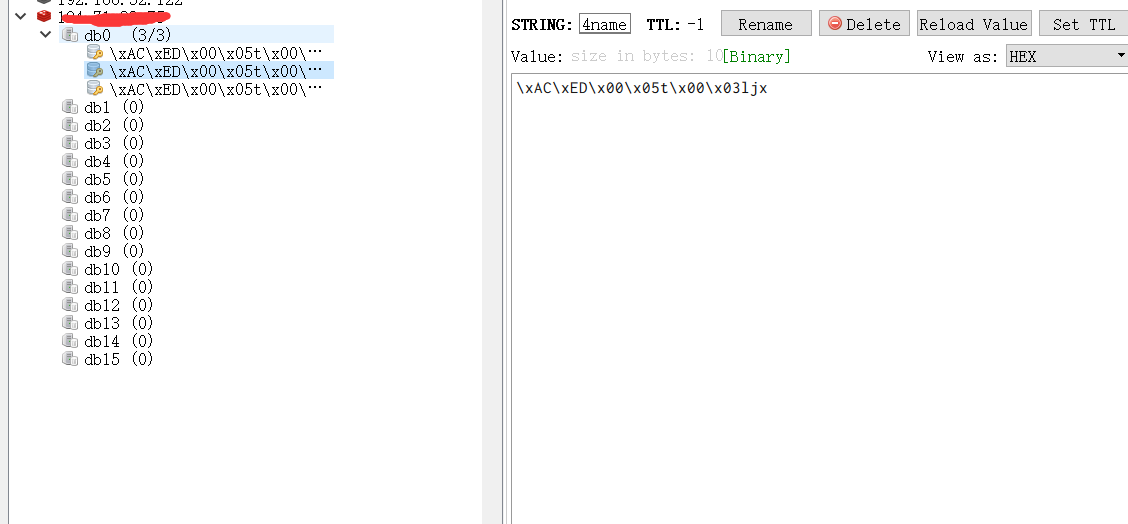
使用RDM工具连接到Redis Server进行key-value操作,比如执行 set name ljx通过Wireshark工具监控数据包内容,可以通过上图看到实际发出的数据包是:*3\r\n$3\r\nSET\r\n$4\r\nname\r\n$3\r\nljx
其中开头的*3这个数字中代表参数个数,我是set name ljx,所以表示三个参数;接着就是$3表示属性长度,$表示包含了3个字符。客户端和服务器发送的命令或数据一律以 \r\n (CRLF回车+换行)结尾。了解了这格式的意思接下来自己实现一个java客户端就非常容易了。
在手写之前先看下Jedis源码是怎么实现的手写客户端代码,在Jedis中就有的,先看一下Jedis内部的实现源码:
protected Connection sendCommand(Protocol.Command cmd, byte[]... args) { try { this.connect();//建立Socket连接 Protocol.sendCommand(this.outputStream, cmd, args);//封装报文并将报文写入流中 ++this.pipelinedCommands; return this; } catch (JedisConnectionException var6) { JedisConnectionException ex = var6; try { String errorMessage = Protocol.readErrorLineIfPossible(this.inputStream); if (errorMessage != null && errorMessage.length() > 0) { ex = new JedisConnectionException(errorMessage, ex.getCause()); } } catch (Exception var5) { } this.broken = true; throw ex; }}
这段源码并不难找,使用Jedis的set方法,然后一直跟进去就可以。最终方法的位置是redis.clients.jedis.Connection.sebdCommand()。
从这个方法的内部实现就可以看出来其实就是通过Socket建立tcp连接,然后将命令和数据转换成RESP协议规范的报文格式,最后通过Socket将数据传入过去。知道这些对于自己写一个Jedis客户端是不是就有思路啦。基于对源码的借鉴,简易的Jedis实现如下:
public class CustomJedis { public static void main(String[] args) throws IOException { //建立socket连接 Socket socket = new Socket(); InetSocketAddress socketAddress = new InetSocketAddress("106.12.75.86", 6379); socket.connect(socketAddress, 10000); //获取scoket输出流,将报文转换成byte[]传入流中 OutputStream outputStream = socket.getOutputStream(); outputStream.write(command()); //获取返回的输出流,并打印输出数据 InputStream inputStream = socket.getInputStream(); byte[] buffer = new byte[1024]; inputStream.read(buffer); System.out.println("返回执行结果:" + new String(buffer)); } //组装报文信息 private static byte[] command() { return "*3\r\n$3\r\nSET\r\n$9\r\nuser:name\r\n$6\r\nitcrud\r\n".getBytes(); }}
但是这里需要注意,上面的实现方式是直接建立socket连接,Redis很多时候是设置密码认证的,如果这样的话上面的代码就需要改动啦。
改动后如下:
public class CustomJedisProd { public static void main(String[] args) throws IOException { Socket socket = new Socket(); InetSocketAddress socketAddress = new InetSocketAddress("106.12.75.86", 6379); socket.connect(socketAddress, 10000); OutputStream outputStream = socket.getOutputStream(); //验证密码 outputStream.write(auth()); InputStream inputStream = socket.getInputStream(); byte[] buffer = new byte[1024]; inputStream.read(buffer); System.out.println("返回执行结果:" + new String(buffer)); //发送数据 outputStream.write(command()); inputStream.read(buffer); System.out.println("返回执行结果:" + new String(buffer)); inputStream.close(); outputStream.close(); } //验证 private static byte[] auth(){ return "*2\r\n$4\r\nAUTH\r\n$6\r\n123456\r\n".getBytes(); } //组装报文信息 private static byte[] command() { return "*3\r\n$3\r\nSET\r\n$9\r\nuser:name\r\n$6\r\nitcrud\r\n".getBytes(); }}
运行结果


这样一个最简单版本就实现了,但是这里面的编码是写死的,每次报问要自己组装太麻烦,下面来进一步优化下:
public class CommandConstant { public static final String START="*"; public static final String LENGTH="$"; public static final String LINE="\r\n"; public enum CommandEnum{ SET, GET }}
CustomClientSocket用来建立网络通信连接,并且发送数据指定到RedisServer。
public class CustomerRedisClientSocket { private Socket socket; private InputStream inputStream; private OutputStream outputStream; public CustomerRedisClientSocket(String ip,int port,String password){ try { socket=new Socket(ip,port); inputStream=socket.getInputStream(); outputStream=socket.getOutputStream(); outputStream.write ( password.getBytes ()); } catch (IOException e) { e.printStackTrace(); } } public void send(String cmd){ try { outputStream.write(cmd.getBytes()); } catch (IOException e) { e.printStackTrace(); } } public String read(){ byte[] bytes=new byte[1024]; int count=0; try { count=inputStream.read(bytes); } catch (IOException e) { e.printStackTrace(); } return new String(bytes,0,count); }}
public class CustomerRedisClient { private CustomerRedisClientSocket customerRedisClientSocket; public CustomerRedisClient(String host,int port,String password) { customerRedisClientSocket=new CustomerRedisClientSocket(host,port,password ("AUTH",password)); } public String password(String key,String value){ convertToCommand(null,key.getBytes(),value.getBytes()); return convertToCommand(null,key.getBytes(),value.getBytes()); } public String set(String key,String value){ customerRedisClientSocket.send(convertToCommand(CommandConstant.CommandEnum.SET,key.getBytes(),value.getBytes())); return customerRedisClientSocket.read(); //在等待返回结果的时候,是阻塞的 } public String get(String key){ customerRedisClientSocket.send(convertToCommand(CommandConstant.CommandEnum.GET,key.getBytes())); return customerRedisClientSocket.read(); } public static String convertToCommand(CommandConstant.CommandEnum commandEnum,byte[]... bytes){ StringBuilder stringBuilder=new StringBuilder(); if (commandEnum==null){ stringBuilder.append(CommandConstant.START).append(bytes.length).append(CommandConstant.LINE); }else{ stringBuilder.append(CommandConstant.START).append(bytes.length+1).append(CommandConstant.LINE); stringBuilder.append(CommandConstant.LENGTH).append(commandEnum.toString().length()).append(CommandConstant.LINE); stringBuilder.append(commandEnum.toString()).append(CommandConstant.LINE); } for (byte[] by:bytes){ stringBuilder.append(CommandConstant.LENGTH).append(by.length).append(CommandConstant.LINE); stringBuilder.append(new String(by)).append(CommandConstant.LINE); } return stringBuilder.toString(); }}
public class MainClient { public static void main(String[] args) { CustomerRedisClient customerRedisClient=new CustomerRedisClient("124.71.33.75",6379,"ghy20200707redis"); System.out.println(customerRedisClient.set("name","ljx")); System.out.println(customerRedisClient.get("ljx")); }}


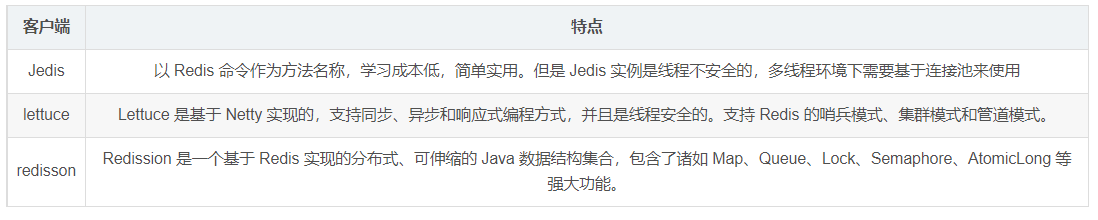
所有事物理解了本质后,实现起来其实一点都不难,通过上面两次优化,就实现了一个自己版本的客户端,但是实际开发过程中,客户端我们不用自己开发,官方推荐了以下三种客户端
Jedis api 在线网址:http://tool.oschina.net/uploads/apidocs/redis/clients/jedis/Jedis.html
redisson 官网地址:https://redisson.org/
redisson git项目地址:https://github.com/redisson/redisson
lettuce 官网地址:https://lettuce.io/
lettuce git项目地址:https://github.com/lettuce-io/lettuce-core
首先,在spring boot2之后,对redis连接的支持,默认就采用了lettuce。这就一定程度说明了lettuce 和Jedis的优劣。
4.2.4、lettuce和jedis比较
<dependency> <groupId>redis.clients</groupId> <artifactId>jedis</artifactId> <version>3.7.0</version> </dependency> <dependency> <groupId>org.junit.jupiter</groupId> <artifactId>junit-jupiter</artifactId> <version>5.7.0</version> <scope>test</scope> </dependency>
public class JedisTest { private Jedis jedis; @BeforeEach void setUp(){ // 1、建立连接 jedis = new Jedis("ip", 6379); // 2、设置密码 jedis.auth("123456"); // 3、选择库 jedis.select(0); } @Test public void testString(){ // 存入数据 String result = jedis.set("name", "张三"); System.out.println("result = " + result); // 获取数据 String name = jedis.get("name"); System.out.println(name); } @Test public void testHash(){ // 插入 hash 数据 jedis.hset("user:1", "name", "lisi"); jedis.hset("user:1", "age", "21"); // 获取 Map<String, String> map = jedis.hgetAll("user:1"); System.out.println(map); } @AfterEach void closeJedis(){ if(jedis != null){ jedis.close(); } }}
引入pom
<dependency> <groupId>org.springframework.boot</groupId> <artifactId>spring-boot-starter</artifactId> </dependency> <dependency> <groupId>org.springframework.boot</groupId> <artifactId>spring-boot-starter-test</artifactId> <scope>test</scope> </dependency> <dependency> <groupId>org.springframework.boot</groupId> <artifactId>spring-boot-starter-data-redis</artifactId> </dependency> <dependency> <groupId>org.apache.commons</groupId> <artifactId>commons-pool2</artifactId> </dependency>
配置yml
#Redis配置spring: redis: database: 6 #Redis索引0~15,默认为0 host: 127.0.0.1 port: 6379 password: #密码(默认为空) lettuce: # 这里标明使用lettuce配置 pool: max-active: 8 #连接池最大连接数(使用负值表示没有限制) max-wait: -1ms #连接池最大阻塞等待时间(使用负值表示没有限制) max-idle: 5 #连接池中的最大空闲连接 min-idle: 0 #连接池中的最小空闲连接 timeout: 10000ms #连接超时时间(毫秒)
添加Redisson的配置参数读取类RedisConfig
@Configuration@EnableCachingpublic class RedisConfig extends CachingConfigurerSupport { /** * RedisTemplate配置 * @param connectionFactory * @return */ @Bean public RedisTemplate<String, Object> redisTemplate(LettuceConnectionFactory connectionFactory) { // 配置redisTemplate RedisTemplate<String, Object> redisTemplate = new RedisTemplate<>(); redisTemplate.setConnectionFactory(connectionFactory); redisTemplate.setKeySerializer(new StringRedisSerializer ());//key序列化 redisTemplate.setValueSerializer(new GenericJackson2JsonRedisSerializer ());//value序列化 redisTemplate.afterPropertiesSet(); return redisTemplate; }}
编写测试类RedisTest
@SpringBootTestclass SpringRedisApplicationTests { // 注入 RedisTemplate @Autowired private RedisTemplate redisTemplate; // String 类型 @Test void testString () { redisTemplate.opsForValue().set("name", "ljx"); Object name = redisTemplate.opsForValue().get("name"); System.out.println(name); } // Hash 类型 @Test public void testHash () { redisTemplate.opsForHash().put("user1", "name", "clarence"); redisTemplate.opsForHash().put("user1", "age", "25"); Map map = redisTemplate.opsForHash().entries("user1"); System.out.println(map); } // List 类型 @Test public void testList () { redisTemplate.opsForList().leftPushAll("names", "xiaobai", "xiaohei", "xiaolan"); List<String> names = redisTemplate.opsForList().range("names", 0, 3); System.out.println(names); } // Set 类型 @Test public void testSet () { redisTemplate.opsForSet().add("set", "a", "b", "c"); Set<String> set = redisTemplate.opsForSet().members("set"); System.out.println(set); } // SortedSet 类型 @Test public void testSortedSet () { redisTemplate.opsForZSet().add("class", "xiaobai", 90); Set aClass = redisTemplate.opsForZSet().rangeByScore("class", 90, 100); System.out.println(aClass); Set<ZSetOperations.TypedTuple<String>> set = new HashSet<> (); set.add(new DefaultTypedTuple<> ("xiaohei", 88.0)); set.add(new DefaultTypedTuple<>("xiaohui", 94.0)); set.add(new DefaultTypedTuple<>("xiaolan", 84.0)); set.add(new DefaultTypedTuple<>("xiaolv", 82.0)); set.add(new DefaultTypedTuple<>("xiaohong", 99.0)); redisTemplate.opsForZSet().add("class", set); Set aClass1 = redisTemplate.opsForZSet().range("class", 0, 6); System.out.println(aClass1); }}
引入pom
<dependency> <groupId>org.redisson</groupId> <artifactId>redisson-spring-boot-starter</artifactId> <version>3.16.0</version> </dependency>
yml文件我就不写了,和上面一样,下面简单写下测试类
@Configurationpublic class RedissonConfig { @Autowired private RedisProperties redisProperties; @Bean public RedissonClient redissonClient() { Config config = new Config(); String redisUrl = String.format("redis://%s:%s", redisProperties.getHost() + "", redisProperties.getPort() + ""); config.useSingleServer().setAddress(redisUrl).setPassword(redisProperties.getPassword()); config.useSingleServer().setDatabase(3); return Redisson.create(config); }}
@RestController@RequestMapping("/redisson")public class RedissonController { @Autowired private StringRedisTemplate stringRedisTemplate; @GetMapping("/save") public String save(){ stringRedisTemplate.opsForValue().set("key","redisson"); return "save ok"; } @GetMapping("/get") public String get(){ return stringRedisTemplate.opsForValue().get("key"); }}
源码地址:https://gitee.com/TongHuaShuShuoWoDeJieJu/redis.git