一些权限框架一般都包含认证器和决策器,前者处理登陆验证,后者处理访问资源的控制
Spring Security的登陆请求处理如图
下面来分析一下是怎么实现认证器的
首先登陆请求会被UsernamePasswordAuthenticationFilter拦截,这个过滤器看名字就知道是一个拦截用户名密码的拦截器
主要的验证是在attemptAuthentication()方法里,他会去获取在请求中的用户名密码,并且创建一个该用户的上下文,然后在去执行一个验证过程
String username = this.obtainUsername(request);String password = this.obtainPassword(request);//创建上下文UsernamePasswordAuthenticationToken authRequest = new UsernamePasswordAuthenticationToken(username, password);this.setDetails(request, authRequest);return this.getAuthenticationManager().authenticate(authRequest);可以看看UsernamePasswordAuthenticationToken这个类,他是继承了AbstractAuthenticationToken,然后这个父类实现了Authentication
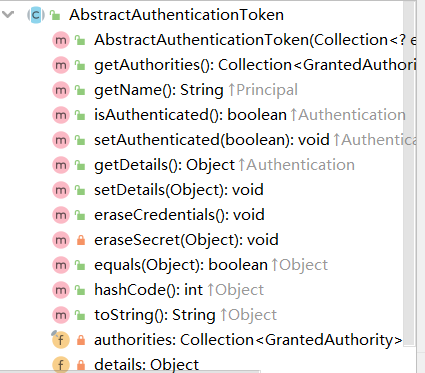
由这个类的方法和属性可得知他就是存储用户验证信息的,认证器的主要功能应该就是验证完成后填充这个类
回到UsernamePasswordAuthenticationToken中,在上面创建的过程了可以发现
public UsernamePasswordAuthenticationToken(Object principal,Object credentials){ super(null); this.principal=principal; this.credentials=credentials; //还没认证 setAuthenticated(false);}还有一个super(null)的处理,因为刚进来是还不知道有什么权限的,设置null是初始化一个空的权限
//权限利集合private final Collection<GrantedAuthority> authorities;//空的集合public static final List<GrantedAuthority> NO_AUTHORITIES = Collections.emptyList();//初始化if (authorities == null) { this.authorities = AuthorityUtils.NO_AUTHORITIES; return;}那么后续认证完还会把权限设置尽量,此时可以看UsernamePasswordAuthenticationToken的另一个重载构造器
//认证完成public UsernamePasswordAuthenticationToken(Object principal, Object credentials, Collection<? extends GrantedAuthority> authorities) { super(authorities); this.principal = principal; this.credentials = credentials; super.setAuthenticated(true); // must use super, as we override}在看源码的过程中,注释一直在强调这些上下文的填充和设置都应该是由AuthenticationManager或者AuthenticationProvider的实现类去操作
接下来会把球踢给AuthenticationManager,但他只是个接口
/** * Attempts to authenticate the passed {@link Authentication} object, returning a * fully populated <code>Authentication</code> object (including granted authorities) * if successful. **/public interface AuthenticationManager { Authentication authenticate(Authentication authentication) throws AuthenticationException;}注释也写的很清楚了,认证完成后会填充Authentication
接下来会委托给ProviderManager,因为他实现了AuthenticationManager
刚进来看authenticate()方法会发现他先遍历了一个List<AuthenticationProvider>集合
/** * Indicates a class can process a specific Authentication **/public interface AuthenticationProvider { Authentication authenticate(Authentication authentication) throws AuthenticationException; //支不支持特定类型的authentication boolean supports(Class<?> authentication);}实现这个类就可以处理不同类型的Authentication,比如上边的UsernamePasswordAuthenticationToken,对应的处理类是AbstractUserDetailsAuthenticationProvider,为啥知道呢,因为在这个supports()里
public boolean supports(Class<?> authentication) { return (UsernamePasswordAuthenticationToken.class .isAssignableFrom(authentication));}注意到这个是抽象类,实际的处理方法是在他的子类DaoAuthenticationProvider里,但是最重要的authenticate()方法子类好像没有继承,看看父类是怎么实现这个方法的
首先是继续判断Authentication是不是特定的类
Assert.isInstanceOf(UsernamePasswordAuthenticationToken.class, authentication, () -> messages.getMessage( "AbstractUserDetailsAuthenticationProvider.onlySupports", "Only UsernamePasswordAuthenticationToken is supported"));查询根据用户名用户,这次就是到了子类的方法了,因为这个方法是抽象的
user=retrieveUser(username, (UsernamePasswordAuthenticationToken)authentication);接着DaoAuthenticationProvider会调用真正实现查询用户的类UserDetailsService
UserDetails loadedUser = this.getUserDetailsService().loadUserByUsername(username);UserDetailsService这个类信息就不陌生了,我们一般都会去实现这个类来自定义查询用户的方式,查询完后会返回一个UserDetails,当然也可以继承这个类来扩展想要的字段,主要填充的是权限信息和密码
检验用户,如果获取到的UserDetails是null,则抛异常,不为空则继续校验
//检验用户合法性preAuthenticationChecks.check(user);//校验密码additionalAuthenticationChecks(user,(UsernamePasswordAuthenticationToken) authentication);第一个教育是判断用户的合法性,就是判断UserDetails里的几个字段
//账号是否过期boolean isAccountNonExpired();//账号被锁定或解锁状态。boolean isAccountNonLocked();//密码是否过期boolean isCredentialsNonExpired();//是否启用boolean isEnabled();第二个则是由子类实现的,判断从数据库获取的密码和请求中的密码是否一致,因为用的登陆方式是根据用户名称登陆,所以有检验密码的步骤
String presentedPassword = authentication.getCredentials().toString(); if (!passwordEncoder.matches(presentedPassword, userDetails.getPassword())) { logger.debug("Authentication failed: password does not match stored value"); throw new BadCredentialsException(messages.getMessage( "AbstractUserDetailsAuthenticationProvider.badCredentials", "Bad credentials")); }需要主要的是请求中的密码是被加密过的,所以从数据库获取到的密码也应该是被加密的
注意到当完成校验的时候会把信息放入缓存
//当没有从缓存中获取到值时,这个字段会被设置成falseif (!cacheWasUsed) { this.userCache.putUserInCache(user); } //下次进来的时候回去获取 UserDetails user = this.userCache.getUserFromCache(username);如果是从缓存中获取,也是会走检验逻辑的
最后完成检验,并填充一个完整的Authentication
return createSuccessAuthentication(principalToReturn, authentication, user);由上述流程来看,Security的检验过程还是比较清晰的,通过AuthenticationManager来委托给ProviderManager,在通过具体的实现类来处理请求,在这个过程中,将查询用户的实现和验证代码分离开来
整个过程看着像是策略模式,后边将变化的部分抽离出来,实现解耦
前边提到的认证成功会调用createSuccessAuthentication()方法,里边的内容很简单
UsernamePasswordAuthenticationToken result = new UsernamePasswordAuthenticationToken( principal, authentication.getCredentials(), authoritiesMapper.mapAuthorities(user.getAuthorities())); result.setDetails(authentication.getDetails());public UsernamePasswordAuthenticationToken(Object principal, Object credentials, Collection<? extends GrantedAuthority> authorities) { super(authorities); this.principal = principal; this.credentials = credentials; super.setAuthenticated(true); // must use super, as we override }这次往supe里放了权限集合,父类的处理是判断里边的权限有没有空的,没有则转换为只读集合
for (GrantedAuthority a : authorities) { if (a == null) { throw new IllegalArgumentException( "Authorities collection cannot contain any null elements"); }}ArrayList<GrantedAuthority> temp = new ArrayList<>(authorities.size());temp.addAll(authorities);this.authorities = Collections.unmodifiableList(temp);回到ProviderManager里的authenticate方法,当我们终于从
result = provider.authenticate(authentication);走出来时,后边还有什么操作
if (result != null) { copyDetails(authentication, result); break; }删除敏感信息
((CredentialsContainer) result).eraseCredentials();这个过程会将一些字段设置为null,可以实现eraseCredentials()方法来自定义需要删除的信息
最后返回到UsernamePasswordAuthenticationFilter中通过过滤
这就是Spring Security实现认证的过程了
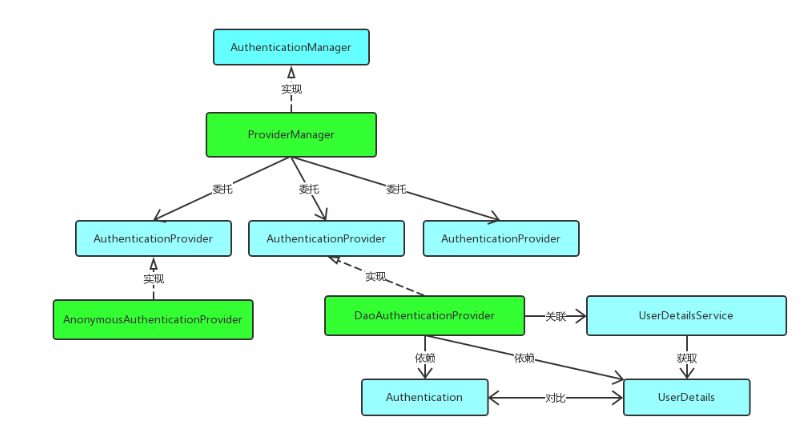
通过实现自己的上下文Authentication和处理类AuthenticationProvider以及具体的查询用户的方法就可以自定义自己的登陆实现
具体可以看Spring Security自定义认证器