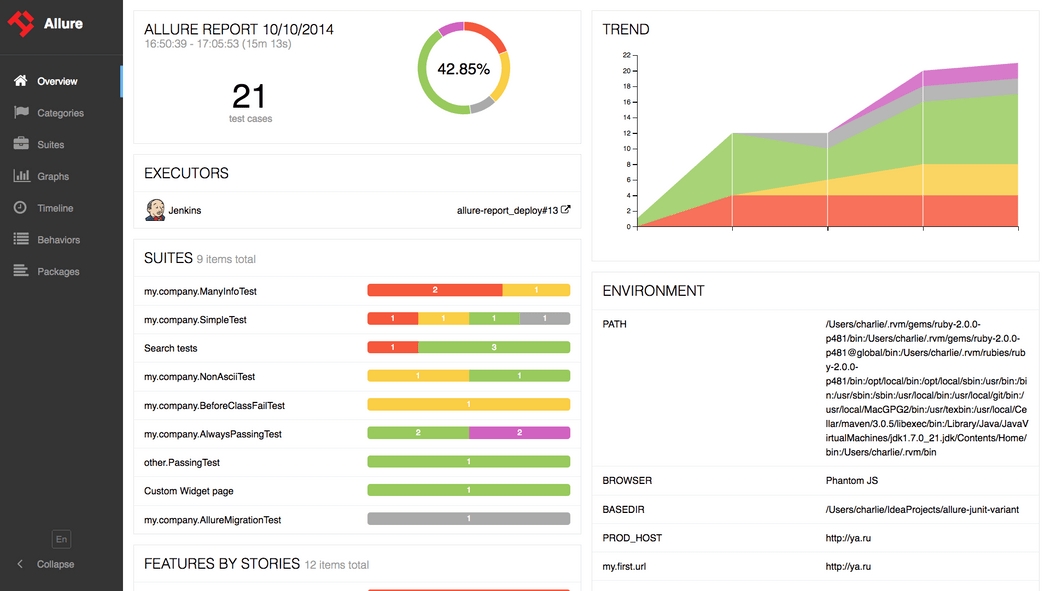
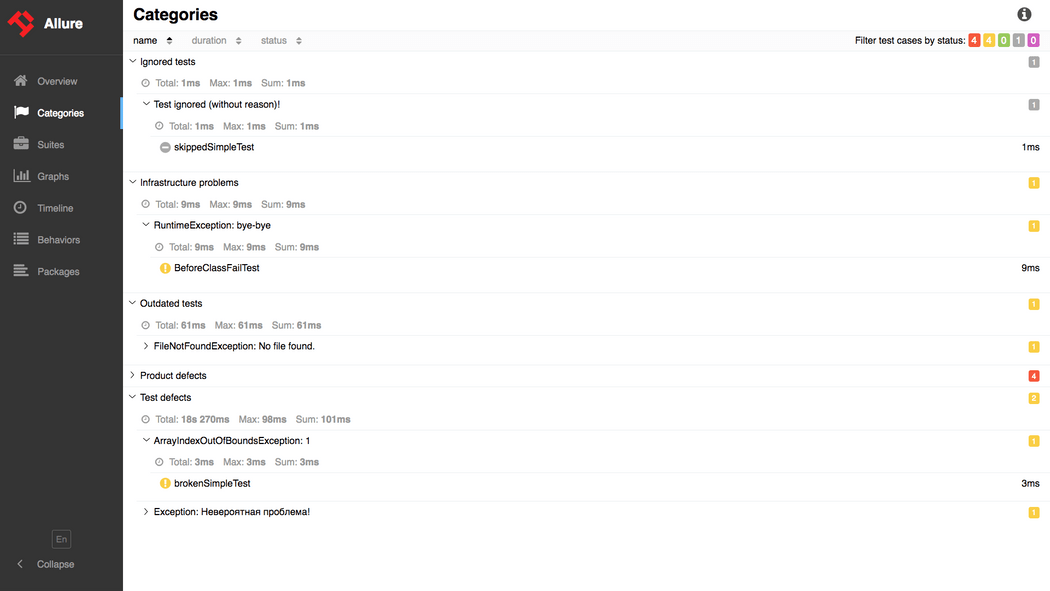
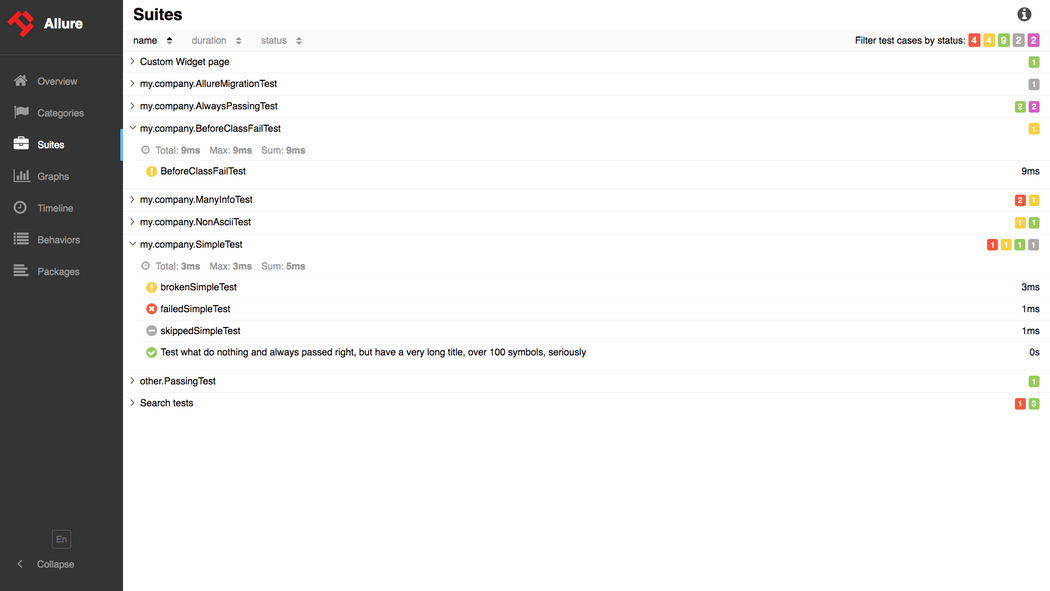
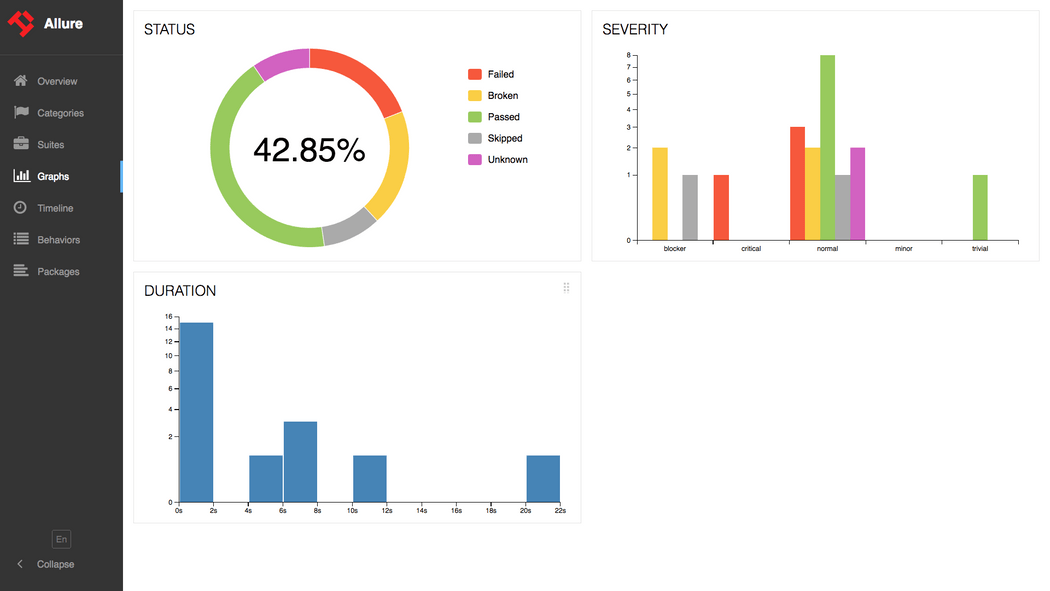
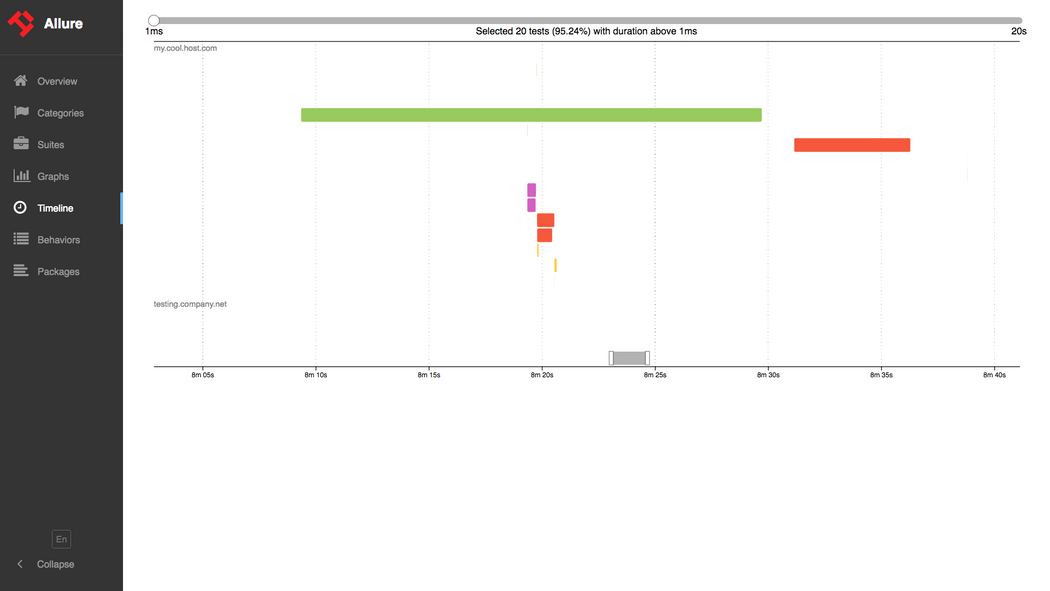
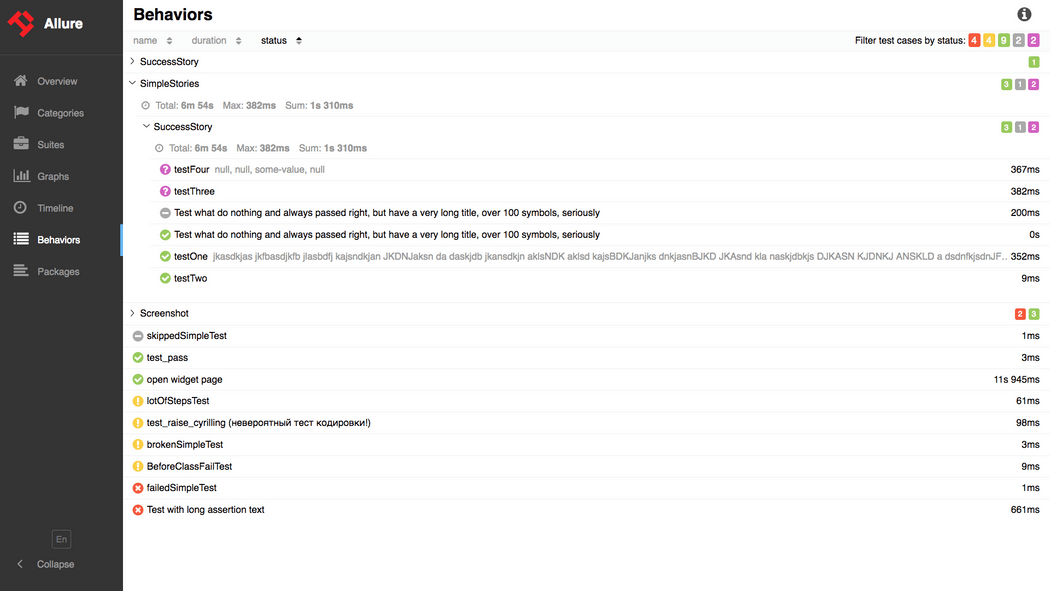
假如你想让测试报告变得漂亮一点,那你一定会在搜索引擎中找到Allure测试报告的。Allure官方给出了个在线网站,访问以下链接就能一睹为快:
https://demo.qameta.io/allure/

可以在左下角切换为中文报告:
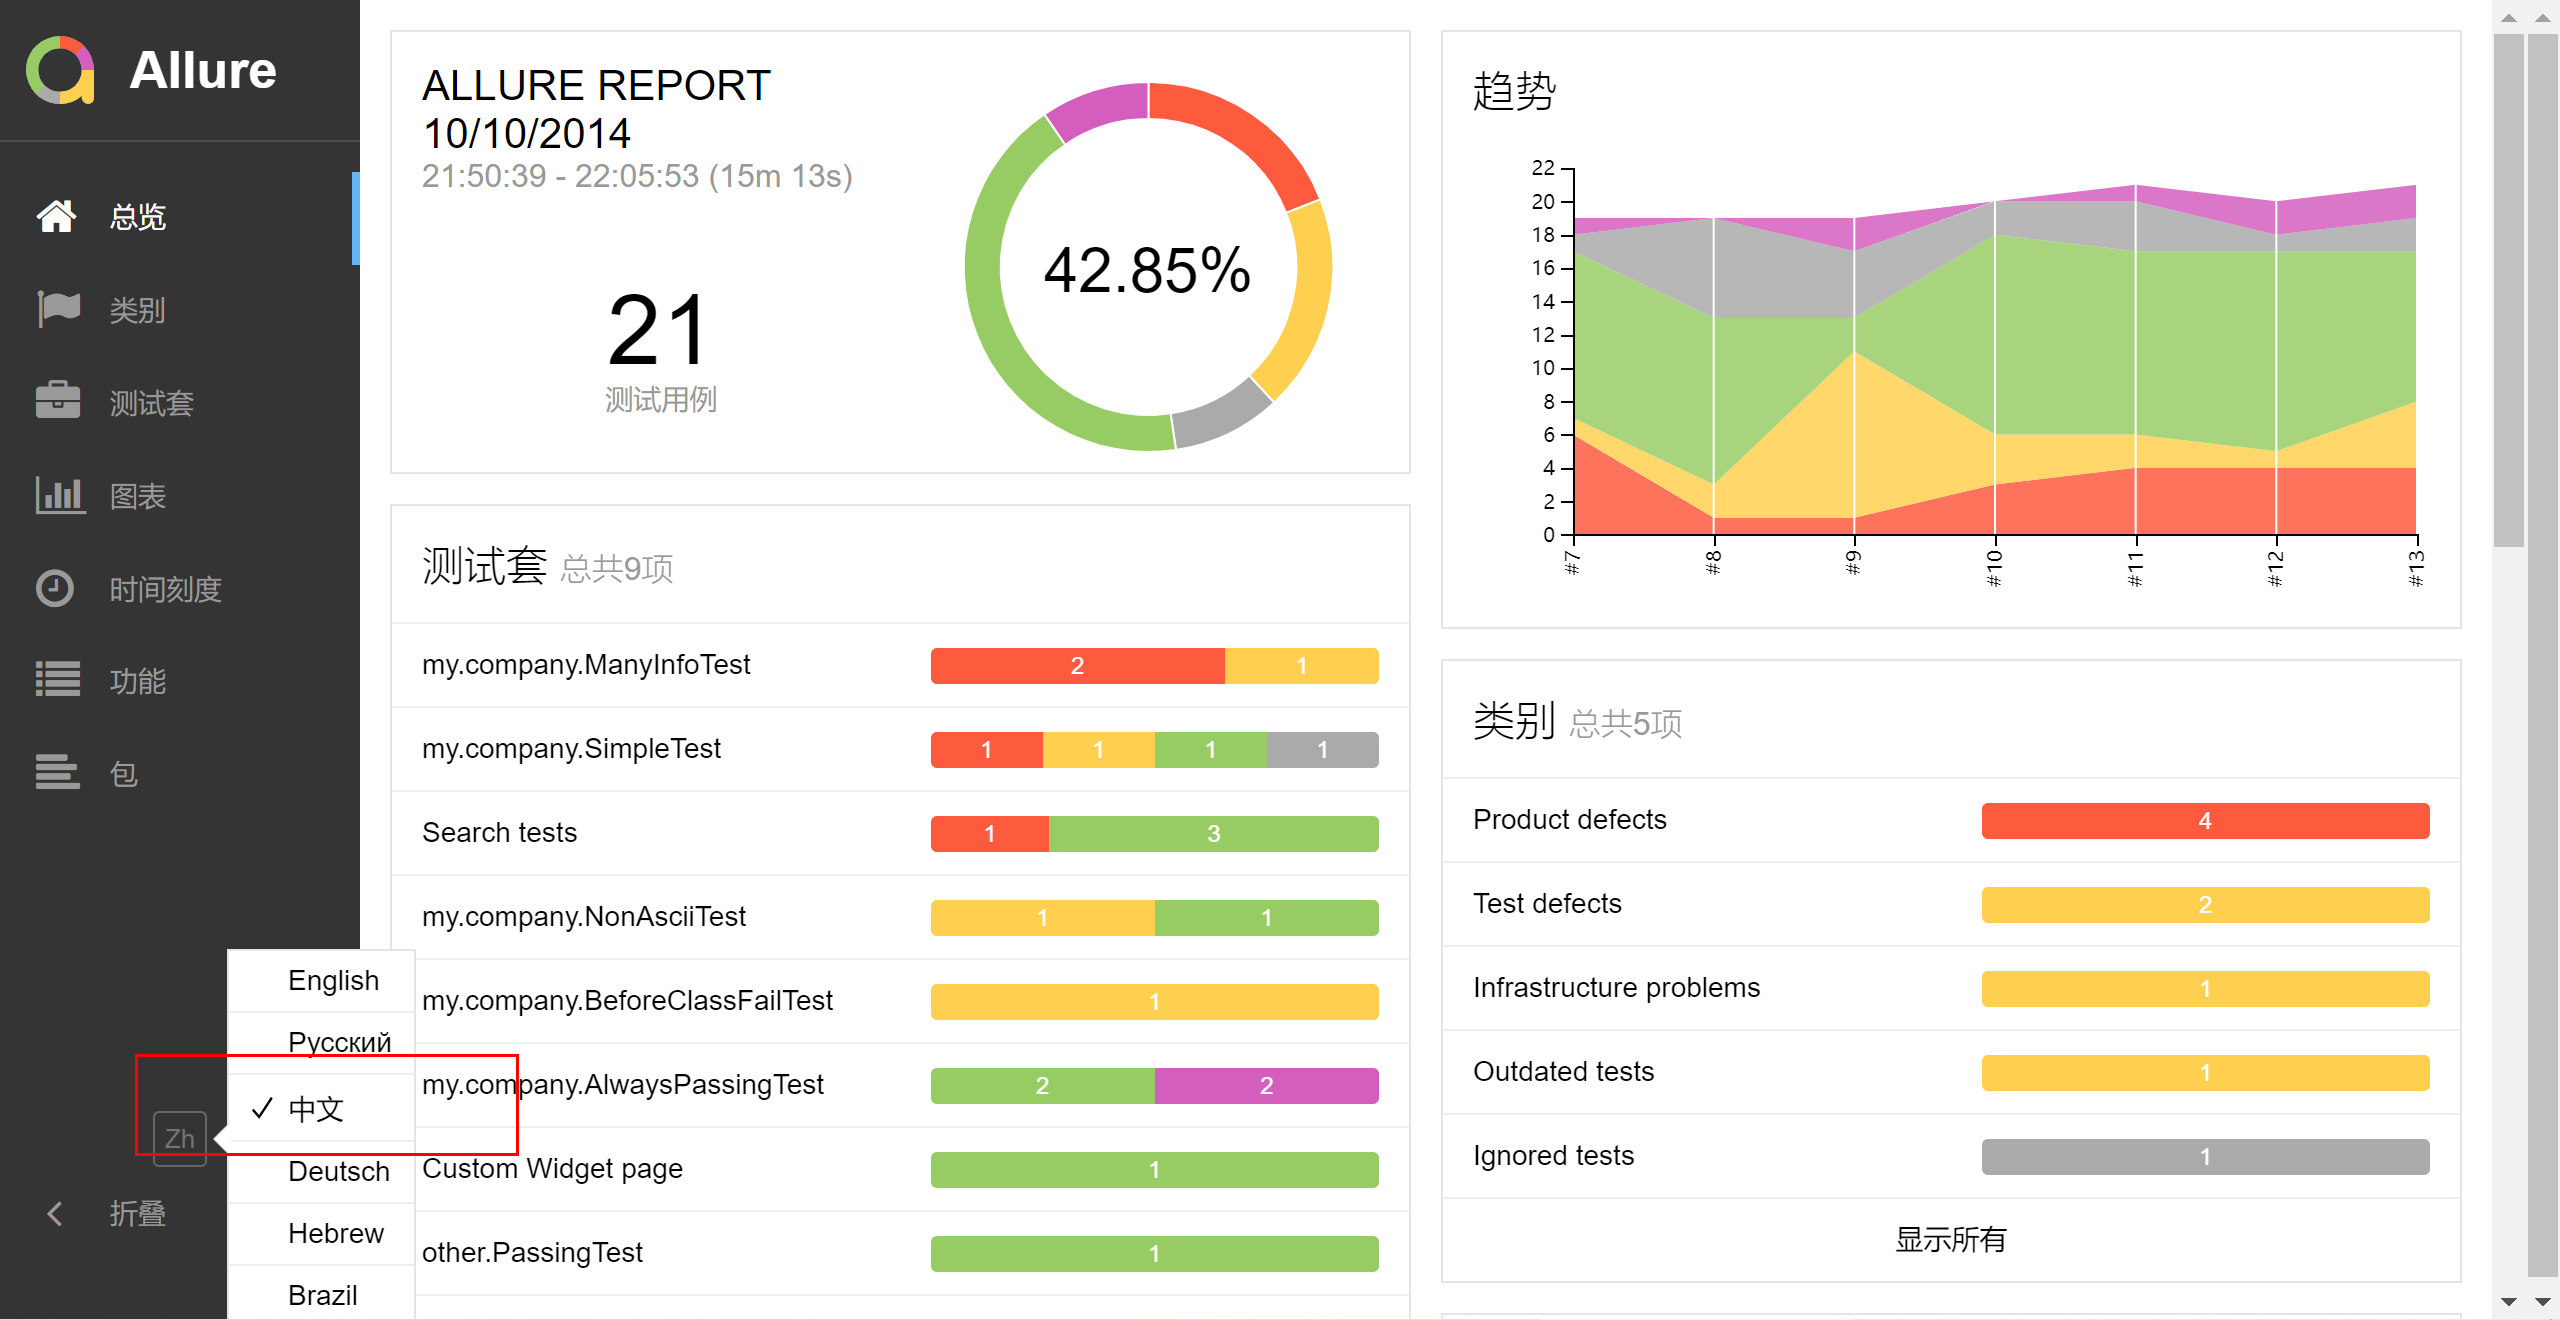
如此好看的测试报告,哪个老板不喜欢呢?
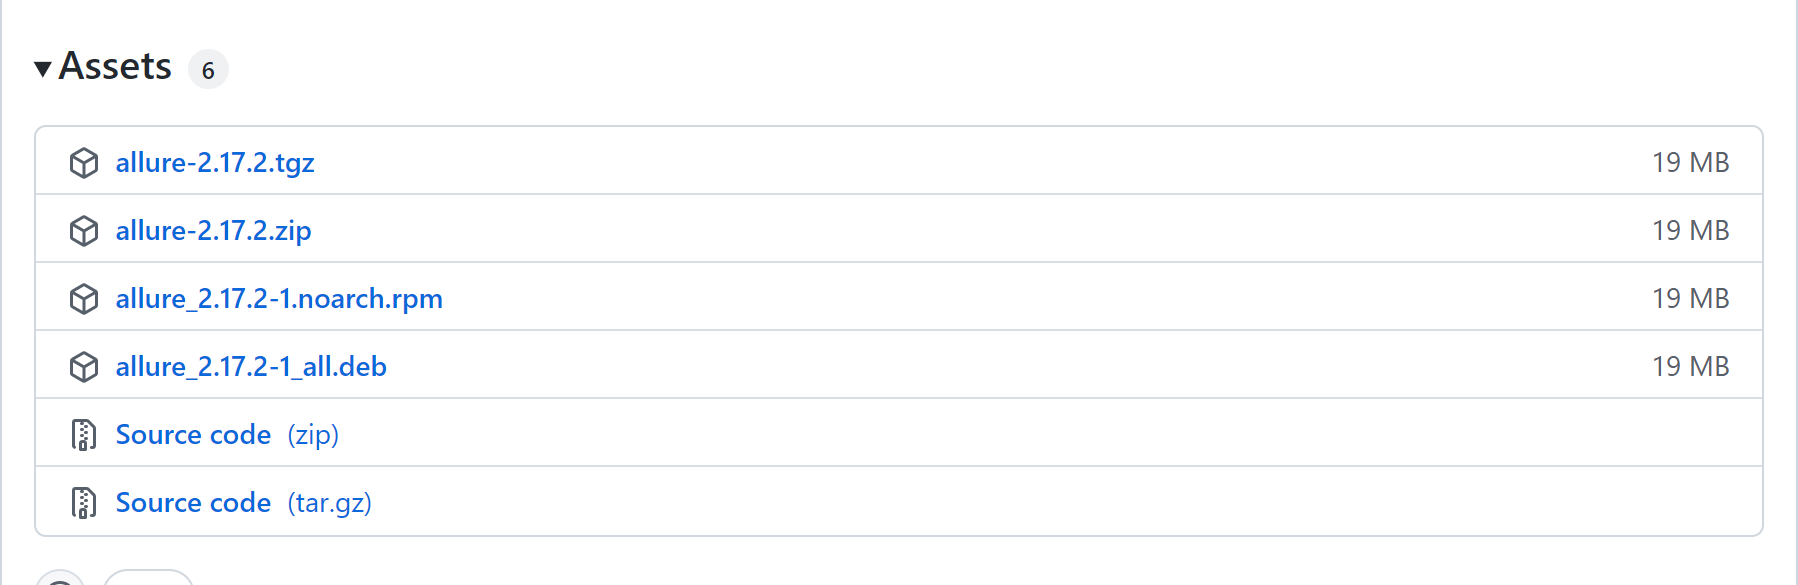
1.在GitHub releases:
https://github.com/allure-framework/allure2/releases
或者Maven Central:
https://repo.maven.apache.org/maven2/io/qameta/allure/allure-commandline/
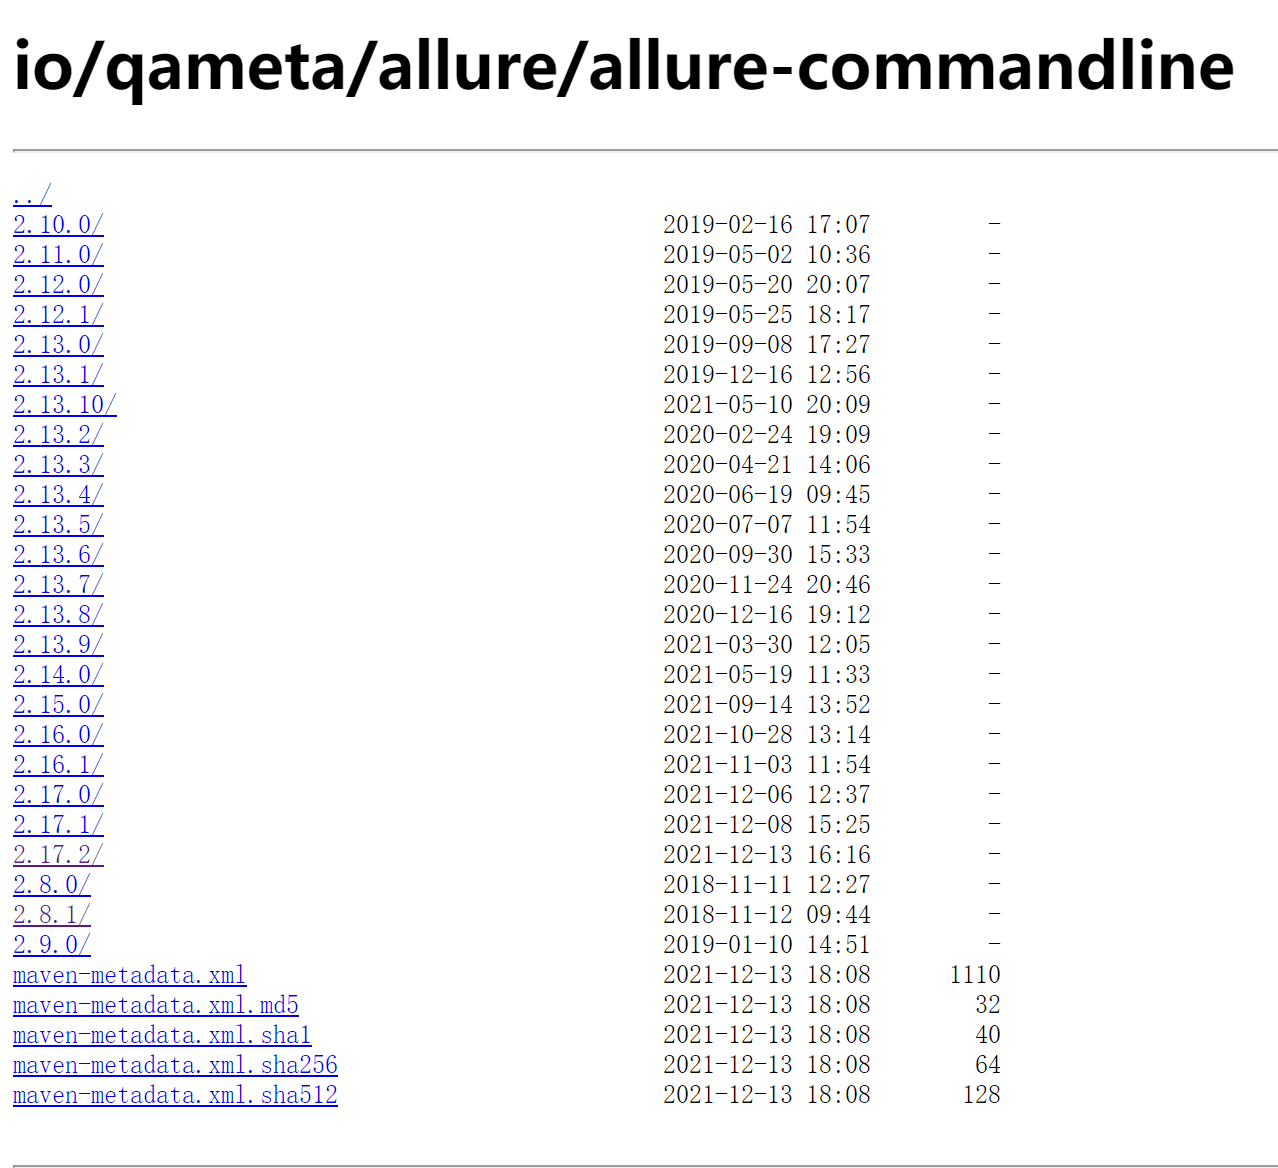
下载安装包并解压。
2.找到bin目录,Windows使用allure.bat,Unix使用allure:
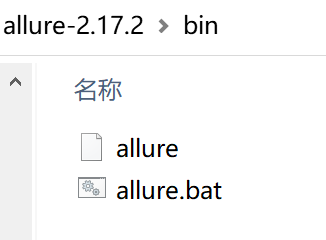
3.为了后续方便使用,可以把bin完整路径添加到系统环境变量PATH中,然后在命令行直接输入allure命令。
官方也给出了通过Linux的ppa、Mac的brew、Windows的scoop的安装方式,不过对于咱们老百姓来说,不如手动下载包来安装实在。
安装后就可以检查是否安装成功了:
$ allure --version2.17.2因为Allure是用Java写的,所以如果无法运行,那么要检查下有没有安装Java。

在Maven的pom.xml中添加:
<properties> <aspectj.version>1.8.10</aspectj.version></properties><dependencies> <dependency> <groupId>io.qameta.allure</groupId> <artifactId>allure-testng</artifactId> <version>LAST_VERSION</version> <scope>test</scope> </dependency></dependencies><build> <plugins> <plugin> <groupId>org.apache.maven.plugins</groupId> <artifactId>maven-surefire-plugin</artifactId> <version>2.20</version> <configuration> <argLine> -javaagent:"${settings.localRepository}/org/aspectj/aspectjweaver/${aspectj.version}/aspectjweaver-${aspectj.version}.jar" </argLine> </configuration> <dependencies> <dependency> <groupId>org.aspectj</groupId> <artifactId>aspectjweaver</artifactId> <version>${aspectj.version}</version> </dependency> </dependencies> </plugin> </plugins></build>然后执行命令:
$ mvn clean test在target/allure-results目录就会生成allure测试报告,再执行命令:
$ allure serve target/allure-resultsAllure会创建一个Jetty服务器,拉起默认浏览器打开测试报告。
添加测试描述:
package my.company.tests;import org.junit.Test;import io.qameta.allure.Description;@Testpublic class MyTests { @Test @Description("Some detailed test description") public void testSomething() throws Exception { ... }}添加测试步骤描述,除了文字,Allure2通过反射机制,能够在@Step中获取参数,比如:
public class User { private String name; private String password; ...}import io.qameta.allure.Step;...@Step("Type {user.name} / {user.password}.")public void loginWith(User user) { ...}添加测试报告的附件,可以是String或byte[]类型,不是显式的话Allure会调用toString()尝试隐式转换:
import io.qameta.allure.Attachment;...@Attachmentpublic String performedActions(ActionSequence actionSequence) { return actionSequence.toString();}@Attachment(value = "Page screenshot", type = "image/png")public byte[] saveScreenshot(byte[] screenShot) { return screenShot;}type用于指定MIME类型,不是必须的,Allure会根据内容自动适配。
除了注解,也可以在代码中添加:
import io.qameta.allure.Allure;...Allure.addAttachment("My attachment", "My attachment content");Path content = Paths.get("path-to-my-attachment-contnet");try (InputStream is = Files.newInputStream(content)) { Allure.addAttachment("My attachment", is);}添加超链接,有3个注解@Link、@Issue、@TmsLink(test management system):
import io.qameta.allure.Link;import io.qameta.allure.Issue;import io.qameta.allure.TmsLink;@Link("https://example.org")@Link(name = "allure", type = "mylink")public void testSomething() { ...}@Issue("123")@Issue("432")public void testSomething() { ...}@TmsLink("test-1")@TmsLink("test-2")public void testSomething() { ...}链接类型可以在properties中定义,Allure会用注解中的值替换{}:
allure.link.mylink.pattern=https://example.org/mylink/{}allure.link.issue.pattern=https://example.org/issue/{}allure.link.tms.pattern=https://example.org/tms/{}添加严重程度标识:
package org.example.tests;import org.junit.Test;import io.qameta.allure.Severity;import io.qameta.allure.SeverityLevel;public class MyTest { @Test @Severity(SeverityLevel.CRITICAL) public void testSomething() throws Exception { // ... }}在敏捷开发中有Epic、Feature和Stories三个概念,用于对需求进行分层管理,同理可以运用到测试分层管理:
package org.example.tests;import org.junit.Test;import io.qameta.allure.Epic;import io.qameta.allure.Feature;import io.qameta.allure.Story;@Epic("Allure examples")@Feature("Junit 4 support")public class MyTest { @Test @Story("Base support for bdd annotations") @Story("Advanced support for bdd annotations") public void testSomething() throws Exception { // ... }}执行以下命令安装:
$ pip install allure-pytest它会同时安装allure-pytest和allure-python-commons两个包。
然后指定Allure测试报告目录:
$ pytest --alluredir=/tmp/my_allure_results最后执行命令打开报告:
$ allure serve /tmp/my_allure_resultsAllure会创建一个Jetty服务器,拉起默认浏览器打开测试报告。
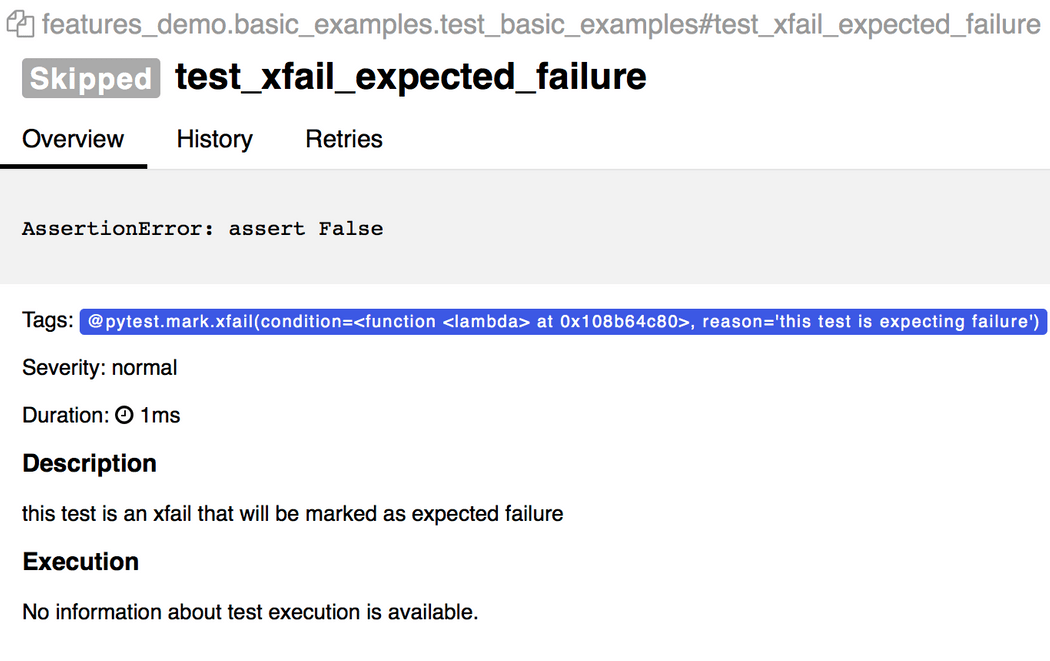
Allure会根据pytest的结果状态进行标记:
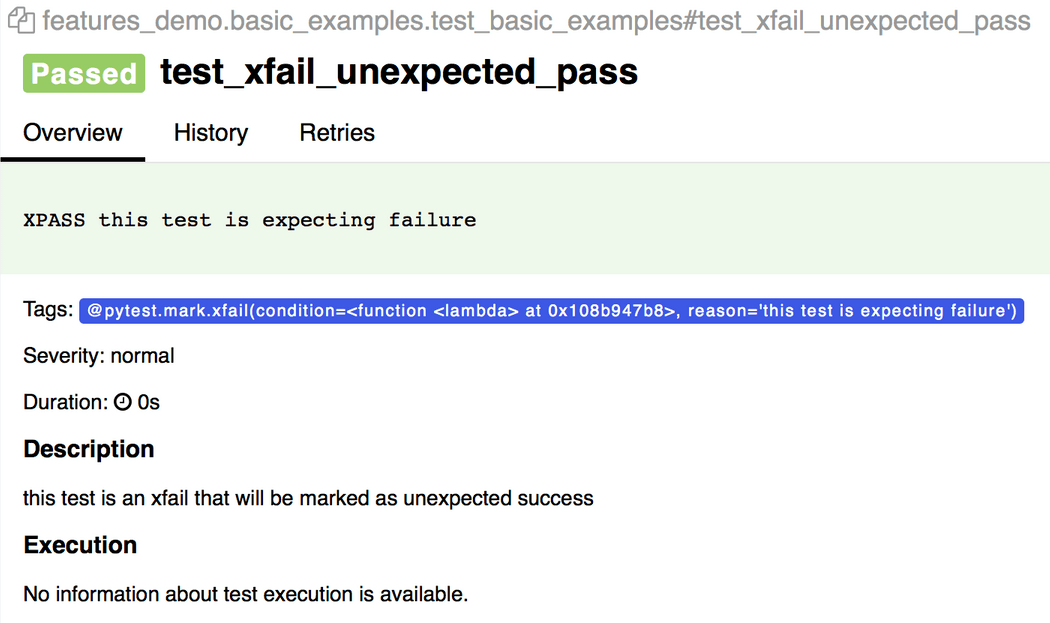
import pytestdef test_success(): """this test succeeds""" assert Truedef test_failure(): """this test fails""" assert Falsedef test_skip(): """this test is skipped""" pytest.skip('for a reason!')def test_broken(): raise Exception('oops')@pytest.mark.xfail(condition=lambda: True, reason='this test is expecting failure')def test_xfail_expected_failure(): """this test is an xfail that will be marked as expected failure""" assert False@pytest.mark.xfail(condition=lambda: True, reason='this test is expecting failure')def test_xfail_unexpected_pass(): """this test is an xfail that will be marked as unexpected success""" assert True会在Allure报告中展示:
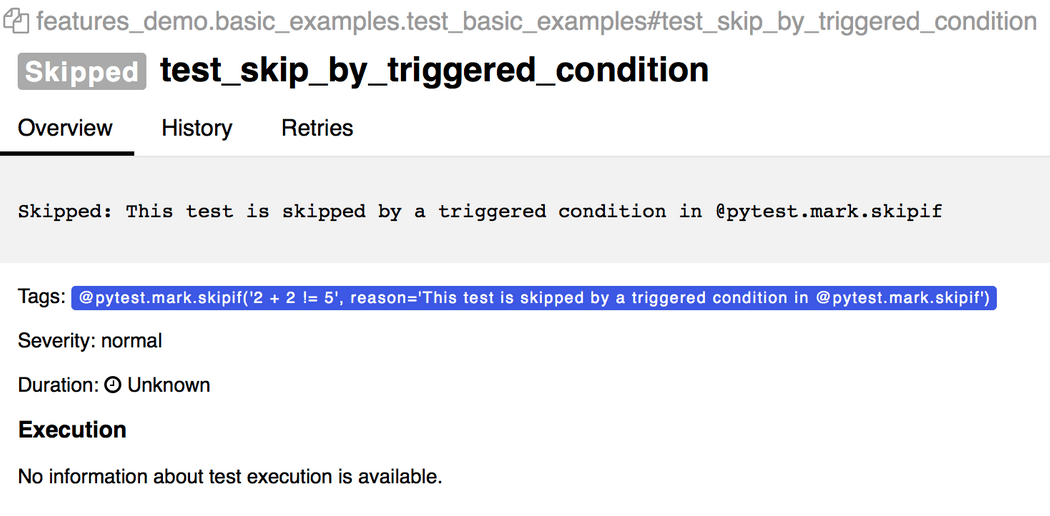
@pytest.mark.skipif('2 + 2 != 5', reason='This test is skipped by a triggered condition in @pytest.mark.skipif')def test_skip_by_triggered_condition(): pass会在Allure报告中展示:
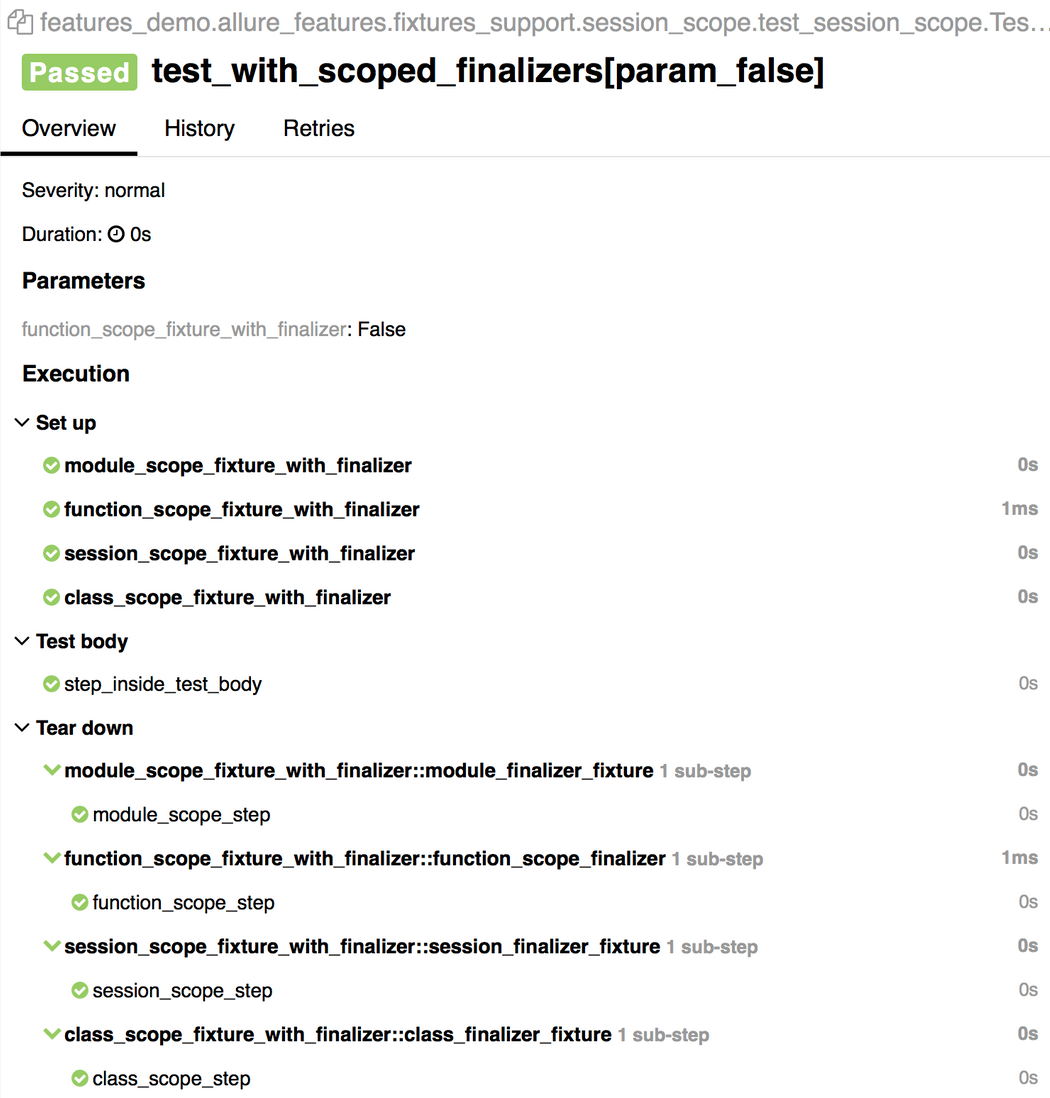
@pytest.fixture(params=[True, False], ids=['param_true', 'param_false'])def function_scope_fixture_with_finalizer(request): if request.param: print('True') else: print('False') def function_scope_finalizer(): function_scope_step() request.addfinalizer(function_scope_finalizer)@pytest.fixture(scope='class')def class_scope_fixture_with_finalizer(request): def class_finalizer_fixture(): class_scope_step() request.addfinalizer(class_finalizer_fixture)@pytest.fixture(scope='module')def module_scope_fixture_with_finalizer(request): def module_finalizer_fixture(): module_scope_step() request.addfinalizer(module_finalizer_fixture)@pytest.fixture(scope='session')def session_scope_fixture_with_finalizer(request): def session_finalizer_fixture(): session_scope_step() request.addfinalizer(session_finalizer_fixture)class TestClass(object): def test_with_scoped_finalizers(self, function_scope_fixture_with_finalizer, class_scope_fixture_with_finalizer, module_scope_fixture_with_finalizer, session_scope_fixture_with_finalizer): step_inside_test_body()会在Allure报告中展示(fixtures会展示在Set up和Tear down中):
而对于fixture中的结果状态,Allure也会进行标记:
import pytest@pytest.fixturedef skip_fixture(): pytest.skip()@pytest.fixturedef fail_fixture(): assert False@pytest.fixturedef broken_fixture(): raise Exception("Sorry, it's broken.")def test_with_pytest_skip_in_the_fixture(skip_fixture): passdef test_with_failure_in_the_fixture(fail_fixture): passdef test_with_broken_fixture(broken_fixture): pass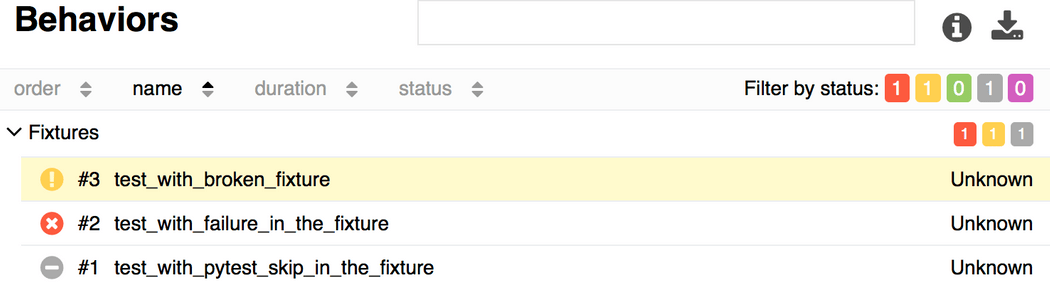
import allureimport pytest@allure.stepdef simple_step(step_param1, step_param2 = None): pass@pytest.mark.parametrize('param1', [True, False], ids=['id explaining value 1', 'id explaining value 2'])def test_parameterize_with_id(param1): simple_step(param1)@pytest.mark.parametrize('param1', [True, False])@pytest.mark.parametrize('param2', ['value 1', 'value 2'])def test_parametrize_with_two_parameters(param1, param2): simple_step(param1, param2)@pytest.mark.parametrize('param1', [True], ids=['boolean parameter id'])@pytest.mark.parametrize('param2', ['value 1', 'value 2'])@pytest.mark.parametrize('param3', [1])def test_parameterize_with_uneven_value_sets(param1, param2, param3): simple_step(param1, param3) simple_step(param2)Allure会展示每个test和id:
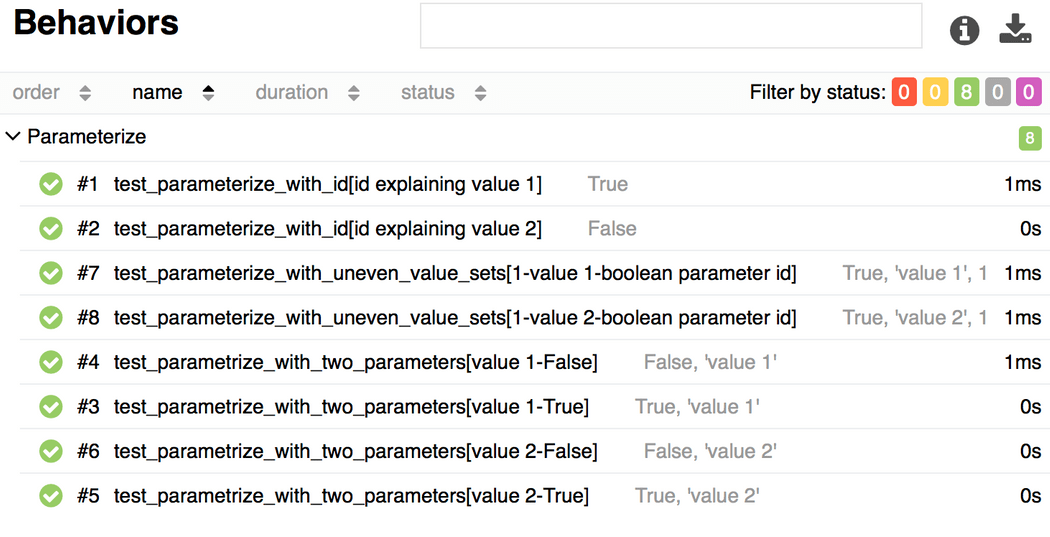
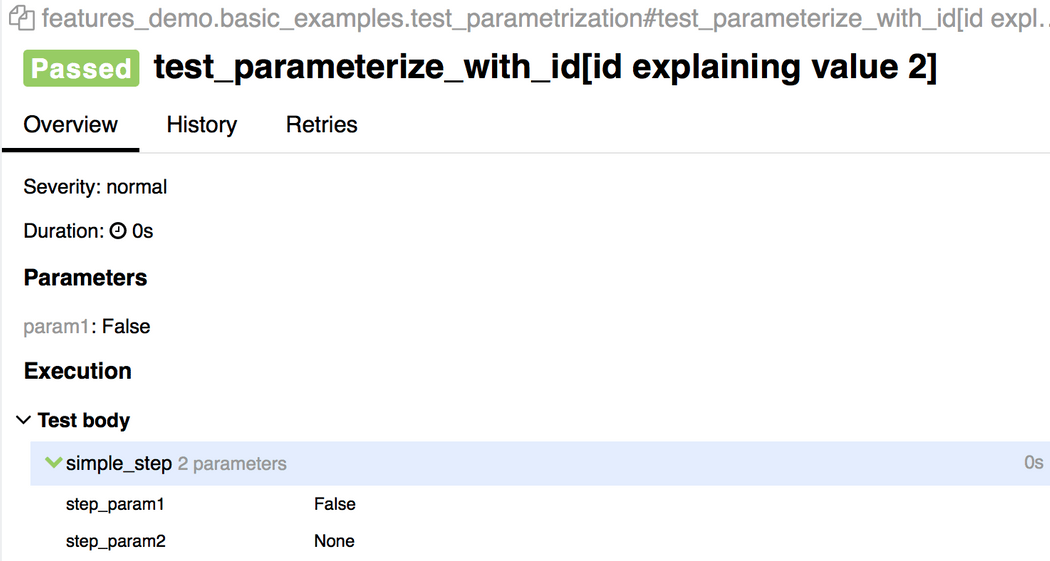
以及运行细节:
import allureimport pytestfrom .steps import imported_step@allure.stepdef passing_step(): pass@allure.stepdef step_with_nested_steps(): nested_step()@allure.stepdef nested_step(): nested_step_with_arguments(1, 'abc')@allure.stepdef nested_step_with_arguments(arg1, arg2): passdef test_with_imported_step(): passing_step() imported_step()def test_with_nested_steps(): passing_step() step_with_nested_steps()
step能从入参中读取值:
import allure@allure.step('Step with placeholders in the title, positional: "{0}", keyword: "{key}"')def step_with_title_placeholders(arg1, key=None): passdef test_steps_with_placeholders(): step_with_title_placeholders(1, key='something') step_with_title_placeholders(2) step_with_title_placeholders(3, 'anything')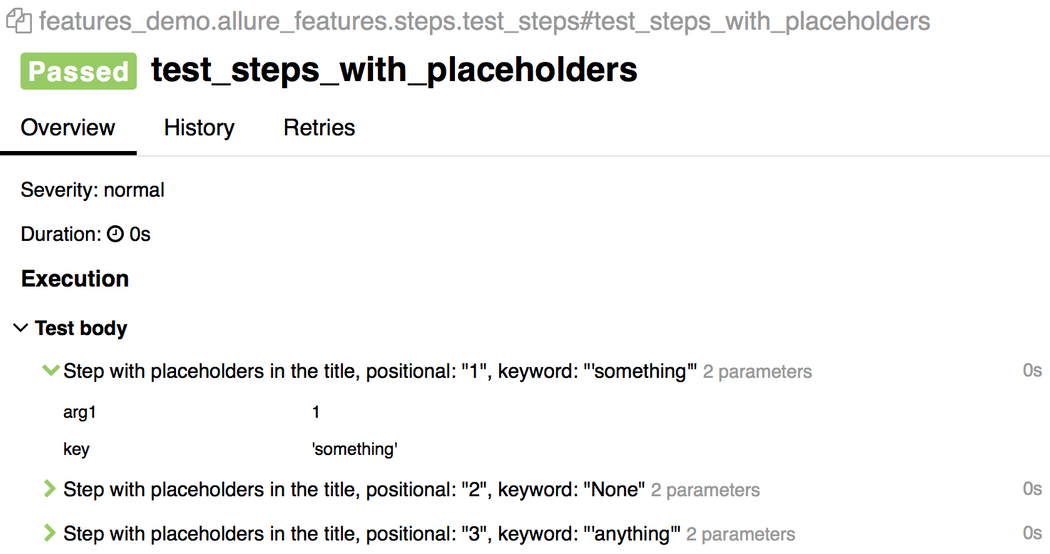
step也能在conftest.py中用到fixtures上:
import allureimport pytest@allure.step('step in conftest.py')def conftest_step(): pass@pytest.fixturedef fixture_with_conftest_step(): conftest_step()import allurefrom .steps import imported_step@allure.stepdef passing_step(): passdef test_with_step_in_fixture_from_conftest(fixture_with_conftest_step): passing_step()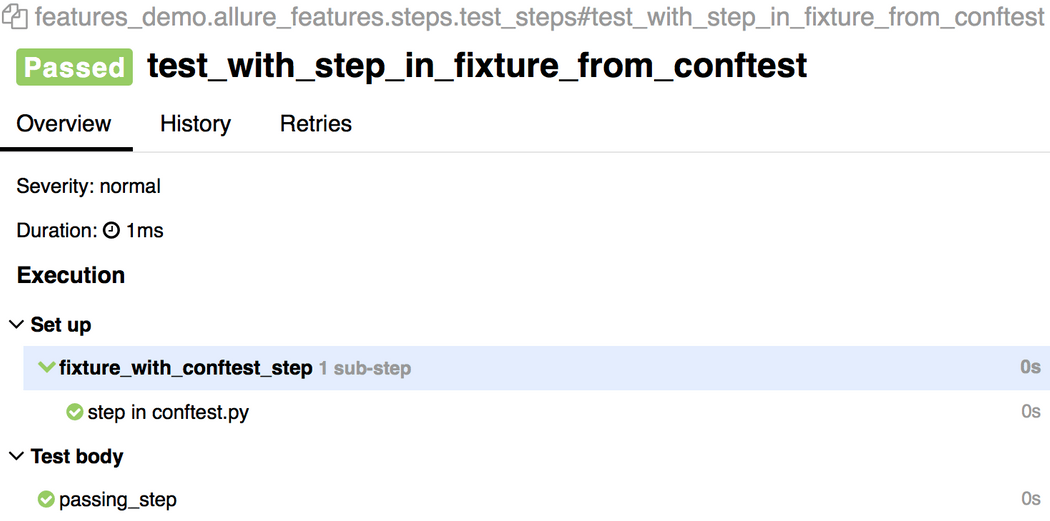
给Allure测试报告添加附件,allure.attach(body, name, attachment_type, extension):
allure.attachment_type中的某个值)import allureimport pytest@pytest.fixturedef attach_file_in_module_scope_fixture_with_finalizer(request): allure.attach('A text attacment in module scope fixture', 'blah blah blah', allure.attachment_type.TEXT) def finalizer_module_scope_fixture(): allure.attach('A text attacment in module scope finalizer', 'blah blah blah blah', allure.attachment_type.TEXT) request.addfinalizer(finalizer_module_scope_fixture)def test_with_attacments_in_fixture_and_finalizer(attach_file_in_module_scope_finalizer): passdef test_multiple_attachments(): allure.attach.file('./data/totally_open_source_kitten.png', attachment_type=allure.attachment_type.PNG) allure.attach('<head></head><body> a page </body>', 'Attach with HTML type', allure.attachment_type.HTML)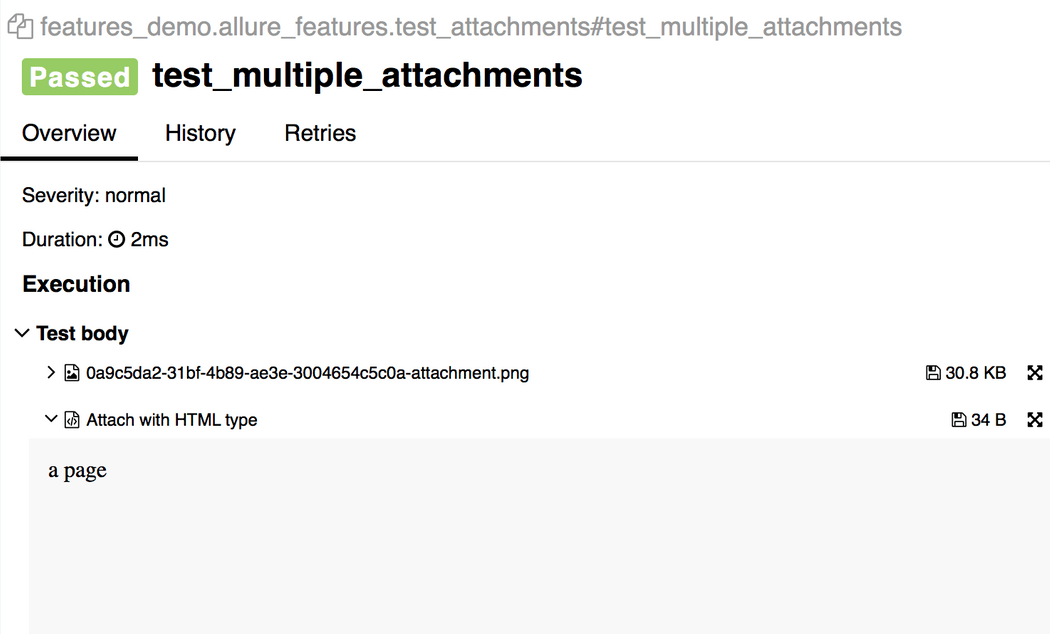
既可以使用装饰器@allure.description或@allure.description_html添加描述:
import allure@allure.description_html("""<h1>Test with some complicated html description</h1><table > <tr> <th>Firstname</th> <th>Lastname</th> <th>Age</th> </tr> <tr align="center"> <td>William</td> <td>Smith</td> <td>50</td> </tr> <tr align="center"> <td>Vasya</td> <td>Jackson</td> <td>94</td> </tr></table>""")def test_html_description(): assert True@allure.description("""Multiline test description.That comes from the allure.description decorator.Nothing special about it.""")def test_description_from_decorator(): assert 42 == int(6 * 7)def test_unicode_in_docstring_description(): """Unicode in description. Этот тест проверяет юникод. 你好伙计. """ assert 42 == int(6 * 7)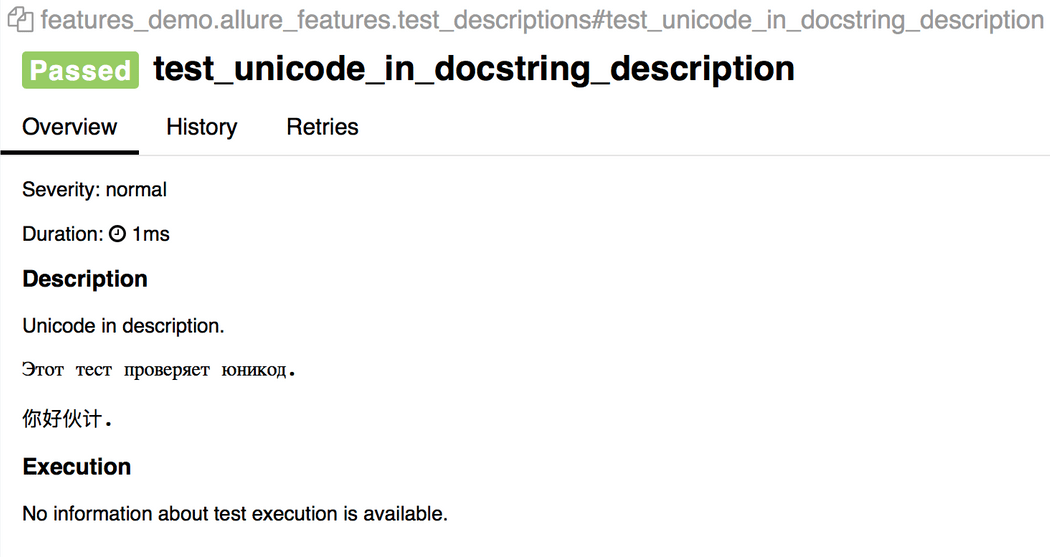
也可以在代码中使用allure.dynamic.description动态添加描述:
import allure@allure.description("""This description will be replaced at the end of the test.""")def test_dynamic_description(): assert 42 == int(6 * 7) allure.dynamic.description('A final description.')既可以使用装饰器@allure.title添加标题:
import allureimport pytest@allure.title("This test has a custom title")def test_with_a_title(): assert 2 + 2 == 4@allure.title("This test has a custom title with unicode: Привет!")def test_with_unicode_title(): assert 3 + 3 == 6并且可以获取参数值:
@allure.title("Parameterized test title: adding {param1} with {param2}")@pytest.mark.parametrize('param1,param2,expected', [ (2, 2, 4), (1, 2, 5)])def test_with_parameterized_title(param1, param2, expected): assert param1 + param2 == expected也可以在代码中使用allure.dynamic.title动态添加:
@allure.title("This title will be replaced in a test body")def test_with_dynamic_title(): assert 2 + 2 == 4 allure.dynamic.title('After a successful test finish, the title was replaced with this line.')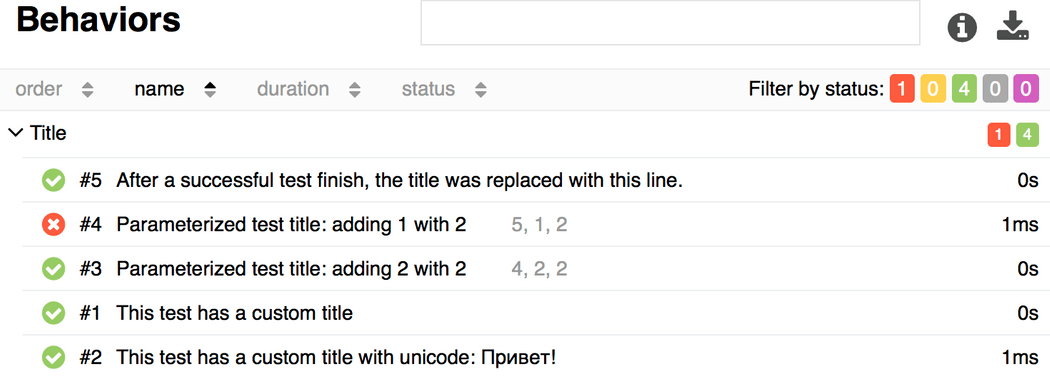
@allure.link、 @allure.issue 和@allure.testcase:
import allureTEST_CASE_LINK = 'https://github.com/qameta/allure-integrations/issues/8#issuecomment-268313637'@allure.link('https://www.youtube.com/watch?v=4YYzUTYZRMU')def test_with_link(): pass@allure.link('https://www.youtube.com/watch?v=Su5p2TqZxKU', name='Click me')def test_with_named_link(): pass@allure.issue('140', 'Pytest-flaky test retries shows like test steps')def test_with_issue_link(): pass@allure.testcase(TEST_CASE_LINK, 'Test case title')def test_with_testcase_link(): pass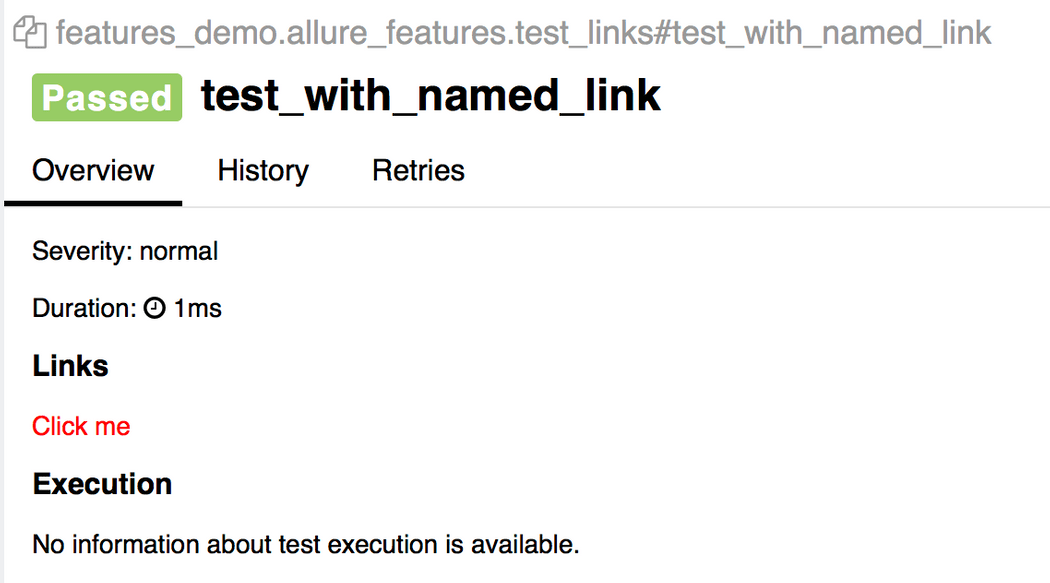
@allure.link会提供可点击的超链接。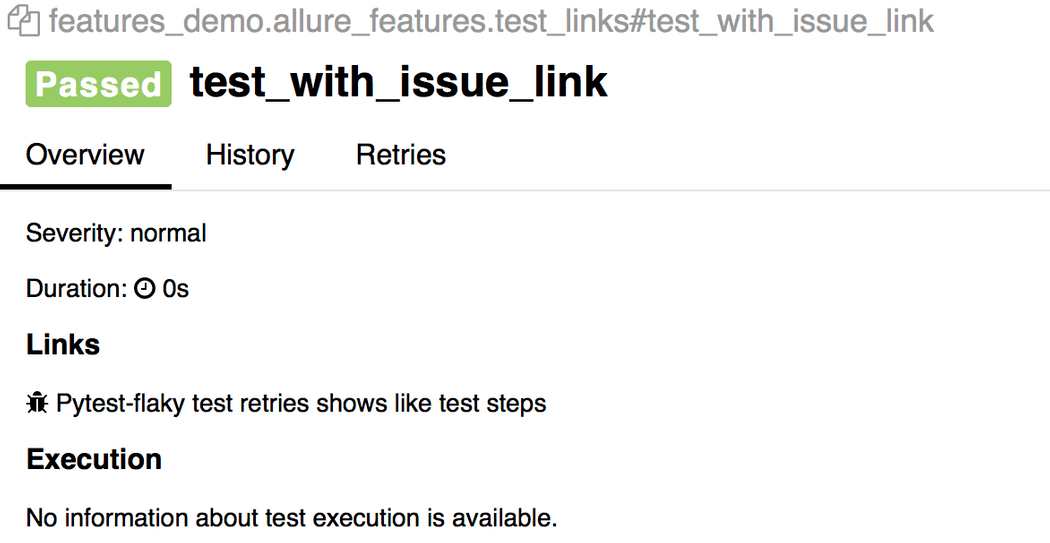
@allure.issue会有个可供点击的图标。
issure链接模板通过--allure-link-pattern定义:
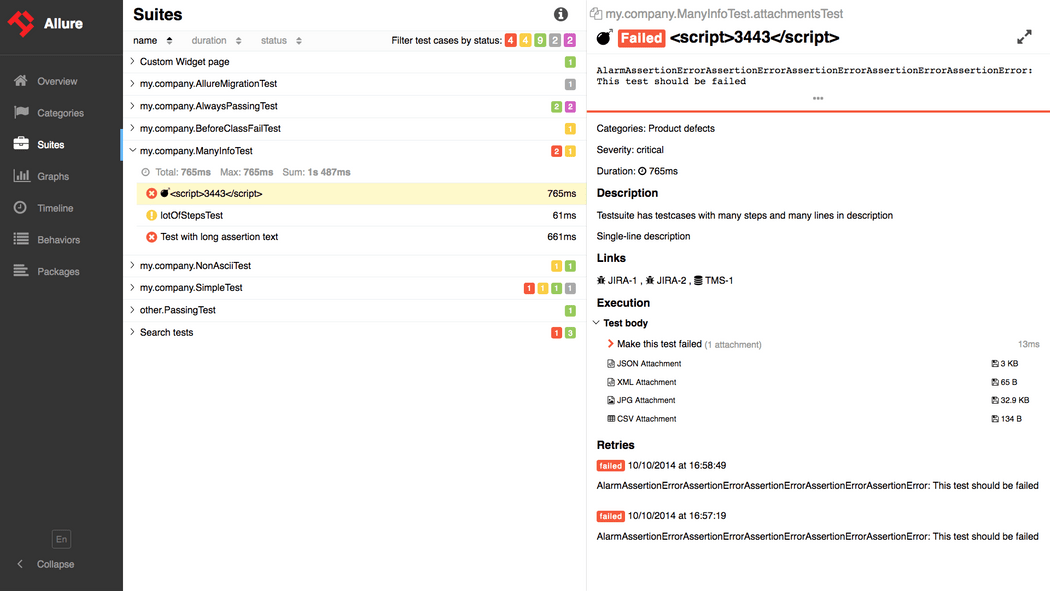
$ pytest directory_with_tests/ --alluredir=/tmp/my_allure_report \ --allure-link-pattern=issue:http://www.mytesttracker.com/issue/{}Allure有个Retries标签页用来展示重试的测试:
import allureimport randomimport time@allure.stepdef passing_step(): pass@allure.stepdef flaky_broken_step(): if random.randint(1, 5) != 1: raise Exception('Broken!')def test_broken_with_randomized_time(): passing_step() time.sleep(random.randint(1, 3)) flaky_broken_step()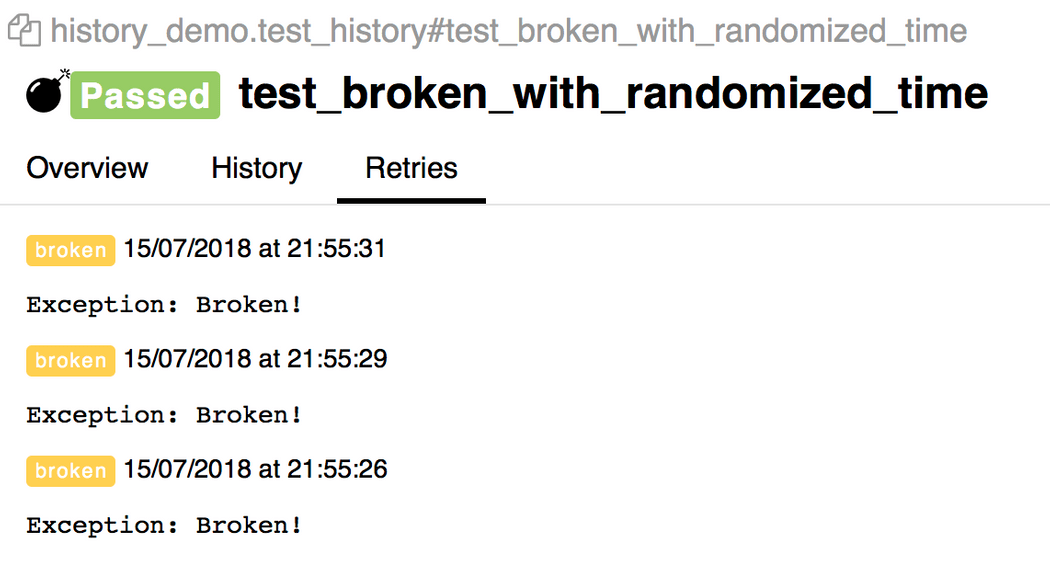
在敏捷开发中有Epic、Feature和Stories三个概念,用于对需求进行分层管理,同理可以运用到测试分层管理:
import alluredef test_without_any_annotations_that_wont_be_executed(): pass@allure.story('epic_1')def test_with_epic_1(): pass@allure.story('story_1')def test_with_story_1(): pass@allure.story('story_2')def test_with_story_2(): pass@allure.feature('feature_2')@allure.story('story_2')def test_with_story_2_and_feature_2(): pass也可以使用--allure-epics、--allure-features、--allure-stories指定运行测试:
$ pytest tests.py --allure-stories story_1,story_2collected 5 itemstests.py ... [100%]============================== 3 passed in 0.01 seconds ==============================$ pytest tests.py --allure-features feature2 --allure-stories story2collected 5 itemstests.py ... [100%]=============================== 2 passed in 0.01 seconds ==============================使用@allure.severity或allure.severity_level:
import alluredef test_with_no_severity_label(): pass@allure.severity(allure.severity_level.TRIVIAL)def test_with_trivial_severity(): pass@allure.severity(allure.severity_level.NORMAL)def test_with_normal_severity(): pass@allure.severity(allure.severity_level.NORMAL)class TestClassWithNormalSeverity(object): def test_inside_the_normal_severity_test_class(self): pass @allure.severity(allure.severity_level.CRITICAL) def test_inside_the_normal_severity_test_class_with_overriding_critical_severity(self): pass--allure-severities用来指定运行哪些严重程度的测试:
$ pytest tests.py --allure-severities normal,criticalcollected 5 itemsbdd_annotations_demo/test_severity_labels.py ... [100%]================================ 3 passed in 0.01 seconds ============================参考资料:
https://docs.qameta.io/allure-report/