
百度飞桨(PaddlePaddle)- 张量(Tensor)
飞桨 使用张量(Tensor) 来表示神经网络中传递的数据,Tensor 可以理解为多维数组,类似于 Numpy 数组(ndarray) 的概念。与 Numpy 数组相比,Tensor 除了支持运行在 CPU 上,还支持运行在 GPU 及各种 AI 芯片上,以实现计算加速;此外,飞桨基于 Tensor,实现了深度学习所必须的反向传播功能和多种多样的组网算子,从而可更快捷地实现深度学习组网与训练等功能。
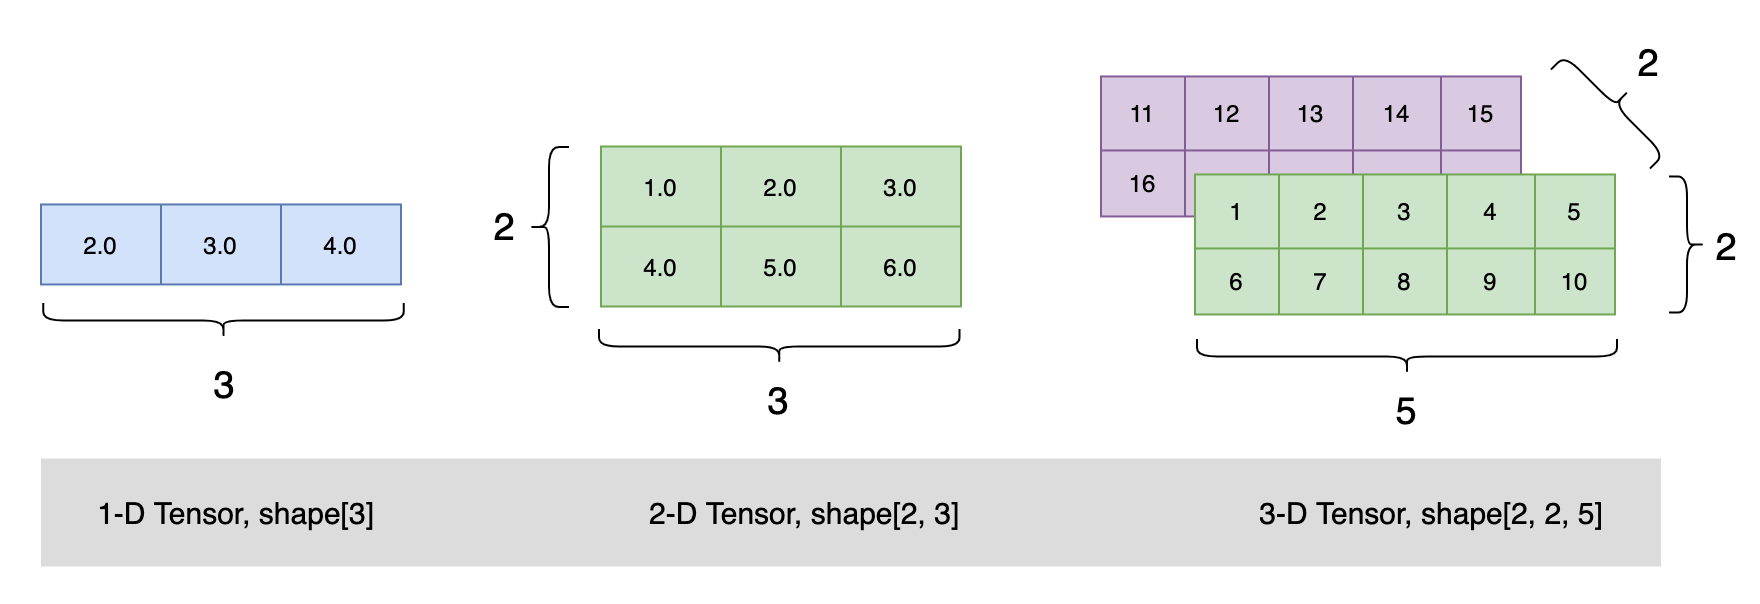
Tensor 必须形如矩形,即在任何一个维度上,元素的数量必须相等,否则会抛出异常
Tensor 的创建
指定数据创建
import paddle

 创建类似向量(vector)的 1 维 Tensor:
ndim_1_Tensor = paddle.to_tensor([2.0, 3.0, 4.0])
print(ndim_1_Tensor)

 创建类似矩阵(matrix)的 2 维 Tensor:
ndim_2_Tensor = paddle.to_tensor([[1.0, 2.0, 3.0],
                                  [4.0, 5.0, 6.0]])
print(ndim_2_Tensor)

 创建 3 维 Tensor:
ndim_3_Tensor = paddle.to_tensor([[[1, 2, 3, 4, 5],
                                   [6, 7, 8, 9, 10]],
                                  [[11, 12, 13, 14, 15],
                                   [16, 17, 18, 19, 20]]])
print(ndim_3_Tensor)
输出
"D:\Program Files\Python38\python.exe" D:/OpenSource/PaddlePaddle/Tensor.py
Tensor(shape=[3], dtype=float32, place=Place(cpu), stop_gradient=True,
       [2., 3., 4.])
Tensor(shape=[2, 3], dtype=float32, place=Place(cpu), stop_gradient=True,
       [[1., 2., 3.],
        [4., 5., 6.]])
Tensor(shape=[2, 2, 5], dtype=int64, place=Place(cpu), stop_gradient=True,
       [[[1 , 2 , 3 , 4 , 5 ],
         [6 , 7 , 8 , 9 , 10]],

        [[11, 12, 13, 14, 15],
         [16, 17, 18, 19, 20]]])

Process finished with exit code 0
指定形状创建
paddle.zeros([m, n])              创建数据全为 0,形状为 [m, n] 的 Tensor
paddle.ones([m, n])               创建数据全为 1,形状为 [m, n] 的 Tensor
paddle.full([m, n], 10)           创建数据全为 10,形状为 [m, n] 的 Tensor
paddle.ones([2,3])
输出
Tensor(shape=[2, 3], dtype=float32, place=Place(gpu:0), stop_gradient=True,
       [[1., 1., 1.],
        [1., 1., 1.]])
指定区间创建
如果要在指定区间内创建 Tensor,可以使用paddle.arange、 paddle.linspace 实现。
paddle.arange(start, end, step)   创建以步长 step 均匀分隔区间[start, end)的 Tensor
paddle.linspace(start, stop, num)  创建以元素个数 num 均匀分隔区间[start, stop)的 Tensor
paddle.arange(start=1, end=5, step=1)
输出
Tensor(shape=[4], dtype=int64, place=Place(gpu:0), stop_gradient=True,
       [1, 2, 3, 4])
指定图像、文本数据创建
在常见深度学习任务中,数据样本可能是图片(image)、文本(text)、语音(audio)等多种类型,在送入神经网络训练或推理前,这些数据和对应的标签均需要创建为 Tensor。以下是图像场景和 NLP 场景中手动转换 Tensor 方法的介绍。
- 对于图像场景,可使用 paddle.vision.transforms.ToTensor 直接将 PIL.Image 格式的数据转为 Tensor,使用 paddle.to_tensor 将图像的标签(Label,通常是 Python 或 Numpy 格式的数据)转为 Tensor。
- 对于文本场景,需将文本数据解码为数字后,再通过 paddle.to_tensor 转为 Tensor。不同文本任务标签形式不一样,有的任务标签也是文本,有的则是数字,均需最终通过 paddle.to_tensor 转为 Tensor。
下面以图像场景为例介绍,以下示例代码中将随机生成的图片转换为 Tensor。
import numpy as np
from PIL import Image
import paddle.vision.transforms as T
import paddle.vision.transforms.functional as F

fake_img = Image.fromarray((np.random.rand(224, 224, 3) * 255.).astype(np.uint8))  创建随机图片
transform = T.ToTensor()
tensor = transform(fake_img)  使用 ToTensor()将图片转换为 Tensor
print(tensor)
自动创建 Tensor 的功能介绍
除了手动创建 Tensor 外,实际在飞桨框架中有一些 API 封装了 Tensor 创建的操作,从而无需用户手动创建 Tensor。例如 paddle.io.DataLoader 能够基于原始 Dataset,返回读取 Dataset 数据的迭代器,迭代器返回的数据中的每个元素都是一个 Tensor。另外在一些高层 API,如 paddle.Model.fit 、paddle.Model.predict ,如果传入的数据不是 Tensor,会自动转为 Tensor 再进行模型训练或推理。
paddle.Model.fit、paddle.Model.predict 等高层 API 支持传入 Dataset 或 DataLoader,如果传入的是 Dataset,那么会用 DataLoader 封装转为 Tensor 数据;如果传入的是 DataLoader,则直接从 DataLoader 迭代读取 Tensor 数据送入模型训练或推理。因此即使没有写将数据转为 Tensor 的代码,也能正常执行,提升了编程效率和容错性。
以下示例代码中,分别打印了原始数据集的数据,和送入 DataLoader 后返回的数据,可以看到数据结构由 Python list 转为了 Tensor。
import paddle

from paddle.vision.transforms import Compose, Normalize

transform = Compose([Normalize(mean=[127.5],
                               std=[127.5],
                               data_format='CHW')])

test_dataset = paddle.vision.datasets.MNIST(mode='test', transform=transform)
print(test_dataset[0][1])  打印原始数据集的第一个数据的 label
loader = paddle.io.DataLoader(test_dataset)
for data in enumerate(loader):
    x, label = data[1]
    print(label)  打印由 DataLoader 返回的迭代器中的第一个数据的 label
    break
Tensor 的属性
在前文中,可以看到打印 Tensor 时有 shape、dtype、place 等信息,这些都是 Tensor 的重要属性,想要了解如何操作 Tensor 需要对其属性有一定了解,接下来分别展开介绍 Tensor 的属性相关概念。
Tensor(shape=[3], dtype=float32, place=Place(gpu:0), stop_gradient=True,
       [2., 3., 4.])
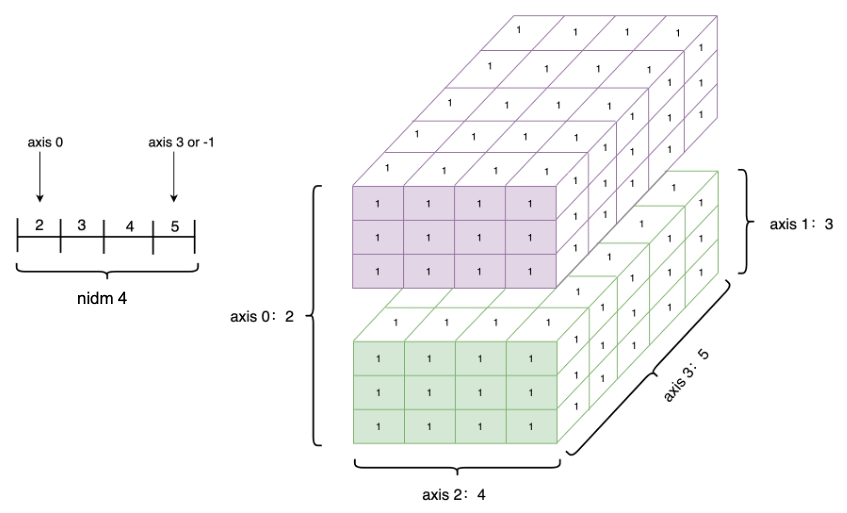
Tensor 的形状(shape)
(1)形状的介绍
形状是 Tensor 的一个重要的基础属性,可以通过 Tensor.shape 查看一个 Tensor 的形状,以下为相关概念:
- shape:描述了 Tensor 每个维度上元素的数量。
- ndim: Tensor 的维度数量,例如向量的维度为 1,矩阵的维度为 2,Tensor 可以有任意数量的维度。
- axis 或者 dimension:Tensor 的轴,即某个特定的维度。
- size:Tensor 中全部元素的个数。
创建 1 个四维 Tensor ,并通过图形来直观表达以上几个概念之间的关系:
ndim_4_Tensor = paddle.ones([2, 3, 4, 5])
print("Data Type of every element:", ndim_4_Tensor.dtype)
print("Number of dimensions:", ndim_4_Tensor.ndim)
print("Shape of Tensor:", ndim_4_Tensor.shape)
print("Elements number along axis 0 of Tensor:", ndim_4_Tensor.shape[0])
print("Elements number along the last axis of Tensor:", ndim_4_Tensor.shape[-1])
(2)重置 Tensor 形状(Reshape) 的方法
重新设置 Tensor 的 shape 在深度学习任务中比较常见,如一些计算类 API 会对输入数据有特定的形状要求,这时可通过 paddle.reshape 接口来改变 Tensor 的 shape,但并不改变 Tensor 的 size 和其中的元素数据。
以下示例代码中,创建 1 个 shape=[3] 的一维 Tensor,使用 reshape 功能将该 Tensor 重置为 shape=[1, 3] 的二维 Tensor。这种做法经常用在把一维的标签(label)数据扩展为二维,由于飞桨框架中神经网络通常需要传入一个 batch 的数据进行计算,因此可将数据增加一个 batch 维,方便后面的数据计算。
ndim_1_Tensor = paddle.to_tensor([1, 2, 3])
print("the shape of ndim_1_Tensor:", ndim_1_Tensor.shape)

reshape_Tensor = paddle.reshape(ndim_1_Tensor, [1, 3])
print("After reshape:", reshape_Tensor.shape)
在指定新的 shape 时存在一些技巧:
- -1 表示这个维度的值是从 Tensor 的元素总数和剩余维度自动推断出来的。因此,有且只有一个维度可以被设置为 -1。
- 0 表示该维度的元素数量与原值相同,因此 shape 中 0 的索引值必须小于 Tensor 的维度(索引值从 0 开始计,如第 1 维的索引值是 0,第二维的索引值是 1)。
origin:[3, 2, 5] reshape:[3, 10]      actual: [3, 10]  直接指定目标 shape
origin:[3, 2, 5] reshape:[-1]         actual: [30]  转换为 1 维,维度根据元素总数推断出来是 3*2*5=30
origin:[3, 2, 5] reshape:[-1, 5]      actual: [6, 5]  转换为 2 维,固定一个维度 5,另一个维度根据元素总数推断出来是 30÷5=6
origin:[3, 2, 5] reshape:[0, -1]         actual: [3, 6]  reshape:[0, -1]中 0 的索引值为 0,按照规则,转换后第 0 维的元素数量与原始 Tensor 第 0 维的元素数量相同,为 3;第 1 维的元素数量根据元素总值计算得出为 30÷3=10。
origin:[3, 2] reshape:[3, 1, 0]          error:  reshape:[3, 1, 0]中 0 的索引值为 2,但原 Tensor 只有 2 维,无法找到与第 3 维对应的元素数量,因此出错。
(3)原位(Inplace)操作和非原位操作的区别
飞桨框架的 API 有原位(Inplace)操作和非原位操作之分,原位操作即在原 Tensor 上保存操作结果,输出 Tensor 将与输入 Tensor 共享数据,并且没有 Tensor 数据拷贝的过程。非原位操作则不会修改原 Tensor,而是返回一个新的 Tensor。通过 API 名称区分两者,如 paddle.reshape 是非原位操作,paddle.reshape_ 是原位操作。
Tensor 的数据类型(dtype)
(1)指定数据类型的介绍
Tensor 的数据类型 dtype 可以通过 Tensor.dtype 查看,支持类型包括:bool、float16、float32、float64、uint8、int8、int16、int32、int64、complex64、complex128。
同一 Tensor 中所有元素的数据类型均相同,通常通过如下方式指定:
(2)修改数据类型的方法
飞桨框架提供了paddle.cast 接口来改变 Tensor 的 dtype:
float32_Tensor = paddle.to_tensor(1.0)

float64_Tensor = paddle.cast(float32_Tensor, dtype='float64')
print("Tensor after cast to float64:", float64_Tensor.dtype)

int64_Tensor = paddle.cast(float32_Tensor, dtype='int64')
print("Tensor after cast to int64:", int64_Tensor.dtype)
Tensor 的设备位置(place)
Tensor 的名称(name)
Tensor 的 stop_gradient 属性
Tensor 的操作
索引和切片
索引或切片的第一个值对应第 0 维,第二个值对应第 1 维,依次类推,如果某个维度上未指定索引,则默认为 :
Python Numpy 切片
import paddle

 创建 3 维 Tensor:
ndim_3_Tensor = paddle.to_tensor([[[[1, 2, 3, 4, 5],
                                    [6, 7, 8, 9, 10],
                                    [11, 12, 13, 14, 15]],
                                   [[21, 22, 23, 24, 25],
                                    [26, 27, 28, 29, 30],
                                    [31, 32, 33, 34, 35]]],

                                  [[[1, 2, 3, 4, 5],
                                    [6, 7, 8, 9, 10],
                                    [11, 12, 13, 14, 15]],
                                   [[29, 22, 23, 24, 25],
                                    [26, 57, 28, 29, 30],
                                    [31, 32, 33, 34, 59]]]])


print("Origin Tensor:", ndim_3_Tensor.ndim)
print("Tensor Shape:", ndim_3_Tensor.shape)  [2, 2, 3, 5]
print("Slice:", ndim_3_Tensor[1, 1, 2, 4].numpy())  对应 shape


print("First row:", ndim_3_Tensor[0].numpy())
print("First row:", ndim_3_Tensor[1, 1, 2, 4].numpy())
print("First column:", ndim_3_Tensor[:, 0].numpy())
print("Last column:", ndim_3_Tensor[:, -1].numpy())
print("All element:", ndim_3_Tensor[:].numpy())
print("First row and second column:", ndim_3_Tensor[1, 0].numpy())